Showing posts with label .NET Core. Show all posts

Friday, 7 February 2025

Manually Map Read Only Entity in Entity Framework Core

We will see how to map a Database Table to EF Core without creating a View. EF Core used in this writing is version 9.0.0.

First we create the entity that we want to map:
public class ReadOnlyCampus
{
    public long UniversityCampusId { get; set; }
    public long UniversityId { get; set; }
    public string CampusName { get; set; }
    public bool IsActive { get; set; }
}

Then we create a new partial class for Database Context file. We could save this file as 'Partial_StudentContext.cs' if the main partial class (generated one) is 'StudentContext.cs'. This is so that our manual mappings and configurations will not be overwritten when we run 'Scaffold-DbContext' command next time.
public partial class StudentContext
{
	// add the DbSet for the entity
    public virtual DbSet<ReadOnlyCampus> ReadOnlyCampuses { get; set; }

	// this is extension from the partial method OnModelCreatingPartial(ModelBuilder modelBuilder) declared in the main context file
    partial void OnModelCreatingPartial(ModelBuilder modelBuilder)
    {
        modelBuilder.Entity<ReadOnlyCampus>(entity =>
        {
            entity.HasKey(e => e.UniversityCampusId);
            //entity.HasNoKey(); // if this entity does not have a primary key
            
            entity.ToTable("UniversityCampus"); // map to the Database Table 'UniversityCampus'

			// map the properties that we need
            entity.Property(e => e.UniversityCampusId).HasColumnName("UniversityCampusId");
            entity.Property(e => e.UniversityId).HasColumnName("UniversityId");
            entity.Property(e => e.CampusName).HasColumnName("CampusName");
            entity.Property(e => e.IsActive).HasColumnName("IsActive");
        });
    }

    public override int SaveChanges()
    {
		// we make sure that this entity cannnot be changed
        foreach (var entry in ChangeTracker.Entries<ReadOnlyCampus>())
        {
            switch (entry.State)
            {
                case EntityState.Added:
                case EntityState.Modified:
                case EntityState.Deleted:
                    entry.State = EntityState.Unchanged;
                    break;
            }
        }

        return base.SaveChanges();
    }
}

Then we will be able to query this entity like other normal EF entity.

Friday, 24 March 2023

Using Entity Framework Core with Existing Database

We can use an existing database with Entity Framework Core (in this example is a MSSQL Database and EF Core 7). Say we need to create a new app that is accessing data from an established database. First we need to generate models and context class from our database. Then our codes can interact with these generated classes.

First of all, install Microsoft.EntityFrameworkCore, Microsoft.EntityFrameworkCore.Tools and Microsoft.EntityFrameworkCore.SqlServer packages to our project.

Then run Scaffold-DbContext command to generate models and context class. I would like to structure my projects like this:

To have this, I need to use some flags when running the command:
Scaffold-DbContext "Server=[SERVER_NAME];Database=[DATABASE_NAME];TrustServerCertificate=True;Trusted_Connection=True" Microsoft.EntityFrameworkCore.SqlServer -OutputDir "[MY_APP_DIRECTORY]\StudentApp\Model\Entity" -Namespace Model.Entity -Context StudentAppContext -ContextDir . -ContextNamespace Repository -Tables Student,School -Force
In my case, I use an Active Directory account that can access my database, so I use 'Server=[SERVER_NAME];Database=[DATABASE_NAME];TrustServerCertificate=True;Trusted_Connection=True'.
The flags used here:
- OutputDir - folder location where the generated model classes will be put
- Namespace - the namespace of the generated model classes
- Context - the name of the context file to be generated
- ContextDir - folder location where the context file will be put. I use '.' for current directory (I run the command from Repository project).
- ContextNamespace - namespace of the context file
- Tables - specify all table names in the database that we want to map
- Force - useful when we want to add new model(s) to be generated or simply to generate the whole thing again if we made mistake

Later when we want to add another model(s) from different table(s), we run the same command again with the new table name(s) added. For example if we want to add Teacher and Subject models:
Scaffold-DbContext "Server=[SERVER_NAME];Database=[DATABASE_NAME];TrustServerCertificate=True;Trusted_Connection=True" Microsoft.EntityFrameworkCore.SqlServer -OutputDir "[MY_WORK_DIRECTORY]\StudentApp\Model\Entity" -Namespace Model.Entity -Context StudentAppContext -ContextDir . -ContextNamespace Repository -Tables Student,School,Teacher,Subject -Force

Tuesday, 14 March 2023

.NET Core Built In Dependency Injection

.NET has built in tool for dependency injection. 'Microsoft.Extensions.DependencyInjection' library has common features needed for IoC that is usually good enough for most applications. However if you need more advanced features, consider using other DI tools.

To use, first install 'Microsoft.Extensions.DependencyInjection' package in our project.

To register the interfaces and objects, use either AddTransient(), AddScoped() or AddSingleton() methods. Their lifetimes are:
  • AddTransient - new instance is created each time requested
  • AddScoped - new instance is created per client request/session
  • AddSingleton - created once only through application life, subsequent requests will access the same instance
To understand the lifetimes better, please check this article .

Then we use GetService() method to get an instance.

An example of how to use the tool in a unit test:
[TestClass]
public class ExampleTest
{
    private readonly IStudentRepository studentRepository;

    public ExampleTest()
    {
        var services = new ServiceCollection();
        services.AddTransient<IStudentRepository, StudentRepository>();

        var serviceProvider = services.BuildServiceProvider();

        studentRepository = serviceProvider.GetService<IStudentRepository>();
		
		. . .
    }
}

To use it in different projects, we can create an extension method of IServiceCollection in the particular project. For example, in service project:
public static class IServiceCollectionExtension
{
	public static IServiceCollection AddServicesConfiguration(this IServiceCollection services)
	{
		services.AddTransient<IStudentService, StudentService>();
		return services;
	}
}
and in repository project:
public static class IServiceCollectionExtension
{
	public static IServiceCollection AddRepositoriesConfiguration(this IServiceCollection services)
	{
		services.AddTransient<IStudentRepository, StudentRepository>();
		return services;
	}
}
Some people like to do this approach but then a project that wants to use the extension method(s) needs to directly reference the other project(s). For example; a web project will need to reference service and repository projects.

Personally, I prefer to create a bootstrap project that contains all DI mappings and has references to all projects needed. Then a project just need to reference the bootstrap project.

In this example, the WebAPI project just need to reference Bootstrap project, not Service and Repository projects.

All DI configurations are in one place:
public static class BootstrapConfig
{
	public static IServiceCollection RegisterRepositories(this IServiceCollection services)
	{
		services.AddTransient<IStudentRepository, StudentRepository>();
		return services;
	}

	public static IServiceCollection RegisterServices(this IServiceCollection services)
	{
		services.AddTransient<IStudentService, StudentService>();
		return services;
	}
}

Monday, 20 February 2023

User Authentication with AWS Cognito with Web API Backend and Frontend Web
Part 3 - Authentication between frontend and Web API backend

This is the last part of the series of setting up a simple Angular frontend web app with ASP.NET Core Web API backend (.NET 5.0) using AWS Cognito as authentication provider. Users will be able to sign up, confirm sign up/verify and sign in. The backend WebAPI will be the point of contact and interaction with AWS Cognito. The frontend Angular web app will simply pass user information and then keep the Cognito Access Token passed by the backend WebAPI.

This series is divided into three parts:
  1. Set up AWS Cognito and backend Web API user functions - previous post
  2. Configure CORS in Web API backend - previous post
  3. Authentication between frontend and Web API backend - this post

We have done our user sign in method that will return an Access Token to the caller (frontend). Now we only want authenticated users access our app. To do this we need to adjust our configurations a little bit.

In our backend Web API, add app.UseAuthentication() in Configure() method in Startup.cs between UseCors() and UseAuthorization():
public void ConfigureServices(IServiceCollection services)
{
	. . .
	app.UseCors();

	app.UseAuthentication();

	app.UseAuthorization();
	. . .
}
The order for the middlewares is specify in this ASP.NET Core documentation.


Next, add this line in our existing authentication configurations. We need to disable the default feature that is validating token audience as AWS Access Token does not include 'audience' (aud). So the frontend can present the token to backend without any issues.
public void ConfigureServices(IServiceCollection services)
{
	// AWS Cognito
	services.AddAuthentication("Bearer")
	.AddJwtBearer(options =>
	{
		options.Audience = "[APP_CLIENT_ID]";
		options.Authority = "https://cognito-idp.[REGION_NAME].amazonaws.com/[USER_POOL_ID]";
        options.TokenValidationParameters = new TokenValidationParameters { ValidateAudience = false };
	});

	. . .
}

To secure any methods, we just need to decorate with [Authorize] attribute. For example:
[Authorize]
public IEnumerable<WeatherForecast> Get()
{

	. . .
	
}

Then, in our frontend app, we create sign in functionality that will receive an access token once successful. The token is then stored in local storage that will be used for subsequent requests to the backend.
signin(): void {
  const params = new HttpParams()
    .set('username', this.model.Username)
    .set('password', this.model.Password);

  var user = this.model;

  this.http.post<any>('https://localhost:5001/api/signin', {username: this.model.Username, password: this.model.Password})
  .subscribe({
    next: token => {
      console.log(token);
      let atoken = token;
      localStorage.setItem("atoken", atoken);
    },
    error: error => {
      console.log(error);
    }
  })    
}

For further interaction with the backend, we retrieve the token and pass in request header:
getItems(): void {
  let token = localStorage.getItem("atoken");
  this.http.get("https://localhost:5001/weatherforecast", {
    headers: new HttpHeaders({
      "Authorization": "Bearer " + token
    })
  }).subscribe(response => console.log(response));
}

Now we have working frontend and backend that utilise AWS Cognito as authentication provider.

Friday, 27 January 2023

User Authentication with AWS Cognito with Web API Backend and Frontend Web
Part 2 - Configure CORS in Web API backend

This is the second part of the series of setting up a simple Angular frontend web app with ASP.NET Core Web API backend (.NET 5.0) using AWS Cognito as authentication provider. Users will be able to sign up, confirm sign up/verify and sign in. The backend WebAPI will be the point of contact and interaction with AWS Cognito. The frontend Angular web app will simply pass user information and then keep the Cognito Access Token passed by the backend WebAPI.

This series is divided into three parts:
  1. Set up AWS Cognito and backend Web API user functions - previous post
  2. Configure CORS in Web API backend - this post
  3. Authentication between frontend and Web API backend - next post

Since our frontend Angular app may be in different domain or at least port number in development (using localhost), we need to allow Cross-Origin Resource Sharing (CORS) in the backend Web API. There are two approaches for this, whether to allow only some methods by using a named policy or apply to all methods.

In ConfigureServices method inside Startup.cs file, to allow CORS for selected methods only, we put:
services.AddCors(options =>
{
	options.AddPolicy("EnableCORS", builder =>
			  builder.WithOrigins("http://localhost:4200", "https://localhost:4200")  // frontend domain(s)
				.AllowAnyHeader()
				.AllowAnyMethod()
				.AllowCredentials()
				//.WithMethods("OPTIONS", "GET")
	);
});

Then in Configure method, add:
. . .

app.UseCors("EnableCORS");

. . .
Important! Make sure to put app.UseCors() code in the right order as specify in the ASP.NET Core documentation


Then on the controller methods, we add EnableCors attribute, for example:
[EnableCors("EnableCORS")]
[HttpGet]
public IEnumerable<WeatherForecast> Get()
{
	. . .
}

If we want to enable CORS for all methods, we use AddDefaultPolicy() instead AddPolicy():
services.AddCors(options =>
{
	options.AddDefaultPolicy(builder =>
			  builder.WithOrigins("http://localhost:4200", "https://localhost:4200")  // frontend domain(s)
				.AllowAnyHeader()
				.AllowAnyMethod()
				.AllowCredentials()
				//.WithMethods("OPTIONS", "GET")
	);
});
Then in Configure method, just put:
app.UseCors();

On the next post, we will configure the Authentication part in the project.

Tuesday, 24 January 2023

User Authentication with AWS Cognito with Web API Backend and Frontend Web
Part 1 - Setting up AWS Cognito and backend Web API user functions

We will set up a simple Angular frontend web app with ASP.NET Core Web API backend (.NET 5.0) using AWS Cognito as authentication provider. Users will be able to sign up, confirm sign up/verify and sign in. The backend WebAPI will be the point of contact and interaction with AWS Cognito. The frontend Angular web app will simply pass user information and then keep the Cognito Access Token passed by the backend WebAPI.

This writing will be divided into three parts:
  1. Set up AWS Cognito and backend Web API user functions - this post
  2. Configure CORS in Web API backend - next post
  3. Authentication between frontend and Web API backend - next post

On this first series, we will set up AWS Cognito and ASP.NET Core Web API backend (.NET 5.0) with some user sign up an sign in functions.

1. First, create a new user pool in AWS Cognito then create a new App Client. Make sure 'Enable username password auth for admin APIs for authentication (ALLOW_ADMIN_USER_PASSWORD_AUTH)' is selected:


2. Create an ASP.NET Core Web API project. On Startup.cs file inside ConfigureServices method set options.Audience and options.Authority
public void ConfigureServices(IServiceCollection services)
{
	// AWS Cognito
	services.AddAuthentication("Bearer")
	.AddJwtBearer(options =>
	{
		options.Audience = "[APP_CLIENT_ID]";
		options.Authority = "https://cognito-idp.[REGION_NAME].amazonaws.com/[USER_POOL_ID]";
	});

	. . .
}
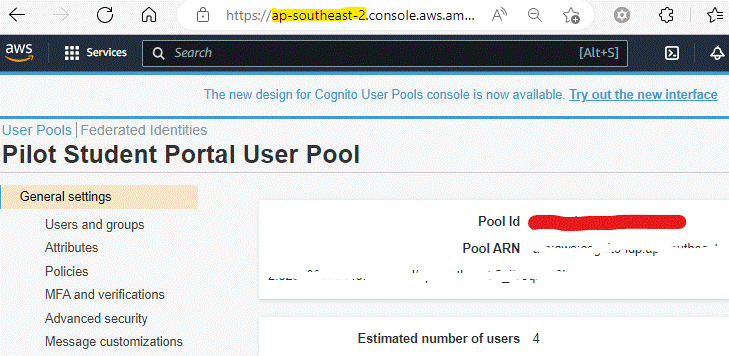
App Client Id is shown on:

Then for the Authority field, we can get Region and User Pool Id from


3. In Configure(IApplicationBuilder app, IWebHostEnvironment env) method, add
app.UseAuthentication();
after app.UseRouting() is called.

4. Make sure your project has this AWSSDK.CognitoIdentityProvider package installed

5. Then we can add sign up feature in a controller
[HttpPost]
[Route("api/signup")]
public async Task<ActionResult<string>> SignUp(User user)
{
	var cognito = new AmazonCognitoIdentityProviderClient(_region);

	var request = new SignUpRequest
	{
		ClientId = _clientId,
		Password = user.Password,
		Username = user.Username
	};
    
	// Cognito email attribute
	var emailAttribute = new AttributeType
	{
		Name = "email",
		Value = user.Email
	};
	request.UserAttributes.Add(emailAttribute);

	var response = await cognito.SignUpAsync(request);

	return Ok(response);
}

6. When a user sign up with the method above, its Account Status is "Unconfirmed" and Email Verified is "false". A confirmation email will be sent with a code. We need to add another function to handle this.
[HttpPost]
[Route("api/confirmSignUp")]
public async Task<ActionResult<string>> ConfirmSignUp(string username, string confirmationCode)
{
	var cognito = new AmazonCognitoIdentityProviderClient(_region);

	var request = new ConfirmSignUpRequest
	{
		ClientId = _clientId,
		Username = username,
		ConfirmationCode = confirmationCode
	};

	var response = await cognito.ConfirmSignUpAsync(request); // after calling this method, user's Account Status will become 'Confirmed' and Email Verified become 'true'

	return Ok(response);
}

7. Then the sign in function. This will return an Access Token if successful.
[HttpPost]
[Route("api/signin")]
public async Task<ActionResult<string>> SignIn([FromBody] User user)
{
	var cognito = new AmazonCognitoIdentityProviderClient(_region);

	var request = new AdminInitiateAuthRequest
	{
		UserPoolId = _userPoolId, // User Pool Id
		ClientId = _clientId, // App Client Id
		AuthFlow = AuthFlowType.ADMIN_USER_PASSWORD_AUTH
	};

	request.AuthParameters.Add("USERNAME", user.Username);
	request.AuthParameters.Add("PASSWORD", user.Password);

	var response = await cognito.AdminInitiateAuthAsync(request);

	return Json(response.AuthenticationResult.AccessToken);
}

Additional resend confirmation code and find user functions:
[HttpPost]
[Route("api/resendConfirmationCode")]
public async Task<ActionResult<string>> ResendConfirmationCode(string username)
{
	var cognito = new AmazonCognitoIdentityProviderClient(_region);

	var request = new ResendConfirmationCodeRequest
	{
		ClientId = _clientId,
		Username = username
	};

	var response = await cognito.ResendConfirmationCodeAsync(request);

	return Ok(response);
}


[HttpPost]
[Route("api/findUser")]
public async Task<ActionResult<string>> FindUser(string username)
{
	var cognito = new AmazonCognitoIdentityProviderClient(_region);

	var request = new AdminGetUserRequest
	{
		UserPoolId = _userPoolId,
		Username = username
	};
	var response = await cognito.AdminGetUserAsync(request);

	return Ok(response);    
}

On the next post, we will set up CORS (Cross-Origin Resource Sharing) in the project.

Friday, 16 April 2021

Config File in .Net Core

To add a configuration file in a .NET Core project, first add a new file JavaScript JSON Configuration File.

Set the file properties; Copy to Output Directory: 'Copy if newer' or 'Copy always'.

Say we put this inside the file:
{
  "ApplicationKey": "a_secret_value",
  "ConnectionStrings": {
    "StudentBoundedContextConnectionString": "server=Server_Name;database=DB_Name;trusted_connection=true",
    "CourseBoundedContextConnectionString": "server=Server_Name;database=DB_Name;trusted_connection=true"
  } 
}

On Package Manager, add Microsoft.Extensions.Configuration.Json.

Then to read the values on our codes:
var config = new ConfigurationBuilder()
				 .AddJsonFile("your_filename.json")
				 .Build();

var appkey = config["ApplicationKey"];
var studentConnectionString = config["ConnectionStrings:StudentBoundedContextConnectionString"];