Showing posts with label Entity Framework. Show all posts

Friday, 14 March 2025

Entity Splitting in Entity Framework Core

We will see how to have an entity with some fields come from different table or view. EF Core used in this writing is version 9.0.0.

We have Student entity:
public partial class Student
{
    // these fields come from Student table
    public long StudentId { get; set; }
    public string FirstName { get; set; }
    public string LastName { get; set; }
    public string StudentNumber { get; set; }
}
Then we would like to add a few fields that come from a different view:
// to have these fields from ViewStudentDetails
public string Email { get; set; }
public string Address { get; set; }

First, we create another Student partial class so that it is not overwritten whenever we run scaffold command again. We could name the file 'Student_Partial.cs'.
public partial class Student
{
    public string Address { get; set; }
    public string Email { get; set; }
}

Then create another partial database context file (name it 'Partial_StudentContext.cs') if we don't have one already. Then add these configurations in OnModelCreatingPartial method:
public partial class StudentContext
{
   partial void OnModelCreatingPartial(ModelBuilder modelBuilder)
   {
      modelBuilder.Entity<Student>(entity =>
      {
         entity.SplitToTable("ViewStudentDetails", x =>
         {
            x.Property(e => e.Email).HasColumnName("Email");
            x.Property(e => e.Address).HasColumnName("Address");
         });
      });
   }
}

Friday, 7 February 2025

Manually Map Read Only Entity in Entity Framework Core

We will see how to map a Database Table to EF Core without creating a View. EF Core used in this writing is version 9.0.0.

First we create the entity that we want to map:
public class ReadOnlyCampus
{
    public long UniversityCampusId { get; set; }
    public long UniversityId { get; set; }
    public string CampusName { get; set; }
    public bool IsActive { get; set; }
}

Then we create a new partial class for Database Context file. We could save this file as 'Partial_StudentContext.cs' if the main partial class (generated one) is 'StudentContext.cs'. This is so that our manual mappings and configurations will not be overwritten when we run 'Scaffold-DbContext' command next time.
public partial class StudentContext
{
	// add the DbSet for the entity
    public virtual DbSet<ReadOnlyCampus> ReadOnlyCampuses { get; set; }

	// this is extension from the partial method OnModelCreatingPartial(ModelBuilder modelBuilder) declared in the main context file
    partial void OnModelCreatingPartial(ModelBuilder modelBuilder)
    {
        modelBuilder.Entity<ReadOnlyCampus>(entity =>
        {
            entity.HasKey(e => e.UniversityCampusId);
            //entity.HasNoKey(); // if this entity does not have a primary key
            
            entity.ToTable("UniversityCampus"); // map to the Database Table 'UniversityCampus'

			// map the properties that we need
            entity.Property(e => e.UniversityCampusId).HasColumnName("UniversityCampusId");
            entity.Property(e => e.UniversityId).HasColumnName("UniversityId");
            entity.Property(e => e.CampusName).HasColumnName("CampusName");
            entity.Property(e => e.IsActive).HasColumnName("IsActive");
        });
    }

    public override int SaveChanges()
    {
		// we make sure that this entity cannnot be changed
        foreach (var entry in ChangeTracker.Entries<ReadOnlyCampus>())
        {
            switch (entry.State)
            {
                case EntityState.Added:
                case EntityState.Modified:
                case EntityState.Deleted:
                    entry.State = EntityState.Unchanged;
                    break;
            }
        }

        return base.SaveChanges();
    }
}

Then we will be able to query this entity like other normal EF entity.

Friday, 24 March 2023

Using Entity Framework Core with Existing Database

We can use an existing database with Entity Framework Core (in this example is a MSSQL Database and EF Core 7). Say we need to create a new app that is accessing data from an established database. First we need to generate models and context class from our database. Then our codes can interact with these generated classes.

First of all, install Microsoft.EntityFrameworkCore, Microsoft.EntityFrameworkCore.Tools and Microsoft.EntityFrameworkCore.SqlServer packages to our project.

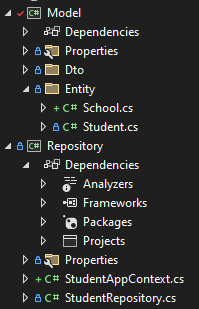
Then run Scaffold-DbContext command to generate models and context class. I would like to structure my projects like this:

To have this, I need to use some flags when running the command:
Scaffold-DbContext "Server=[SERVER_NAME];Database=[DATABASE_NAME];TrustServerCertificate=True;Trusted_Connection=True" Microsoft.EntityFrameworkCore.SqlServer -OutputDir "[MY_APP_DIRECTORY]\StudentApp\Model\Entity" -Namespace Model.Entity -Context StudentAppContext -ContextDir . -ContextNamespace Repository -Tables Student,School -Force
In my case, I use an Active Directory account that can access my database, so I use 'Server=[SERVER_NAME];Database=[DATABASE_NAME];TrustServerCertificate=True;Trusted_Connection=True'.
The flags used here:
- OutputDir - folder location where the generated model classes will be put
- Namespace - the namespace of the generated model classes
- Context - the name of the context file to be generated
- ContextDir - folder location where the context file will be put. I use '.' for current directory (I run the command from Repository project).
- ContextNamespace - namespace of the context file
- Tables - specify all table names in the database that we want to map
- Force - useful when we want to add new model(s) to be generated or simply to generate the whole thing again if we made mistake

Later when we want to add another model(s) from different table(s), we run the same command again with the new table name(s) added. For example if we want to add Teacher and Subject models:
Scaffold-DbContext "Server=[SERVER_NAME];Database=[DATABASE_NAME];TrustServerCertificate=True;Trusted_Connection=True" Microsoft.EntityFrameworkCore.SqlServer -OutputDir "[MY_WORK_DIRECTORY]\StudentApp\Model\Entity" -Namespace Model.Entity -Context StudentAppContext -ContextDir . -ContextNamespace Repository -Tables Student,School,Teacher,Subject -Force

Monday, 15 February 2021

Starting Entity Framework Core with Code First

On this post we will see how to use Code First development with EntityFramework Core and SQL Server.

Add Microsoft.EntityFrameworkCore.SqlServer (current version at time of writing is v5.0.2) in Package Manager.

Create the model class:
public class Trainee
{
    public long TraineeId { get; set; }
    public string Firstname { get; set; }
    public string Lastname { get; set; }
}

Then create a context class derived from DbContext:
public class TraineeBoundedContext : DbContext
{
    public DbSet<Trainee> Trainees { get; set; }

    /* using default constructor is enough
    public TraineeBoundedContext(DbContextOptions<TraineeBoundedContext> options) : base(options)
    {
    }*/
    
    protected override void OnConfiguring(DbContextOptionsBuilder optionsBuilder)
    {
        optionsBuilder.UseSqlServer("Server=YOUR_SERVER_NAME;Database=YOUR_DATABASE_NAME;Integrated Security=True");  // put your server and database names
    }
}

Add Microsoft.EntityFrameworkCore.Tools (current version at time of writing is v5.0.3) package for EF migration feature.

Then run 'Add-Migration MIGRATION_NAME' command on Package Manager Console:
PM> Add-Migration InitialMigration
Build started...
Build succeeded.
To undo this action, use Remove-Migration.

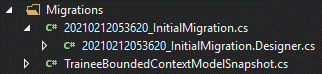
It will create some files. In my case, I chose 'InitialMigration' as the name.

One of the generated file shows this:

Then we can apply this to the database with 'Update-Database' command.
PM> update-database
Build started...
Build succeeded.
Applying migration '20210212053620_InitialMigration'.
Done.

When you check your database, it should have new tables:

Friday, 16 November 2018

Quick Steps Creating Web API in ASP.NET Core 2.1 with Entity Framework

These are steps of how to quickly create Web API service in ASP.NET Core 2.1 with Entity Framework for an existing database (you will need to design in different projects and layers for a proper solution):

1. Create a new ASP.NET Core Web Application project

2. Select Web API for template

3. Install the following packages from Nuget or Package Manager console:
Microsoft.EntityFrameworkCore.SqlServer
Microsoft.EntityFrameworkCore.Tools
Microsoft.VisualStudio.Web.CodeGeneration.Design

4. On Package Manager console, run:
Scaffold-DbContext “Server=your_server_name;Database=your_db_name;Trusted_Connection=True;” Microsoft.EntityFrameworkCore.SqlServer -OutputDir Model
This will create DbContext instance and all the model classes for tables in database.

5. Open Startup.cs and comment out the whole OnConfiguring(DbContextOptionsBuilder optionsBuilder) method

6. On ConfigureServices(IServiceCollection services) method, add:
public void ConfigureServices(IServiceCollection services)
{
   services.AddMvc();
   var connection = @"Server=server_name;Database=db_name;Trusted_Connection=True;ConnectRetryCount=0";
   services.AddDbContext<MyDBContext>(options => options.UseSqlServer(connection));
}
7. Create a controller by right clicking Controller folder

8. Choose ‘API Controller with actions, using Entity Framework’

9. Select a model class which you would like to use


For allowing CORS, put these codes on Startup.cs:
services.AddCors(options => options.AddPolicy("AllowAll", p => p.AllowAnyOrigin()
                                                                      .AllowAnyMethod()
                                                                      .AllowAnyHeader()));

Wednesday, 30 December 2015

How to Move EF Database First Template .tt File to Another Project

On this post, we will see how to have Entity Framework .tt template file generated by an .edmx file in a different project. By default .tt files are created under the same project where the .edmx file is. Usually this is our data layer project. However, for most of the time, we would want the POCO models that are generated by a model .tt file to be put under a separate project (i.e. domain or model project) for a better practice.

There are a few steps to make this happen (I am using VS 2013 here):
1. Add a new model template .tt file in the other project through 'add a new item' then select EF DbContext Generator file type under 'Data'.


2. Open the new .tt file then change the value of 'inputFile' to point to the .edmx file in the original project.

In this case, my data project is called 'MySolution.Data.StudentBoundedContext'.

3. To ensure that all of the to be be generated POCO classes have right namespaces, we need to tell the template file the new namespace to use. Right click the .tt file and select 'Properties' then put the new namespace on 'Custom Tool Namespace' value.


4. Delete the model .tt file on the original project.

5. I prefer to leave the context .Context.tt template file on the data layer project and only move the model .tt file to a domain/model project. Therefore, I will need to tell the context template file to refer to the models in the other project.
To do this:
- add a project reference to the other project (domain/model project)
- open the .Context.tt file and add a 'using' statement referring to the models namespace


6. Regenerate the models and context files by right clicking the template files and selecting 'Run Custom Tool'.

Friday, 21 August 2015

Simpler Framework with DbContext and DbSet

I am trying to design a base framework that utilises DbContext as a unit of work and its DbSet properties as repositories. There are some voices on the Internet suggesting this approach for simplicity, performance, faster development effort and being able to keep exposing Entity Framework goodness. I also try to use bounded context approach that is based on domain driven design.

I have a base context class that is derived from DbContext:
    public abstract class BaseContext : DbContext
    {
        static BaseContext()
        {
        }
        protected BaseContext()
            : base("name=FrameworkOneDatabase")
        { }               
    }
Then some bounded contexts. Below is one of them:
    public class ArticleBoundContext : BaseContext
    {
        public ArticleBoundContext()
        {            
        }

        public virtual DbSet<Article> Article { get; set; }
        public virtual DbSet<User> Submitter { get; set; }
    }
Also a basic service class to help me calling CRUD operations on any bounded context:
    public class CRUDService
    {
        private BaseContext _context;

        public CRUDService(BaseContext context)
        {
            this._context = context;
        }

        public void Insert(dynamic entityObject)
        {
            dynamic dbset = GetDbSetFromObject(entityObject);
            entityObject.ObjectState = ObjectState.Added;
            dbset.Add(entityObject);
            _context.ApplyStateChanges();
        }

        public void InsertOrUpdate(dynamic entityObject)
        {
            dynamic dbset = GetDbSetFromObject(entityObject);
            dbset.Attach(entityObject);  
            _context.ApplyStateChanges();
        }
        
        public void Delete(dynamic entityObject)
        {
            dynamic dbset = GetDbSetFromObject(entityObject);
            dbset.Remove(entityObject);
        }

        public async Task<int> Commit()
        {
            var result = await _context.SaveChangesAsync();
            return result;
        }

        public void Dispose()
        {
            _context.Dispose();
        }

        private dynamic GetDbSetFromObject(dynamic entityObject)
        {
            // if dynamicproxies wrapper is used then get the base object
            System.Type objectType = entityObject.GetType();
            if (objectType.Namespace == "System.Data.Entity.DynamicProxies")
            {
                objectType = objectType.BaseType;
            }

            var dbset = (from p in _context.GetType().GetProperties()
                    where p.PropertyType.IsGenericType
                    && p.PropertyType.GetGenericTypeDefinition() == typeof(DbSet<>)
                    let entityType = p.PropertyType.GetGenericArguments().First()
                    where objectType == entityType
                    select p.GetValue(_context)).FirstOrDefault();

            if (dbset == null)
            {
                throw new System.ArgumentException("object type does not exist in the context");
            }

            return dbset;
        }
    }
The class has methods accepting an object then will find its corresponding DbSet member of the context. The method then call one of the DbSet operations. The GetDbSetFromObject() method is the one that will do the finding.

Then I can use all of the classes and structure above to do something like in the tests below:
    [TestClass]
    public class CRUDServiceTest
    {
        private ArticleBoundContext _context;
        private CRUDService _service;

        public CRUDServiceTest()
        {
            _context = new ArticleBoundContext();
            _service = new CRUDService(_context);
        }
        
        [TestMethod]
        public async Task CanInsertArticle()
        {
            Article article = new Article { Title = "title test " + DateTime.Now.ToString("HH:mm:ss"), Description = "desc", Url = "test.com", ObjectState = ObjectState.Added };
            article.Submitter = new User { Firstname = "first " + DateTime.Now.ToString("HH:mm:ss"), Lastname = "last", ObjectState = ObjectState.Added };
            _service.Insert(article);
            var insert = await _service.Commit();
            Assert.IsTrue(insert > 0);
        }

        [TestMethod]
        public async Task CanUpdateArticle()
        {
            Article article = _context.Article.FirstOrDefault(); 
            article.Title = "UPDATED TITLE " + DateTime.Now.ToString("HH:mm:ss");
            article.Description = "UPDATED DESCRIPTION";
            article.ObjectState = ObjectState.Modified;
            _service.InsertOrUpdate(article);
            var update = await _service.Commit();
            Assert.IsTrue(update > 0);
        }

        [TestMethod]
        public async Task CanUpdateSubmitter()
        {
            var article = _context.Article.FirstOrDefault(); 
            article.Submitter.Firstname = "UPDATED FIRSTNAME " + DateTime.Now.ToString("HH:mm:ss");
            article.Submitter.Lastname = "UPDATED LASTNAME " + DateTime.Now.ToString("HH:mm:ss");
            article.Submitter.ObjectState = ObjectState.Modified;

            _service.InsertOrUpdate(article);
            var update = await _service.Commit();
            Assert.IsTrue(update > 0);
        }
        
        [TestMethod]
        public async Task CanUpdateSubmitter_2()
        {
            var submitter = _context.Submitter.FirstOrDefault();
            submitter.Firstname = "UPDATED FIRSTNAME " + DateTime.Now.ToString("HH:mm:ss");
            submitter.Lastname = "UPDATED LASTNAME " + DateTime.Now.ToString("HH:mm:ss");
            submitter.ObjectState = ObjectState.Modified;

            _service.InsertOrUpdate(submitter);
            var update = await _service.Commit();
            Assert.IsTrue(update > 0);
        }

        [TestMethod]
        public async Task CanDeleteArticle()
        {
            var article = _context.Article.FirstOrDefault();

            _service.Delete(article);
            var result = await _service.Commit();

            Assert.IsTrue(result > 0);
        }

        [TestMethod]
        public async Task CanInsertAndDeleteSubmitter()
        {
            var submitter = new User();
            submitter.Firstname = "firstname " +DateTime.Now.ToString("HH:mm:ss");
            submitter.Lastname = "lastname " + DateTime.Now.ToString("HH:mm:ss");

            _service.Insert(submitter);
            var result = await _service.Commit();

            Assert.IsTrue(result > 0);
            var insertedSubmitter = await _context.Submitter.FindAsync(submitter.Id);
            Assert.IsTrue(insertedSubmitter.Firstname == submitter.Firstname && insertedSubmitter.Lastname == submitter.Lastname);

            _service.Delete(submitter);
            result = await _service.Commit();

            Assert.IsTrue(result > 0);
        }

        [TestMethod]
        public async Task ThrowExceptionWhenInsertingWrongObject()
        {
            try
            {
                int test = 5;
                _service.Insert(test);
                var insert = await _service.Commit();
            }
            catch (Exception ex)
            {
                Assert.IsInstanceOfType(ex, typeof(System.ArgumentException));
            }
        }
    }

Friday, 15 May 2015

Setting Up One to Many Relationship with Fluent API in Code First

Let's say that we would like to have a one to many relationship between two tables, e.g. User and Article. A User can have many Articles. Below are two ways of how we could specify the models and relationship configuration with Fluent API.

1. Without Having Foreign Key Property in Model
public class Article 
{
 public int Id { get; set; }

 [StringLength(150)]
 [Required]
 public string Title { get; set; }

 [Required]
 public string Description { get; set; }

 [StringLength(500)]
 [Required]
 public string Url { get; set; }

 #region navigation properties
 public virtual User Submitter { get; set; }
 #endregion
}


public class User 
{
 public int Id { get; set; }
 
 [StringLength(100)]
 [Required]
 public string Firstname { get; set; }
 
 [StringLength(100)]
 [Required]
 public string Lastname { get; set; }

 #region navigational property
 public virtual ICollection<Article> Articles { get; set; }
 #endregion
}


protected override void OnModelCreating(DbModelBuilder modelBuilder)
{
 #region Article table
 modelBuilder.Entity<Article>().HasKey(t => t.Id);
 // specify the relationship between the two tables
 modelBuilder.Entity<Article>().HasRequired(t => t.Submitter).WithMany(t => t.Articles);
 #endregion

 #region User table
 modelBuilder.Entity<User>().HasKey(t => t.Id);
 #endregion
}
Before we go further, I would like to say that I prefer to use Data Annotation attributes in a model for validation purpose only for its properties. The database related configurations are done inside OnModelCreating() method.

On the codes above, we do not specify any foreign key property such as 'SubmitterId'. We do this purely in 'code first perspective' only which focuses on models and 'code' relationships between them, not their relational database relationships. So we do not worry on specifying any foreign key property here, we only specify the navigational property.

Please note as well that we do not put a [Required] attribute on the navigation property even though we always want this model to have a navigational property object (i.e. an article must have a submitter). This would create an issue for us later when we want to update an article object only without worrying about submitter. It is better to specify this rule when specifying the relationship in Fluent API.

To let Code First know the relationship we want, we put this on OnModelCreating() method:
modelBuilder.Entity<Article>().HasRequired(t => t.Submitter).WithMany(t => t.Articles);
The validation rule that the navigational property (i.e. submitter) is required is set here.

Code First will generate tables like below:


2. With Foreign Key Property in Model
If we prefer to specify foreign key property in our model, then we can do this way:
// add foreign key property to the model (Article)
public int SubmitterId { get; set; }
The advantage of doing it this way is that we can name it with any name we like.

Then on OnModelCreating() method, we write:
modelBuilder.Entity<Article>().HasRequired(t => t.Submitter).WithMany(t => t.Articles).HasForeignKey(t => t.SubmitterId);

Below are the tables and columns that will be generated:


For setting other configurations using fluent API, please see this post.

Monday, 11 May 2015

MergeOptions in Entity Framework

Understanding MergeOption when using Entity Framework is important, especially when you do multiple operations of the same object within a context.

If we have codes like these ones and assume the MergeOption is applied to all operations:
// first query
var listOne = Context.Students.OrderBy(s => s.Id).Take(2).ToList();
var studentA = listOne.First();

// first update
studentA.FirstName = "Updated";


// second query
var listTwo = Context.Students.OrderBy(s => s.Id).Take(5).ToList();
var studentB = listTwo.First();

// second update
studentB.FirstName = "UpdatedB";

The four options are:
- NoTracking
Objects are maintained in a Detached state and are not tracked in the ObjectStateManager. As the object is not tracked, object cannot be updated. On the second query, EF will get fresh records from the data source, including the ones that have been retrieved by query one then populate listTwo.

- AppendOnly (default)
Objects that do not exist in the context are attached to the context. Object that is already tracked in the context, will not be overwritten when EF retrieves records again from data source. On the second query, only three other student objects are retrieved from data source.
If there's change in values in the data source between first and second queries, all tracked objects in the context will not have the latest values from data source after retrieving on the second query.

- PreserveChanges
Similar like AppendOnly, but will replace unmodified objects (objects with EntityState Unchanged) from data source. On the second query, the other student object from first query and three new ones will be retrieved from data source.
If there's change in values in the data source between first and second queries, modified objects in the context will not have the latest values from data source after retrieving on the second query. The unmodified objects will be refreshed and have latest values from data source.

- OverwriteChanges
Objects will be replaced with fresh records from data source. If a change is made and not committed to data source yet, when retrieving from data source again the change will be lost and replaced with the retrieved value from data source. In our example, the first update is lost when second query is made. All objects will then reset to Unchanged state.
If there's change in values in the data source between first and second queries, all objects in the context will have the latest values from data source after retrieving on the second query.


References:
https://docs.microsoft.com/en-us/dotnet/api/system.data.objects.mergeoption?view=netframework-4.8
https://community.dynamics.com/crm/b/develop1/posts/do-you-understand-mergeoptions


Saturday, 1 March 2014

TransactionScope and SaveChanges in Entity Framework

TransactionScope class in .Net is great but if not used properly can cause table locks for long time and suffer application performance.

When using it with Entity Framework, only use TransactionScope when operation cannot be done within one SaveChanges() method or involves more than one data context.

Let's see the following codes. Imagine for some reasons, two data contexts are used.
using (var scope = new TransactionScope(TransactionScopeOption.Required))
{
    // some codes that do not involve database

    // some queries
	var student = contextOne.Students.Where( . . . );
	var schoolList = contextTwo.Schools;
	
	// more queries and validations
	//		check if student is allowed to move out ...
	//		check if student is allowed to move in ...
	
	// update student
	student.School = newSchool;
	
	// update some data in school context
	. . .
	
	
	contextOne.SaveChanges();
	contextTwo.SaveChanges();
	
    scope.Complete();
}
When we check SQL Profiler with tracing transactions enabled, we can see that Begin Transaction is executed immediately before the first database related operation. In this case is before the first data context querying a student (line #6). The transaction is wrapped up after the two data contexts are updated. This is a long time of locking and far beyond the necessary.

To enable tracing transactions, go to 'Events Selection' tab, click 'Show all events' then scroll to almost the end, expand 'Transactions' and tick the ones starting with 'TM: ...'

What should have been done is like the following:
    // some codes that do not involve database

    // some queries
	var student = contextOne.Students.Where( . . . );
	var schoolList = contextTwo.Schools;
	
	// more queries and validations
	//		check if student is allowed to move out ...
	//		check if student is allowed to move in ...
	
	// update student
	student.School = newSchool;
	
	// update some data in school context
	. . .
	

    using (var scope = new TransactionScope(TransactionScopeOption.Required))
    {	
	    contextOne.SaveChanges();
	    contextTwo.SaveChanges();
	
        scope.Complete();
    }
You can add try catch as well around the codes and discard the changes when there is an error.


Secondly, if there is only one data context needs to be updated, TransactionScope is not needed. Calling SaveChanges() method alone is enough and will create a transaction in database and execute any changes that have been made to the objects within the context.


For more information about TransactionScope, please see my previous article.

Tuesday, 18 February 2014

Example of Using SQL Script Directly in Entity Framework

Below is a code example of how to use direct SQL script command and normal entity operation in Entity Framework 5. TransactionScope is used to cover the operations to do all if both are successful or nothing at all:

using (var scope = new TransactionScope(TransactionScopeOption.Required))
{
                context.ExecuteStoreCommand("UPDATE Class Set Number = 20");
                context.Student.Add(new Student{ StudentId = 1, Firstname = "first", Lastname = "last" });
                context.SaveChanges();
                scope.Complete();
}

Tuesday, 24 December 2013

Enabling Automatic Code First Migration

This post is describing how to set automatic Entity Framework Code Fist migration, for the manual migration please see my previous post.

Automatic Code First migration feature is useful during development phase when database has not gone into production environment yet.

If you haven't got an EF migration Configuration.cs file then you can run this command on Package Manager Console:
Enable-Migrations –EnableAutomaticMigrations
This will add a folder called 'Migrations' in the project and a file called Configuration.cs with this setting in the constructor method:
AutomaticMigrationsEnabled = true;

If you have already got the file, make sure that AutomaticMigrationsEnabled property setting is set to true in the constructor.

Secondly, ensure that MigrateDatabaseToLatestVersion initialisation option is set on the project startup file (for example; inside global.asax)
Database.SetInitializer(new MigrateDatabaseToLatestVersion<DatabaseContext, Configuration>());
DatabaseContext: your database context class name
Configuration: this is the Configuration file discussed earlier. You would need to make the class to be public if you put the initialiser inside other project.

Also if we want the automatic migration to allow data loss (for example; allowing column to be removed) then AutomaticMigrationDataLossAllowed property would need to be set to true.

So the constructor will have these settings:
public Configuration()
{
    AutomaticMigrationsEnabled = true;
    AutomaticMigrationDataLossAllowed = true;
}

Monday, 23 December 2013

Code First Migration

Let say we are using Entity Framework Code First for our project and have a class below:
public class Student
{
   public int StudentId { get; set; }
   public string Name { get; set; }
}
When we use the database context for the first time, the database will be created with a table called __MigrationHistory.

The table has one record initially.

To enable the migration feature, type enable-migrations on Package Manager Console. Some messages will be displayed when the command has finished running.
PM> enable-migrations
Checking if the context targets an existing database...
Detected database created with a database initializer. Scaffolded migration '201312050353336_InitialCreate' corresponding to existing database. To use an automatic migration instead, delete the Migrations folder and re-run Enable-Migrations specifying the -EnableAutomaticMigrations parameter.
Code First Migrations enabled for project CodeFirstMigrationTest.
A folder called 'Migrations' with two files are created.

[timestamp]_InitialCreate.cs is created because the database has already exists when the first time we access the database context. If the database was still empty then only Configuration.cs file would be added.

There are two main commands for the migration feature:
- add-migration - add migration codes in the code layer (under 'Migrations' folder)
- update-database - update the database according to the migration codes written in the code layer

Now let's try to change our model to add a new property:
. . .
public DateTime DOB { get; set; }
. . .
Then run add-migration command to add the change:
PM> add-migration addDOB
Scaffolding migration 'addDOB'.
The Designer Code for this migration file includes a snapshot of your current Code First model. This snapshot is used to calculate the changes to your model when you scaffold the next migration. If you make additional changes to your model that you want to include in this migration, then you can re-scaffold it by running 'Add-Migration addDOB' again.
[timestamp]_addDOB.cs file is created.


Now try update-database command to apply the changes to the database:
PM> update-database
Specify the '-Verbose' flag to view the SQL statements being applied to the target database.
Applying explicit migrations: [201312081946270_addDOB].
Applying explicit migration: 201312081946270_addDOB.
Running Seed method.

Then check __MigrationHistory table again. As we can see, a new record is created in the table with Id value the same as the name of the newly generated file.


If necessary, we could customise the codes in the file generated by the add-migration command.

update-database command also has a few parameters that could be useful. We will see briefly TargetMigration, SourceMigration and Script parameters.

To upgrade/downgrade the database to a specific state, use -TargetMigration parameter. For example:
Update-Database –TargetMigration: addDOB
To roll back to empty database, use $InitialDatabase:
Update-Database –TargetMigration: $InitialDatabase

To get the changes in script only without applying those to database, use -Script parameter:
Update-Database -Script -SourceMigration: [initialState] -TargetMigration: [targetState]
If -SourceMigration is not specified then it will use the current database state. If -TargetMigration is not specified then the latest state will be assumed. For example, the command below will generate all migration scripts from empty database up to the addDOB migration state.
Update-Database -Script -SourceMigration: $InitialDatabase -TargetMigration: addDOB

Starting from EF6, we could use the generated scripts to update from any previous state to the one specified as the target. The scripts have logic to check the states based on entries in __MigrationsHistory table.


Reference:
http://msdn.microsoft.com/en-us/data/jj591621.aspx

Friday, 13 September 2013

Not Supported Database Function in IQueryable Query

One of the simplest ways that we could try to fix errors related to non-translatable function from EF query to its similar database function is to take that function out of the query and put in separate line(s). It might help in some cases.

For example; if we have this error "LINQ to Entities does not recognize the method 'Int64 ToInt64(System.String)' method, and this method cannot be translated into a store expression." because of the code below:
query = query.Where(x => x.StudentId.Value == Convert.ToInt64(number));
then we can try to do as below:
long value = Convert.ToInt64(number);
query = query.Where(x => x.StudentId.Value == value);

Thursday, 21 February 2013

How to Seed/Initialise Some Data in Entity Framework Code First

Entity Framework version 5.0.0 is used when writing this post.

First, we need to create a class derived from one of the built in database initialiser options' classes. They are CreateDatabaseIfNotExists, DropCreateDatabaseIfModelChanges and DropCreateDatabaseAlways. In the example below is DropCreateDatabaseIfModelChanges. I think it is possible to create a custom initialiser if we wish to do so.
public class DBInitialiser : DropCreateDatabaseIfModelChanges<MyContext>
{
    protected override void Seed(MyContext context)
    {
        // populate sizes table
        var sizes = new List<Size> {
            new Size {SizeId = 1, Code="S", Description="Small"},
            new Size {SizeId = 2, Code="M", Description="Medium"},
            new Size {SizeId = 3, Code="L", Description="Large"}
        };
        sizes.ForEach(s => context.Sizes.Add(s));       
    }
}
Notice that on line 1, we also pass the context type. Then we need to override the Seed() method and create some items to populate the database.

Next, we need to call Database.SetInitializer() method with an instance of the new derived class as its parameter when the application starts. In an MVC application, this would be inside Application_Start() in Global.asax.cs file.

If you have used Database.SetInitializer() with one of the built in database initialiser options as its parameter then you need to replace it with the new derived class' instance.
//Database.SetInitializer(new DropCreateDatabaseIfModelChanges<MyContext>());
    // Replaced the parameter with the new derived class' instance
    Database.SetInitializer<MyContext>(new DBInitialiser());

Thursday, 15 November 2012

Some Notes about Entity Framework Code First Fluent API on Properties

- By convention a property with name 'Id' or '[Class]Id' will become the generated table primary key.

- string property will become an nvarchar(max) column.

- Keys properties and value types (any numeric, DateTime, bool and char) properties will become non-nullable columns. Reference types (String and arrays) and nullable value types (e.g.; Int16?, int?, decimal?, etc) properties will yield as nullable columns.

- byte[] property will become varbinary(max) column.

- Configuring primary key
modelBuilder.Entity<[ClassName]>().HasKey(p => p.[PropertyName]);

- Non-nullable column
modelBuilder.Entity<[ClassName]>().Property(p => p.[PropertyName]).IsRequired();

- Nullable column
modelBuilder.Entity<[ClassName]>().Property(p => p.[PropertyName]).IsOptional();

- Set the maximum length for a property and the generated column
modelBuilder.Entity<[ClassName]>().Property(p => p.[PropertyName]).HasMaxLength([NumberLength]);

- Largest possible length of column's data type
modelBuilder.Entity<[ClassName]>().Property(p => p.[PropertyName]).IsMaxLength();

- Use fixed rather than variable data type, e.g.; varchar instead of nvarchar
modelBuilder.Entity<[ClassName]>().Property(p => p.[PropertyName]).IsFixedLength();
To extend the fixed data type column use
.IsFixedLength().HasMaxLength([NumberLength])
To have largest possible length of the fixed data type column use
.IsFixedLength().IsMaxLength()
For string property, we can change the default data type generated (nvarchar) to varchar by using
.IsUnicode(false)

- Use variable length data type
modelBuilder.Entity<[ClassName]>().Property(p => p.[PropertyName]).IsVariableLength();

- Specify the generated column data type
modelBuilder.Entity<[ClassName]>().Property(p => p.[PropertyName]).HasColumnType("[ColumnName]");

- Set the property to be used for concurrency checking
modelBuilder.Entity<[ClassName]>().Property(p => p.[PropertyName]).IsConcurrencyToken();

- Set a row version column in the generated table to be used as the concurrency token
modelBuilder.Entity<[ClassName]>().Property(p => p.[PropertyName]).IsRowVersion();
The property must have Byte[] type. IsRowVersion() is only allowed one in a class.


Further reading:
Configuring Properties and Types with the Fluent API

Friday, 2 November 2012

Get Started with Entity Framework Code First

Entity Framework version 5.0.0 is used when writing this post.

First thing we need to do is add Entity.Framework library into the project. If you are using NuGet, you can do:
PM> Install-Package EntityFramework

Then prepare your POCO classes. An example of POCO classes:
public class Stock
{
    public int StockId { get; set; }
    public int ItemId { get; set; }
    public Int16 Quantity { get; set; }
    public DateTime DateUpdated { get; set; }

    public virtual Item Item { get; set; }
}
and
public class Invoice
{
    public int InvoiceId { get; set; }
    public string Name { get; set; }    
    public string Description { get; set; }
    public decimal TotalPrice { get; set; }
    public DateTime DateSold { get; set; }
    public DateTime DateCreated { get; set; }
    public DateTime DateUpdated { get; set; }

    public virtual ICollection<ItemSelling> Items { get; set; }
}
To allow lazy loading, declare each navigational property as public virtual. For change tracking, declare the property as public virtual and use ICollection<T> for navigational property which contains collection. For complete details, please see this MSDN article 'Requirements for Creating POCO Proxies'

Next, create a context class that inherits from DBContext. Then specify one DBSet property for each of the POCO class that we have. If you would like to use Fluent API for configuring POCO class properties, then override the OnModelCreating() method. See an example below:
public class MyContext : DbContext
{
    . . .

    public DbSet<Stock> Stocks { get; set; }
    public DbSet<Invoice> Invoices { get; set; }

    . . .

    protected override void OnModelCreating(DbModelBuilder modelBuilder)
    {
        modelBuilder.Entity().HasKey(p => p.StockId);
        modelBuilder.Entity().Property(p => p.ItemId).IsRequired();
        modelBuilder.Entity().Property(p => p.Quantity).IsRequired();

        modelBuilder.Entity().HasKey(p => p.InvoiceId);
        modelBuilder.Entity().Property(p => p.Name).HasMaxLength(50);
    }
}

If a database connection string has not been specified, EF will try to find an SQL Server Express for the database. If you would like EF to create the database in a specified server, then you need to specify a connection string and make sure to named it similar as the database context class' name.

Then we might want to specify Database.SetInitializer() method to determine the behaviour of EF Code First when initialising our database. By default, it will create the database if it not exists yet but will not change it afterwards even if the model(s) has changed. In an ASP.NET application, we put this inside Global.asax.cs file. An instance:
Database.SetInitializer(new DropCreateDatabaseIfModelChanges());
There are three built in database initialisers options available:
- CreateDatabaseIfNotExists (default)
- DropCreateDatabaseIfModelChanges
- DropCreateDatabaseAlways
We can also pass null as the parameter to the Database.SetInitializer() method to skip database initialisation process.

By default the database will be initialised when the context is used for the first time. For example, when the code is trying to retrieve items from an entity. To do the database initialisation explicitly without waiting for the context to be used, call:
db.Database.Initialize(false);
For example, you can put this code below in Global.asax.cs
// do the database initialisation explicitly without waiting for the context to be used 
using (var db = new MyContext())
{
    db.Database.Initialize(false);
}

Monday, 5 March 2012

Grouping Data with LINQ

To group data in LINQ, we can use group ... by ... clause in query syntax or GroupBy() in method syntax. We will go through some examples and explanations along this post.


SIMPLE GROUPING
Let's start with simple grouping, below is an example:
// query syntax
var groupedData = from c in context.Customers
                  group c by c.Country;
// method syntax
var groupedData = context.Customers.GroupBy(c => c.Country);
Grouping in LINQ will result in an object of type IEnumerable<IGrouping<TKey,TSource>> which in this case is IEnumerable<IGrouping<String,Customer>>. IGrouping is a special class that has two properties; a key property and an IEnumerable<TSource> property that holds all the items corresponding to the key.

If we try to debug the 'groupedData' object, we will get something like this (you may need to click the image below to make it displayed bigger):
As we can see there's a 'Key' property and another property that contains some items corresponding to the 'Key' value.

To print out these items on screen:
foreach(var groupedItems in groupedData)
{
    Console.WriteLine(string.Format("Key: {0}", groupedItems.Key));
    foreach (var item in groupedItems)
    {
        Console.WriteLine(string.Format("{0} - {1}", item.CompanyName, item.Country));
    }
    Console.WriteLine("----------------------------------");
}


GROUPING WITH MORE THAN ONE KEY
If we want to have a grouping using two keys, we could use group x by new { x.Key1, x.Key2 } in query syntax or GroupBy( x => new { x.Key1, x.Key2 } ) in method syntax. Below is an example:
// query syntax
var groupedData2 = from c in context.Customers
                   group c by new { c.Country, c.City };
// method syntax
var groupedData2 = context.Customers.GroupBy(c => new {c.Country, c.City});

foreach (var groupedItems in groupedData2)
{
    //note that the Keys' names now become part of Key properties; ie. Key.Country and Key.City
    Console.WriteLine(string.Format("Key: {0} - {1}", groupedItems.Key.Country, groupedItems.Key.City));
    foreach (var item in groupedItems)
    {
        Console.WriteLine(string.Format("{0} - {1} - {2}", item.CompanyName, item.City, item.Country));
    }
    Console.WriteLine("----------------------------------");
}


PROJECTION
Here is an example of projecting the result into anonymous type objects:
// query syntax
var groupedData3 = from c in context.Customers
                   group c by c.Country into grp
                   select new
                   {
                       Key = grp.Key,
                       Items = grp.Select(g => new { g.CompanyName, g.Country })
                   };
// method syntax
var groupedData3 = context.Customers.GroupBy(c => c.Country).
                   Select(grp => new {
                                       Key = grp.Key, 
                                       Items = grp.Select(g => new {g.CompanyName, g.Country})
                                     }
                   );

foreach (var groupedItems in groupedData3)
{
    Console.WriteLine(string.Format("Key: {0}", groupedItems.Key));
    foreach (var item in groupedItems.Items)
    {
        Console.WriteLine(string.Format("{0} - {1}", item.CompanyName, item.Country));
    }
    Console.WriteLine("----------------------------------");
}

Below is another example that projects the result into strong typed objects.
The classes (made simple for demonstration purpose):
public class CompanyViewModel
{
    public string Name { get; set; }
    public string Country { get; set; }
}

public class GroupedCompanies
{
    public string CountryKey { get; set; }
    public IEnumerable<CompanyViewModel> Companies { get; set; }
}
Then the query:
var groupedData4 = from c in context.Customers
                   group c by c.Country into grp
                   select new GroupedCompanies
                   {
                       CountryKey = grp.Key,
                       Companies = grp.Select(g => new CompanyViewModel { Name = g.CompanyName, Country = g.Country })
                   };
foreach (GroupedCompanies groupedItems in groupedData4)
{
    Console.WriteLine(string.Format("Key: {0}", groupedItems.CountryKey));
    foreach (CompanyViewModel item in groupedItems.Companies)
    {
        Console.WriteLine(string.Format("{0} - {1}", item.Name, item.Country));
    }
    Console.WriteLine("----------------------------------");
}


GROUPING WITH MORE THAN ONE KEY + PROJECTION
Finally this example shows a combination of grouping with two keys and projection:
// query syntax
var groupedData5 = from c in context.Customers
                   group c by new { c.Country, c.City } into grp
                   select new
                   {
                       Key = grp.Key,
                       Items = grp.Select(g => new { g.CompanyName, g.City, g.Country })
                   };
// method syntax
var groupedData5 = context.Customers.GroupBy( c => new {c.Country, c.City} ).
                   Select( grp => new {
                                       Key = grp.Key, 
                                       Items = grp.Select(g => new {g.CompanyName, g.City, g.Country})
                                      }
                   );

Thursday, 16 February 2012

Adding Abstract Entity in Entity Framework

This post will show how to create an Abstract entity and its derived entities in Entity Framework 4.1.

Suppose we have an 'Employee' table as shown below that is set as a table to store two different types of employees, namely staffs and managers. For simplicity; staffs are under managers, both staffs and managers have 'FirstName' and 'LastName', only staffs have 'DeskNumbers' while managers have 'OfficeRoomNumbers'. They are differentiate by 'Type' flag. We could see that 'Table per Hierarchy' (TPH) style is used here.

We would like to create these mappings of staffs and managers to the 'Employee' table in Entity Framework designer. To implement this 'Table per Hierarchy' style, we will create an abstract Employee entity and have Staff and Manager entities as the derived/child entities from Employee entity.

Assume we create Employee entity from scratch:
1. Right click an empty space on designer
2. Select Add > Entity
3. Type 'Employee' as Entity name
4. Leave Base type as '(None)'
5. On the 'Key Property' section, type 'EmployeeID' as the Property name. This is the same name as the primary key column name in the database table
6. Click 'OK' then a new entity is added
7. A new entity called 'Employee' is added
8. Right click the entity then select Properties
9. Change 'Abstract' value to 'True.

Then we create the child entities:
1. Right click an empty space on designer
2. Select Add > Entity
3. Type 'Staff' as Entity name
4. On Base type dropdown select' Employee'. This will make 'Key Property' section disabled.
5. Click 'OK' then the new entity is added
6. Repeat the same process to add 'Manager' entity

Next we need to add properties that are common to both derived entities on the abstract entity. In this case we need to add 'FirstName' and 'LastName' as Scalar Properties on Employee entity. Make sure to modify the 'Type' and 'MaxLength' values of the properties according to their data types in database.

After we add the common properties, we need to add properties that are specific to the derived entities. Add 'DeskNumber' Scalar Property to Staff entity and 'OfficeRoomNumber' Scalar Property to Manager entity. Right click each of the newly added Scalar Properties then select Properties. Modify the 'Type' of the properties and make sure the 'Nullable' value is set to 'True'.

After doing all of those, we will have this:

Finally we need to map the entities to the table in database. First we map the abstract entity.
1. Right click 'Employee' entity then select Table Mapping
2. Click '<Add a Table or View>' then select 'Employee' from dropdown
3. Then you will see under 'Column Mappings' all the columns from 'Employee' table in the database are displayed on the left side, while the entity properties are displayed on the right side. All matched properties are automatically mapped.

The derived entities need to be mapped as well. They will be mapped to the same table as the abstract entity.
1. Right click 'Staff' entity then select Table Mapping
2. Click '<Add a Table or View>' then select 'Employee' from dropdown
3. Click '<Add a Condition>' then select 'Type' from dropdown
4. Type 'S' as the ' When Type' value
5. Do the same process with 'Manager' entity, however the 'When Type' value will be 'M'

Thursday, 2 February 2012

Adding Complex Type in Entity Framework

This post will show how to create and add Complex Type to entity class in Entity Framework 4.1.

Let's say that we have a Customer table that looks like the following:
We can see that the table stores billing and shipping addresses information. The addresses information have similar structure and data types. Other tables in the same database might have other addresses information similar to these as well. Therefore, instead of handling each of the address part individually for each address information, we can use a common type for these addresses. In Entity Framework, we call this Complex Type.

So now we are going to add 'AddressInfo' Complex Type. Here are the steps to do that:
1. Right click an empty space on designer
2. Select Add > Complex Type
3. A new complex type is added, rename it to 'AddressInfo'
4. To add its properties, right click the complex type then select Add > Scalar Poperty > String
5. A new property is added, rename it to 'Address'
6. then right click 'Address', select Properties
7. change 'Max Length' value to 150
8. Repeat steps 4-7 above to add 'Suburb', 'Country' and 'PostCode'

After adding the Complex Type, we need to add that to the 'Customer' entity. Say that we want to create 'Customer' entity manually then add the Complex Type to it:
1. Right click an empty space on designer
2. Select Add > Entity
3. Type 'Customer' as Entity name
4. On the 'Key Property' section, type 'CustomerID' as the Property name. This is the same name as the primary key column name in the database table
5. Click 'OK' then a new entity is added
6. To add 'FirstName' property, right click the entity then select Add > Scalar Property
7. A new property is added, rename it to 'FirstName'
8. Right click 'FirstName' then select Properties
9. Change the 'Max Length' value to 50
10. Repeat the steps 6-9 to add 'LastName' property
11. To add 'BillingAddress', select Add > Complex Property
12. A new property is added, rename to 'BillingAddress'
13. Right click 'BillingAddess' then select Properties
14. Make sure the 'Type' is 'AddressInfo'
15. Repeat steps 11-14 to add 'ShippingAddress'

Finally we need to map the entity and its Complex Type and Scalar properties to the actual columns in the database.
1. Right click 'Customer' entity then select Table Mapping
2. Click '<Add a Table or View>' then select 'Customer' from dropdown
3. Then you will see under 'Column Mappings' all the columns from 'Customer' table in the database displayed on the left side, while the entity properties are displayed on the right side. All matched properties are automatically mapped, however our Complex Types are not recognized.
4. Click on the 'Value / Property' column of 'BillingAddress' then select 'BillingAddress.Address'
5. Repeat the process for other columns that will be mapped to Complex Type properties. When we have done all the mappings we will have this: