Showing posts with label Web API. Show all posts

Monday, 20 February 2023

User Authentication with AWS Cognito with Web API Backend and Frontend Web
Part 3 - Authentication between frontend and Web API backend

This is the last part of the series of setting up a simple Angular frontend web app with ASP.NET Core Web API backend (.NET 5.0) using AWS Cognito as authentication provider. Users will be able to sign up, confirm sign up/verify and sign in. The backend WebAPI will be the point of contact and interaction with AWS Cognito. The frontend Angular web app will simply pass user information and then keep the Cognito Access Token passed by the backend WebAPI.

This series is divided into three parts:
  1. Set up AWS Cognito and backend Web API user functions - previous post
  2. Configure CORS in Web API backend - previous post
  3. Authentication between frontend and Web API backend - this post

We have done our user sign in method that will return an Access Token to the caller (frontend). Now we only want authenticated users access our app. To do this we need to adjust our configurations a little bit.

In our backend Web API, add app.UseAuthentication() in Configure() method in Startup.cs between UseCors() and UseAuthorization():
public void ConfigureServices(IServiceCollection services)
{
	. . .
	app.UseCors();

	app.UseAuthentication();

	app.UseAuthorization();
	. . .
}
The order for the middlewares is specify in this ASP.NET Core documentation.


Next, add this line in our existing authentication configurations. We need to disable the default feature that is validating token audience as AWS Access Token does not include 'audience' (aud). So the frontend can present the token to backend without any issues.
public void ConfigureServices(IServiceCollection services)
{
	// AWS Cognito
	services.AddAuthentication("Bearer")
	.AddJwtBearer(options =>
	{
		options.Audience = "[APP_CLIENT_ID]";
		options.Authority = "https://cognito-idp.[REGION_NAME].amazonaws.com/[USER_POOL_ID]";
        options.TokenValidationParameters = new TokenValidationParameters { ValidateAudience = false };
	});

	. . .
}

To secure any methods, we just need to decorate with [Authorize] attribute. For example:
[Authorize]
public IEnumerable<WeatherForecast> Get()
{

	. . .
	
}

Then, in our frontend app, we create sign in functionality that will receive an access token once successful. The token is then stored in local storage that will be used for subsequent requests to the backend.
signin(): void {
  const params = new HttpParams()
    .set('username', this.model.Username)
    .set('password', this.model.Password);

  var user = this.model;

  this.http.post<any>('https://localhost:5001/api/signin', {username: this.model.Username, password: this.model.Password})
  .subscribe({
    next: token => {
      console.log(token);
      let atoken = token;
      localStorage.setItem("atoken", atoken);
    },
    error: error => {
      console.log(error);
    }
  })    
}

For further interaction with the backend, we retrieve the token and pass in request header:
getItems(): void {
  let token = localStorage.getItem("atoken");
  this.http.get("https://localhost:5001/weatherforecast", {
    headers: new HttpHeaders({
      "Authorization": "Bearer " + token
    })
  }).subscribe(response => console.log(response));
}

Now we have working frontend and backend that utilise AWS Cognito as authentication provider.

Friday, 27 January 2023

User Authentication with AWS Cognito with Web API Backend and Frontend Web
Part 2 - Configure CORS in Web API backend

This is the second part of the series of setting up a simple Angular frontend web app with ASP.NET Core Web API backend (.NET 5.0) using AWS Cognito as authentication provider. Users will be able to sign up, confirm sign up/verify and sign in. The backend WebAPI will be the point of contact and interaction with AWS Cognito. The frontend Angular web app will simply pass user information and then keep the Cognito Access Token passed by the backend WebAPI.

This series is divided into three parts:
  1. Set up AWS Cognito and backend Web API user functions - previous post
  2. Configure CORS in Web API backend - this post
  3. Authentication between frontend and Web API backend - next post

Since our frontend Angular app may be in different domain or at least port number in development (using localhost), we need to allow Cross-Origin Resource Sharing (CORS) in the backend Web API. There are two approaches for this, whether to allow only some methods by using a named policy or apply to all methods.

In ConfigureServices method inside Startup.cs file, to allow CORS for selected methods only, we put:
services.AddCors(options =>
{
	options.AddPolicy("EnableCORS", builder =>
			  builder.WithOrigins("http://localhost:4200", "https://localhost:4200")  // frontend domain(s)
				.AllowAnyHeader()
				.AllowAnyMethod()
				.AllowCredentials()
				//.WithMethods("OPTIONS", "GET")
	);
});

Then in Configure method, add:
. . .

app.UseCors("EnableCORS");

. . .
Important! Make sure to put app.UseCors() code in the right order as specify in the ASP.NET Core documentation


Then on the controller methods, we add EnableCors attribute, for example:
[EnableCors("EnableCORS")]
[HttpGet]
public IEnumerable<WeatherForecast> Get()
{
	. . .
}

If we want to enable CORS for all methods, we use AddDefaultPolicy() instead AddPolicy():
services.AddCors(options =>
{
	options.AddDefaultPolicy(builder =>
			  builder.WithOrigins("http://localhost:4200", "https://localhost:4200")  // frontend domain(s)
				.AllowAnyHeader()
				.AllowAnyMethod()
				.AllowCredentials()
				//.WithMethods("OPTIONS", "GET")
	);
});
Then in Configure method, just put:
app.UseCors();

On the next post, we will configure the Authentication part in the project.

Tuesday, 24 January 2023

User Authentication with AWS Cognito with Web API Backend and Frontend Web
Part 1 - Setting up AWS Cognito and backend Web API user functions

We will set up a simple Angular frontend web app with ASP.NET Core Web API backend (.NET 5.0) using AWS Cognito as authentication provider. Users will be able to sign up, confirm sign up/verify and sign in. The backend WebAPI will be the point of contact and interaction with AWS Cognito. The frontend Angular web app will simply pass user information and then keep the Cognito Access Token passed by the backend WebAPI.

This writing will be divided into three parts:
  1. Set up AWS Cognito and backend Web API user functions - this post
  2. Configure CORS in Web API backend - next post
  3. Authentication between frontend and Web API backend - next post

On this first series, we will set up AWS Cognito and ASP.NET Core Web API backend (.NET 5.0) with some user sign up an sign in functions.

1. First, create a new user pool in AWS Cognito then create a new App Client. Make sure 'Enable username password auth for admin APIs for authentication (ALLOW_ADMIN_USER_PASSWORD_AUTH)' is selected:


2. Create an ASP.NET Core Web API project. On Startup.cs file inside ConfigureServices method set options.Audience and options.Authority
public void ConfigureServices(IServiceCollection services)
{
	// AWS Cognito
	services.AddAuthentication("Bearer")
	.AddJwtBearer(options =>
	{
		options.Audience = "[APP_CLIENT_ID]";
		options.Authority = "https://cognito-idp.[REGION_NAME].amazonaws.com/[USER_POOL_ID]";
	});

	. . .
}
App Client Id is shown on:

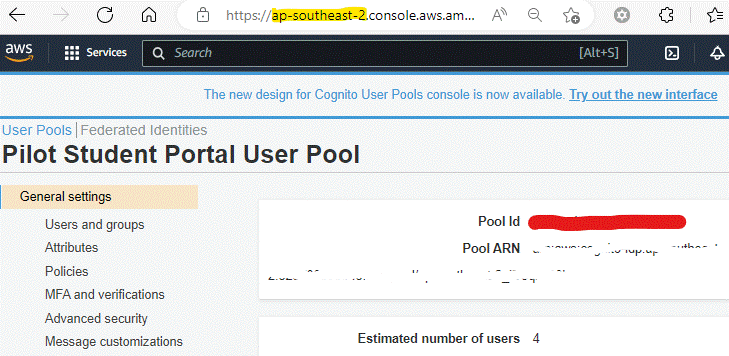
Then for the Authority field, we can get Region and User Pool Id from


3. In Configure(IApplicationBuilder app, IWebHostEnvironment env) method, add
app.UseAuthentication();
after app.UseRouting() is called.

4. Make sure your project has this AWSSDK.CognitoIdentityProvider package installed

5. Then we can add sign up feature in a controller
[HttpPost]
[Route("api/signup")]
public async Task<ActionResult<string>> SignUp(User user)
{
	var cognito = new AmazonCognitoIdentityProviderClient(_region);

	var request = new SignUpRequest
	{
		ClientId = _clientId,
		Password = user.Password,
		Username = user.Username
	};
    
	// Cognito email attribute
	var emailAttribute = new AttributeType
	{
		Name = "email",
		Value = user.Email
	};
	request.UserAttributes.Add(emailAttribute);

	var response = await cognito.SignUpAsync(request);

	return Ok(response);
}

6. When a user sign up with the method above, its Account Status is "Unconfirmed" and Email Verified is "false". A confirmation email will be sent with a code. We need to add another function to handle this.
[HttpPost]
[Route("api/confirmSignUp")]
public async Task<ActionResult<string>> ConfirmSignUp(string username, string confirmationCode)
{
	var cognito = new AmazonCognitoIdentityProviderClient(_region);

	var request = new ConfirmSignUpRequest
	{
		ClientId = _clientId,
		Username = username,
		ConfirmationCode = confirmationCode
	};

	var response = await cognito.ConfirmSignUpAsync(request); // after calling this method, user's Account Status will become 'Confirmed' and Email Verified become 'true'

	return Ok(response);
}

7. Then the sign in function. This will return an Access Token if successful.
[HttpPost]
[Route("api/signin")]
public async Task<ActionResult<string>> SignIn([FromBody] User user)
{
	var cognito = new AmazonCognitoIdentityProviderClient(_region);

	var request = new AdminInitiateAuthRequest
	{
		UserPoolId = _userPoolId, // User Pool Id
		ClientId = _clientId, // App Client Id
		AuthFlow = AuthFlowType.ADMIN_USER_PASSWORD_AUTH
	};

	request.AuthParameters.Add("USERNAME", user.Username);
	request.AuthParameters.Add("PASSWORD", user.Password);

	var response = await cognito.AdminInitiateAuthAsync(request);

	return Json(response.AuthenticationResult.AccessToken);
}

Additional resend confirmation code and find user functions:
[HttpPost]
[Route("api/resendConfirmationCode")]
public async Task<ActionResult<string>> ResendConfirmationCode(string username)
{
	var cognito = new AmazonCognitoIdentityProviderClient(_region);

	var request = new ResendConfirmationCodeRequest
	{
		ClientId = _clientId,
		Username = username
	};

	var response = await cognito.ResendConfirmationCodeAsync(request);

	return Ok(response);
}


[HttpPost]
[Route("api/findUser")]
public async Task<ActionResult<string>> FindUser(string username)
{
	var cognito = new AmazonCognitoIdentityProviderClient(_region);

	var request = new AdminGetUserRequest
	{
		UserPoolId = _userPoolId,
		Username = username
	};
	var response = await cognito.AdminGetUserAsync(request);

	return Ok(response);    
}

On the next post, we will set up CORS (Cross-Origin Resource Sharing) in the project.

Monday, 29 July 2019

ASP.NET Core Client Server JWT Authentication

Recently, I was trying to play around with ASP.NET Core JWT Authentication with Web API as backend server and Angular as front end client. I used ASP.NET Core 2.1 version.

Web API server setup
1. Add these codes inside ConfigureService method on Startup.cs:
public void ConfigureServices(IServiceCollection services)
{
 services.AddMvc().SetCompatibilityVersion(CompatibilityVersion.Version_2_1);

 services.AddAuthentication(JwtBearerDefaults.AuthenticationScheme)
  .AddJwtBearer(options =>
  {
   options.TokenValidationParameters = new TokenValidationParameters
   {
    ValidateIssuer = true,
    ValidateAudience = true,
    ValidateLifetime = true,
    ValidateIssuerSigningKey = true,

    ValidIssuer = "ABC",
    ValidAudience = "DEF",
    IssuerSigningKey = new SymmetricSecurityKey(Encoding.UTF8.GetBytes("mySuperSecretKey"))
   };
  });

 services.AddCors(options =>
 {
  options.AddPolicy("EnableCORS", builder =>
  {
   builder.AllowAnyOrigin().AllowAnyHeader().AllowAnyMethod().AllowCredentials().Build();
  });
 });
}
Notice that we also need to enable Cross Origin Resource Sharing (CORS) as our Angular client will sit on different domain.

2. Then inside Configure method, add:
public void Configure(IApplicationBuilder app, IHostingEnvironment env)
{
 if (env.IsDevelopment())
 {
  app.UseDeveloperExceptionPage();
 }
 else
 {
  app.UseHsts();
 }

 app.UseAuthentication();

 app.UseCors("EnableCORS");

 app.UseHttpsRedirection();
 app.UseMvc();
}
Make sure it is before app.UseMvc(); line otherwise you will keep getting ‘401 Unauthorized’ message with no details. Also we need to add CORS setting that we have done.

3. On the Web API login method on controller:
[EnableCors("EnableCORS")]
[HttpPost, Route("login")]
public IActionResult Login([FromBody]LoginModel user)
{
 if (user == null)
 {
  return BadRequest("Invalid client request");
 }

 if (user.UserName == "user" && user.Password == "password")
 {
  var secretKey = new SymmetricSecurityKey(Encoding.UTF8.GetBytes("mySuperSecretKey "));
  var signinCredentials = new SigningCredentials(secretKey, SecurityAlgorithms.HmacSha256);

  var tokeOptions = new JwtSecurityToken(
   issuer: "ABC",
   audience: "DEF",
   claims: new List<Claim>(),
   expires: DateTime.Now.AddMinutes(5),
   signingCredentials: signinCredentials
  );

  var tokenString = new JwtSecurityTokenHandler().WriteToken(tokeOptions);
  return Ok(new { Token = tokenString });
 }
 else
 {
  return Unauthorized();
 }
}
Make sure [EnableCors("EnableCORS")] is added either to the method or at controller level.

4. On our Angular client we will need to call login:
login(form: NgForm) {
    let credentials = JSON.stringify(form.value);
    this.http.post("http://localhost:5000/api/auth/login", credentials, {
      headers: new HttpHeaders({
        "Content-Type": "application/json"
      })
    }).subscribe(response => {
      let token = (<any>response).token;
      localStorage.setItem("jwt", token);
      this.invalidLogin = false;
      this.router.navigate(["/"]);
    }, err => {
      this.invalidLogin = true;
    });
}
Once authenticated, we use local storage to store the token with ‘jwt’ key.

5. Then on our secured resource controller:
[EnableCors("EnableCORS")]
[HttpGet, Authorize]
public IEnumerable<string> Get()
{
 return new string[] { "confidential one", " confidential two" };
}

6. To request that API, we simply use this on client side:
let token = localStorage.getItem("jwt");
this.http.get("http://localhost:5000/api/customer", {
  headers: new HttpHeaders({
 "Authorization": "Bearer " + token
  })
}).subscribe(response => console.log(response)); 

Note that we need to have "Authorization": "Bearer " + token in the request header so that the server can authorize it.  

Friday, 16 November 2018

Quick Steps Creating Web API in ASP.NET Core 2.1 with Entity Framework

These are steps of how to quickly create Web API service in ASP.NET Core 2.1 with Entity Framework for an existing database (you will need to design in different projects and layers for a proper solution):

1. Create a new ASP.NET Core Web Application project

2. Select Web API for template

3. Install the following packages from Nuget or Package Manager console:
Microsoft.EntityFrameworkCore.SqlServer
Microsoft.EntityFrameworkCore.Tools
Microsoft.VisualStudio.Web.CodeGeneration.Design

4. On Package Manager console, run:
Scaffold-DbContext “Server=your_server_name;Database=your_db_name;Trusted_Connection=True;” Microsoft.EntityFrameworkCore.SqlServer -OutputDir Model
This will create DbContext instance and all the model classes for tables in database.

5. Open Startup.cs and comment out the whole OnConfiguring(DbContextOptionsBuilder optionsBuilder) method

6. On ConfigureServices(IServiceCollection services) method, add:
public void ConfigureServices(IServiceCollection services)
{
   services.AddMvc();
   var connection = @"Server=server_name;Database=db_name;Trusted_Connection=True;ConnectRetryCount=0";
   services.AddDbContext<MyDBContext>(options => options.UseSqlServer(connection));
}
7. Create a controller by right clicking Controller folder

8. Choose ‘API Controller with actions, using Entity Framework’

9. Select a model class which you would like to use


For allowing CORS, put these codes on Startup.cs:
services.AddCors(options => options.AddPolicy("AllowAll", p => p.AllowAnyOrigin()
                                                                      .AllowAnyMethod()
                                                                      .AllowAnyHeader()));

Wednesday, 23 April 2014

Building Single Page Application with AngularJS and Web API - Part 2

On this post, we will continue building our single page application with AngularJS and Web API. For the first part of this topic, please see my previous post.

Update Functionality
Now we want to add update user functionality. First, we add a new route in our AngularJS routing configuration:
. . .
.when('/edit/:userId', {
 templateUrl: 'Partials/create-edit.html',
 controller: 'UserCtrl'
}).
. . .
Note that we use a parameter ':userId' in the path. This is used to get a value from the url and will be stored into $routeParams object. A new property called 'userId' will be created in $routeParams object (i.e. $routeParams.userId).

Other types of parameter can be used as well in a routing path:
- ':name*' is used to store all values from the path of the parameter up to the next matching string path. For example; if we set a route like '/edit/:user*/end' then when we have a url '/edit/1/type/admin/end', :user will have value '1/type/admin'
- 'name?', we can use '?' to specify that this is an optional parameter

Then add logic for updating user in our WebAPI controller:
// PUT api/UserRegistration/5
public async Task<IHttpActionResult> PutUser(int id, User user)
{
 if (!ModelState.IsValid)
 {
  return BadRequest(ModelState);
 }

 if (id != user.UserId)
 {
  return BadRequest();
 }

 db.Entry(user).State = EntityState.Modified;

 try
 {
  await db.SaveChangesAsync();
 }
 catch (DbUpdateConcurrencyException)
 {
  if (!UserExists(id))
  {
   return NotFound();
  }
  else
  {
   throw;
  }
 }

 return StatusCode(HttpStatusCode.NoContent);
}

Also add this in our AngularJS user service:
. . .
getById: function (id) {
 //return $resource('/api/UserRegistration/' + id).get();
 return $resource('/api/UserRegistration/:userId', { userId: '@userId' }).get({ userId: id });   // this is another way to build the string to be passed
},
updateUser: function (user) {
 return $resource('/api/UserRegistration/' + user.UserId, {},
  {
  customUpdate: { method: 'PUT', isArray:false }
  }
 ).customUpdate(user);
},
. . .
Notice that in updateUser function, we need to specify a custom action to invoke our Web API method. By default AngularJS $resource service has these default methods:
{ 'get': {method:'GET'},
'save': {method:'POST'},
'query': {method:'GET', isArray:true},
'remove': {method:'DELETE'},
'delete': {method:'DELETE'} };
Each method will invoke a call with the specified HTTP method. We need to specify an additional one with HTTP PUT method to invoke the Web API method. isArray is true if we expect the call to return an array of objects.

Then in our AngularJS user controller:
. . .
userService.getById($routeParams.userId).$promise.then(
//success
function (data) {
 $scope.user = data;
},
//error
function (response) {
 //console.log(response.status)
 $scope.error = true;
})
. . .
userService.updateUser(user).$promise.then(
 //success
 function () { $location.url('/'); },
 //error
 function () { $scope.error = true }
);
. . .

Finally, we add this link to the view:
<td><a data-ng-href="#edit/{{user.UserId}}">Edit</a></td>


Delete Functionality

Our delete function does not require a routing because it does not have its on view. The delete function will be executed on the main view.

We specify our Web API method:
// DELETE api/UserRegistration/5
[ResponseType(typeof(User))]
public async Task<IHttpActionResult> DeleteUser(int id)
{
 User user = await db.Users.FindAsync(id);
 if (user == null)
 {
  return NotFound();
 }

 db.Users.Remove(user);
 await db.SaveChangesAsync();

 return Ok(user);
}

Then in our AngularJS user service, we invoke the Web API method with $resource delete method.
. . .
removeUser: function (userId) {
 return $resource('/api/UserRegistration/' + userId).delete();
}
. . .

We add these codes as well to our controller:
. . .
$scope.remove = function (index) {
 if (confirm('Are you sure to delete this user?')) {
  //console.log(index);
  var userId = $scope.users[index].UserId;
  //console.log(userId);
  userService.removeUser(userId).$promise.then(
    //success
    function () { $scope.users.splice(index, 1); },
    //error
    function () { $scope.error = true }
   );
 }
}
. . .

Finally add this delete link to the view:
<td><a href="" data-ng-click="remove($index)">Delete</a></td>
Notice that we use $index property of ng-repeat in the view and pass it to the controller function to be able to know which particular record is being clicked. Then we can get any property's value of the record.

The complete source codes can be downloaded from here.

Monday, 24 March 2014

Building Single Page Application with AngularJS and Web API - Part 1

On this post, we will see the first part of building a simple single page CRUD application using AngularJs and Web API. The application will manage user registrations data. Complete source codes can be downloaded from here.

First we configure AngularJS routing for our views. See this post to learn more about AngularJS routing.
userApp.config(['$routeProvider',
function ($routeProvider) {
    $routeProvider
    .when('/', {
        templateUrl: 'Partials/home.html',   // this is the partial view for listing page
        controller: 'UserCtrl'
    })
    .when('/create', {
        templateUrl: 'Partials/create-edit.html',   // this is the partial view for creating user page
        controller: 'UserCtrl'
    })
    otherwise({
        redirectTo: '/'
    });
}]);

Create Functionality
Create the partial html page for creating a user.
<div>
  <span style="color:red" data-ng-show="error">An error has occured.</span>
</div>
<div>
  <label>First Name</label>
  <input type="text" data-ng-model="user.Firstname" />
</div>
<div>
  <label>Last Name</label>
  <input type="text" data-ng-model="user.Lastname" />
</div>
<div>
  <label>Organisation</label>
  <input type="text" data-ng-model="user.Organisation" />
</div>
<div>
  <label>Position</label>
  <input type="text" data-ng-model="user.Position" />
</div>
<div>
  <label>Email</label>
  <input type="text" data-ng-model="user.Email" />
</div>
<button data-ng-click="submit(user)">Save</button>
Note that there are some ng-model attributes on the input fields to instruct AngularJS to bind the value. The attributes were prefixed with 'data-' to be HTML5 compliant. ng-click attribute is also used to tell AngularJS to execute a function.

Then create our Web API method (this one is scaffoled by Visual Studio when creating a new controller):
// POST api/UserRegistration
[ResponseType(typeof(User))]
public async Task<IHttpActionResult> PostUser(User user)
{
  if (!ModelState.IsValid)
  {
    return BadRequest(ModelState);
  }

  db.Users.Add(user);
  await db.SaveChangesAsync();

  return CreatedAtRoute("DefaultApi", new { id = user.UserId }, user);
}

Now, we create our AngularJS custom service to call the Web API method:
userApp.factory('userService', ['$resource', function ($resource) {
    return {
        createUser: function (user) {
            return $resource('/api/UserRegistration').save(user);
        }
    }
}]);
Here AngularJS $resource service is used to interact with the Web API method. $resource service is useful for interacting with RESTful based services such as Web API. It is simpler to use than $http service. To use this service, ngResource module will need to be included as well in our application. In this JavaScript function, we call the save() method of the $resource service, passing user object as the argument. The service will invoke a HTTP POST call to the specified url.

Finally we create our AngularJS controller:
userApp.controller('UserCtrl', ['$scope', '$location', '$routeParams', 'userService', function ($scope, $location, $routeParams, userService) {
   
    $scope.submit = function (user) {
        $scope.error = false;        
        userService.createUser(user).$promise.then(
          //success
          function (data) { $location.url('/'); },
          //error
          function (response) { 
                         //console.log(response);
                         //console.log(response.status);
                         $scope.error = true }
        );        
    }
}]);
Here we create a submit function that calls the user service that we have just created. The submit function is called by the save button in our partial view through ng-click attribute.

Note that $promise is also used to determine what action to take if the service call is successful and if it has error. $promise is part of $resource service. If it is successful, $promise will return data object (similar to the one we passed to the service call). If it fails, it will return a HTTP response object. It might be useful to see the headers and status properties of the response object.

$scope.error variable is used to show an error message if an error has occurred. This variable is referred to by ng-show in our partial view.


Listing Functionality
We have already implemented the create user functionality, now let us do the listing function.

First, create the partial view.
<div>
    <span style="color:red" data-ng-show="error">An error has occured.</span>
</div>
<table>
    <thead>
        <tr>
            <th>Firstname</th>
            <th>Lastname</th>
            <th>Email</th>
        </tr>
    </thead>
    <tbody ng-repeat="user in users">
        <tr>
            <td>{{ user.Firstname }}</td>
            <td>{{ user.Lastname }}</td>
            <td>{{ user.Email }}</td>
        </tr>
    </tbody>
</table>

Then the Web API method:
// GET api/UserRegistration
public IQueryable<User> GetUsers()
{
  return db.Users;
}

Add our user service with this method:
getAllUsers: function () {
  return $resource('/api/UserRegistration').query();
}
Here we use the $resource service's query() method that will invoke a HTTP GET call.

Then add the following codes in our controller:
$scope.init = function () {
  // Get all users
  userService.getAllUsers().$promise.then(
    //success
    function (data) {
      $scope.users = data;
    },
    //error
    function (response) {
      //console.log(response);
      //console.log(response.status);
      $scope.error = true;
    }
  );
}

In the coming post, we will see the edit and delete functionality.