Wednesday 21 July 2021

Android Back Button to Exit App in Ionic

There are at least two ways to have Android hardware back button to exit app. I am using Ionic 5 at the time of writing this.

1) Using IonRouterOutlet to check through history stack
import { IonRouterOutlet, Platform } from '@ionic/angular';
import { Plugins } from '@capacitor/core';
const { App } = Plugins;

export class HomePage {
   constructor(private platform: Platform, private routerOutlet: IonRouterOutlet){
   
      . . .
   
      this.platform.backButton.subscribeWithPriority(-1, () => {
         if (!this.routerOutlet.canGoBack()) {
            navigator['app'].exitApp();
            //App.exitApp();   // if using Capacitor framework, we can use Plugins component
         }
      });
   }

   . . .
}

2) Using Location from Angular library
import { Platform } from '@ionic/angular';
import { AfterViewInit, OnDestroy } from "@angular/core";
import { Subscription } from "rxjs";
import { Location } from '@angular/common';

export class HomePage implements OnDestroy, AfterViewInit {
   backButtonSubscription: Subscription;
    
   constructor(private platform: Platform, private location: Location){   
      . . .
   }
   
   ngAfterViewInit() {
      this.backButtonSubscription = this.platform.backButton.subscribe(() => {
         if (this.location.isCurrentPathEqualTo("HOME_PAGE_URL")){
            navigator['app'].exitApp();
         }
      });
   }
   
   ngOnDestroy() {
      this.backButtonSubscription.unsubscribe();
   }

   . . .

}

References:
Ionic Framework Documentation - Hardware Back Button
How To Exit App On Back Press | Ionic 4

Further reading:
Ionic 5 handle back hardware event to confirm exit by user

Wednesday 23 June 2021

Merge Specific Changeset in Azure Repos or Git with Visual Studio Code

To get a specific checked in changeset item in Azure Repos (Git) in Visual Studio Code, we use git cherry-pick command. It can be a changeset belong to a different branch. There is Merge Branch menu, but this will get and merge all the new changesets into our working branch.

By default when running git cherry-pick command, it will automatically merge and check in the codes in the repository for us. Use -n option to have the codes staged and we can check in manually.

Run in Terminal window:
git cherry-pick -n [commithashcode]

Friday 16 April 2021

Config File in .Net Core

To add a configuration file in a .NET Core project, first add a new file JavaScript JSON Configuration File.

Set the file properties; Copy to Output Directory: 'Copy if newer' or 'Copy always'.

Say we put this inside the file:
{
  "ApplicationKey": "a_secret_value",
  "ConnectionStrings": {
    "StudentBoundedContextConnectionString": "server=Server_Name;database=DB_Name;trusted_connection=true",
    "CourseBoundedContextConnectionString": "server=Server_Name;database=DB_Name;trusted_connection=true"
  } 
}

On Package Manager, add Microsoft.Extensions.Configuration.Json.

Then to read the values on our codes:
var config = new ConfigurationBuilder()
				 .AddJsonFile("your_filename.json")
				 .Build();

var appkey = config["ApplicationKey"];
var studentConnectionString = config["ConnectionStrings:StudentBoundedContextConnectionString"];

Monday 12 April 2021

Easily Generating Icon and Splash Images with Cordova Resource Generation Tool

A tool/plugin called cordova-res (https://github.com/ionic-team/cordova-res) is great to automatically generate icon and splash images if you develop an app using Capacitor.

1. First install the plugin
npm install -g cordova-res

2. Prepare the base icon and splash screen images
icon.(png|jpg) must be at least 1024×1024 px
splash.(png|jpg) must be at least 2732×2732 px
For iOS, the icon image should be squared and not masked https://developer.apple.com/design/human-interface-guidelines/ios/icons-and-images/app-icon/.

3. Then place the image files in resources folder. The plugin expects files structure like this:
resources/
├── icon.png
└── splash.png
config.xml (optional)


For iOS
4. Run this command
cordova-res ios --skip-config –copy
The result will be something like:
Generated 47 resources for iOS
Copied 21 resource items to iOS

5. Assign the images in Xcode
On Xcode, navigate to App > App > Assets.xcassets. Replace the icon and splash images with the newly generated images.
https://www.joshmorony.com/adding-icons-splash-screens-launch-images-to-capacitor-projects/


For Android
4. Run the command
cordova-res android --skip-config –copy
Splash and legacy icon images will be generated.

5. Generate adaptive icons
Since Android 8.0 (API level 26), adaptive icon is used as launcher icons for variety of Android devices.
Open Android Studio then select app folder.
Click File -> New -> Image Asset.
Set Foreground and Background Layers.
For adaptive icon source image, the centre area is smaller than the one for legacy icon.

6. Replace splash images (if using Capacitor framework)
The current Capacitor version replaces all the icons but not the splash screens. We need to replace all the default images under 'splash' folder ourselves.

These default images are in separated folders located inside 'app\src\main\res' folder.

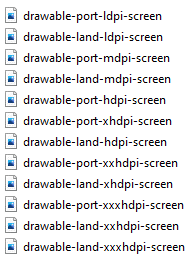
We just need to replace each 'splash.png' file inside each folder with our generated splash images:


Monday 15 February 2021

Starting Entity Framework Core with Code First

On this post we will see how to use Code First development with EntityFramework Core and SQL Server.

Add Microsoft.EntityFrameworkCore.SqlServer (current version at time of writing is v5.0.2) in Package Manager.

Create the model class:
public class Trainee
{
    public long TraineeId { get; set; }
    public string Firstname { get; set; }
    public string Lastname { get; set; }
}

Then create a context class derived from DbContext:
public class TraineeBoundedContext : DbContext
{
    public DbSet<Trainee> Trainees { get; set; }

    /* using default constructor is enough
    public TraineeBoundedContext(DbContextOptions<TraineeBoundedContext> options) : base(options)
    {
    }*/
    
    protected override void OnConfiguring(DbContextOptionsBuilder optionsBuilder)
    {
        optionsBuilder.UseSqlServer("Server=YOUR_SERVER_NAME;Database=YOUR_DATABASE_NAME;Integrated Security=True");  // put your server and database names
    }
}

Add Microsoft.EntityFrameworkCore.Tools (current version at time of writing is v5.0.3) package for EF migration feature.

Then run 'Add-Migration MIGRATION_NAME' command on Package Manager Console:
PM> Add-Migration InitialMigration
Build started...
Build succeeded.
To undo this action, use Remove-Migration.

It will create some files. In my case, I chose 'InitialMigration' as the name.

One of the generated file shows this:

Then we can apply this to the database with 'Update-Database' command.
PM> update-database
Build started...
Build succeeded.
Applying migration '20210212053620_InitialMigration'.
Done.

When you check your database, it should have new tables: