Wednesday 30 December 2015

How to Move EF Database First Template .tt File to Another Project

On this post, we will see how to have Entity Framework .tt template file generated by an .edmx file in a different project. By default .tt files are created under the same project where the .edmx file is. Usually this is our data layer project. However, for most of the time, we would want the POCO models that are generated by a model .tt file to be put under a separate project (i.e. domain or model project) for a better practice.

There are a few steps to make this happen (I am using VS 2013 here):
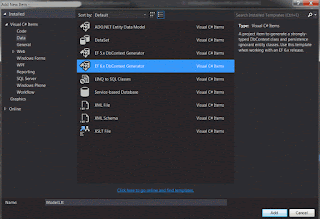
1. Add a new model template .tt file in the other project through 'add a new item' then select EF DbContext Generator file type under 'Data'.


2. Open the new .tt file then change the value of 'inputFile' to point to the .edmx file in the original project.

In this case, my data project is called 'MySolution.Data.StudentBoundedContext'.

3. To ensure that all of the to be be generated POCO classes have right namespaces, we need to tell the template file the new namespace to use. Right click the .tt file and select 'Properties' then put the new namespace on 'Custom Tool Namespace' value.


4. Delete the model .tt file on the original project.

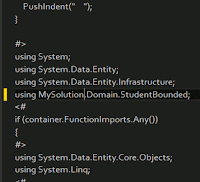
5. I prefer to leave the context .Context.tt template file on the data layer project and only move the model .tt file to a domain/model project. Therefore, I will need to tell the context template file to refer to the models in the other project.
To do this:
- add a project reference to the other project (domain/model project)
- open the .Context.tt file and add a 'using' statement referring to the models namespace


6. Regenerate the models and context files by right clicking the template files and selecting 'Run Custom Tool'.

Monday 14 December 2015

Bulk Insert in Web SQL

Below is a snippet of how to do bulk insert of records in Web SQL:
// db is the database object that is usually initialise with openDatabase() function
db.transaction(function (tx) {  
  // insert each record
  $.each(myArray, function (i, item) {
   tx.executeSql("INSERT INTO MyTable(name, value) VALUES (?, ?)", [item.name, item.value]);
  });   
},
// error
function (error) {
 . . .
},
// success - the transaction() function does not pass any object to its success callback
function () {
 . . .
});

Web SQL does not understand the Standard SQL bulk insert syntax such as
Insert Into tbl (col1, col2) Values ('val1', 'val2'), ('val3', 'val4'), ...
but each insert statement needs to be executed using executeSql() function. A transaction is usually used to wrap these insert commands.

Tuesday 27 October 2015

A Form Validation Example in AngularJS - Show Error Style After Submitted

Below is a basic example of a form validation in AngularJS that shows error style after the form is submitted.

To do this, we need to use novalidate attribute on the form to avoid browser validating the form but is passed to JavaScript to perform manual validation. In addition, we can utilise ng-submitted class that is added to the form by AngularJS after it is submitted.

The view:
<body ng-app="validationExample">
    <div ng-controller="MyCtrl as vm">
      <form name="myForm" novalidate ng-submit="vm.submitted(myForm, vm.input)">
        <input type="text" name="name" ng-model="vm.input.name" placeholder="please enter text" required/>
        <span ng-show="myForm.name.$error.required == true">*</span>
        <input type='text' name="value" ng-model='vm.input.value' placeholder="a number greater than 0" required ng-pattern='/^([1-9][0-9]*(\.[0-9]+)?|0+\.[0-9]*[1-9][0-9]*)$/'>
        <span ng-show="myForm.value.$error.required == true">*</span>
        <button>submit</button>
      </form>
    </div>
</body>

The script:
var myApp = angular.module('validationExample', [])

myApp.controller('MyCtrl', [function () {
    var vm = this;
    vm.submitted = function(form, input) {
      if(form.$valid) {
        alert('submitted');
      }
    }
} ]);

The stylesheet:
.ng-submitted input.ng-invalid {
  border-color:red;
}

See the example in Plunker.

To read more about form validation, please see my previous post.

Thursday 1 October 2015

Table with Dynamic Rows Manipulation Example in AngularJS

Below is a code example of building a table with the ability to add, edit and remove rows dynamically with AngularJS. It also makes the corresponding input in focus.

The view:
<html>
  <head>
    <script src="http://code.jquery.com/jquery-2.1.4.min.js"></script>
    <script src="https://code.angularjs.org/1.2.16/angular.js"></script>
    <script src="script.js"></script>
  </head>
  <body ng-app="myApp">
    <div ng-controller="MyCtrl as vm">
      <table>
        <thead>
          <tr>
            <th>Name</th>
            <th>Value</th>
          </tr>
        </thead>
        <tbody>
          <tr ng-repeat="row in vm.rows">
            <td>
              <input type="text" ng-model="row.name" ng-readonly="row.readonly" ng-disabled="row.readonly" on-focus="!row.readonly" />
            </td>
            <td>
              <input type="text" ng-model="row.value" ng-readonly="row.readonly" ng-disabled="row.readonly" />
            </td>
            <td>
              <button ng-click="vm.editRow($index)">{{row.readonly ? "Edit" : "Save" }}</button>
              <button ng-click="vm.removeRow($index)">Remove</button>
            </td>
          </tr>
        </tbody>
      </table>
      <br />
      <input type="button" value="Add New" ng-click="vm.addNewRow('','')" />
    </div>
  </body>
</html>

The script:
angular.module('myApp', [])
.controller('MyCtrl', function () {
    var vm = this;
    vm.rows = [{"name": "aaa", "value" : 50, "readonly": true}, {"name": "bbb", "value" : 70, "readonly": true}];
    
    vm.addNewRow = function(name, value) {
      vm.rows[vm.rows.length - 1].readonly= true;
      vm.rows.push({"name":"", "value":"", "readonly": false})
    }
    
    vm.removeRow = function(index) {
      vm.rows.splice(index, 1);
    }
    
    vm.editRow = function(index) {
      vm.rows[index].readonly = !vm.rows[index].readonly;
    }
})
.directive('onFocus', function($timeout) {
    return function(scope, element, attrs) {
        scope.$watch(attrs.onFocus, function (newValue) {
            if (newValue) {
                $timeout(function () {
                    element.focus();
                }, 0, false);
            }
        }); 
      };    
});

See the example in action on Plunker.

Wednesday 30 September 2015

[INSTALL_PARSE_FAILED_MANIFEST_MALFORMED] Error

If you encounter an issue when trying to run a Cordova app in an Android emulator with the error messages similar like the following:
  Installing app on device...
C:\Users\Me\Documents\Visual Studio 2015\Projects\MyApp\MyApp\platforms\android\cordova\node_modules\q\q.js:126
throw e;
^
ERROR: Failed to launch application on device: ERROR: Failed to install apk to device:  pkg: /data/local/tmp/android-debug.apk
Failure [INSTALL_PARSE_FAILED_MANIFEST_MALFORMED]
  Command finished with error code 1: cmd /s /c ""C:\Users\Me\Documents\Visual Studio 2015\Projects\MyApp\MyApp\platforms\android\cordova\run.bat" --nobuild --target=169.254.56.136:5555 --debug "--buildConfig=C:\Users\Me\Documents\Visual Studio 2015\Projects\MyApp\MyApp\build.json""
  ERROR running one or more of the platforms: Error: cmd: Command failed with exit code 1
  You may not have the required environment or OS to run this project
try to make sure that Package Name in config.xml is in lower case then rebuild/rerun the app.

Friday 21 August 2015

Simpler Framework with DbContext and DbSet

I am trying to design a base framework that utilises DbContext as a unit of work and its DbSet properties as repositories. There are some voices on the Internet suggesting this approach for simplicity, performance, faster development effort and being able to keep exposing Entity Framework goodness. I also try to use bounded context approach that is based on domain driven design.

I have a base context class that is derived from DbContext:
    public abstract class BaseContext : DbContext
    {
        static BaseContext()
        {
        }
        protected BaseContext()
            : base("name=FrameworkOneDatabase")
        { }               
    }
Then some bounded contexts. Below is one of them:
    public class ArticleBoundContext : BaseContext
    {
        public ArticleBoundContext()
        {            
        }

        public virtual DbSet<Article> Article { get; set; }
        public virtual DbSet<User> Submitter { get; set; }
    }
Also a basic service class to help me calling CRUD operations on any bounded context:
    public class CRUDService
    {
        private BaseContext _context;

        public CRUDService(BaseContext context)
        {
            this._context = context;
        }

        public void Insert(dynamic entityObject)
        {
            dynamic dbset = GetDbSetFromObject(entityObject);
            entityObject.ObjectState = ObjectState.Added;
            dbset.Add(entityObject);
            _context.ApplyStateChanges();
        }

        public void InsertOrUpdate(dynamic entityObject)
        {
            dynamic dbset = GetDbSetFromObject(entityObject);
            dbset.Attach(entityObject);  
            _context.ApplyStateChanges();
        }
        
        public void Delete(dynamic entityObject)
        {
            dynamic dbset = GetDbSetFromObject(entityObject);
            dbset.Remove(entityObject);
        }

        public async Task<int> Commit()
        {
            var result = await _context.SaveChangesAsync();
            return result;
        }

        public void Dispose()
        {
            _context.Dispose();
        }

        private dynamic GetDbSetFromObject(dynamic entityObject)
        {
            // if dynamicproxies wrapper is used then get the base object
            System.Type objectType = entityObject.GetType();
            if (objectType.Namespace == "System.Data.Entity.DynamicProxies")
            {
                objectType = objectType.BaseType;
            }

            var dbset = (from p in _context.GetType().GetProperties()
                    where p.PropertyType.IsGenericType
                    && p.PropertyType.GetGenericTypeDefinition() == typeof(DbSet<>)
                    let entityType = p.PropertyType.GetGenericArguments().First()
                    where objectType == entityType
                    select p.GetValue(_context)).FirstOrDefault();

            if (dbset == null)
            {
                throw new System.ArgumentException("object type does not exist in the context");
            }

            return dbset;
        }
    }
The class has methods accepting an object then will find its corresponding DbSet member of the context. The method then call one of the DbSet operations. The GetDbSetFromObject() method is the one that will do the finding.

Then I can use all of the classes and structure above to do something like in the tests below:
    [TestClass]
    public class CRUDServiceTest
    {
        private ArticleBoundContext _context;
        private CRUDService _service;

        public CRUDServiceTest()
        {
            _context = new ArticleBoundContext();
            _service = new CRUDService(_context);
        }
        
        [TestMethod]
        public async Task CanInsertArticle()
        {
            Article article = new Article { Title = "title test " + DateTime.Now.ToString("HH:mm:ss"), Description = "desc", Url = "test.com", ObjectState = ObjectState.Added };
            article.Submitter = new User { Firstname = "first " + DateTime.Now.ToString("HH:mm:ss"), Lastname = "last", ObjectState = ObjectState.Added };
            _service.Insert(article);
            var insert = await _service.Commit();
            Assert.IsTrue(insert > 0);
        }

        [TestMethod]
        public async Task CanUpdateArticle()
        {
            Article article = _context.Article.FirstOrDefault(); 
            article.Title = "UPDATED TITLE " + DateTime.Now.ToString("HH:mm:ss");
            article.Description = "UPDATED DESCRIPTION";
            article.ObjectState = ObjectState.Modified;
            _service.InsertOrUpdate(article);
            var update = await _service.Commit();
            Assert.IsTrue(update > 0);
        }

        [TestMethod]
        public async Task CanUpdateSubmitter()
        {
            var article = _context.Article.FirstOrDefault(); 
            article.Submitter.Firstname = "UPDATED FIRSTNAME " + DateTime.Now.ToString("HH:mm:ss");
            article.Submitter.Lastname = "UPDATED LASTNAME " + DateTime.Now.ToString("HH:mm:ss");
            article.Submitter.ObjectState = ObjectState.Modified;

            _service.InsertOrUpdate(article);
            var update = await _service.Commit();
            Assert.IsTrue(update > 0);
        }
        
        [TestMethod]
        public async Task CanUpdateSubmitter_2()
        {
            var submitter = _context.Submitter.FirstOrDefault();
            submitter.Firstname = "UPDATED FIRSTNAME " + DateTime.Now.ToString("HH:mm:ss");
            submitter.Lastname = "UPDATED LASTNAME " + DateTime.Now.ToString("HH:mm:ss");
            submitter.ObjectState = ObjectState.Modified;

            _service.InsertOrUpdate(submitter);
            var update = await _service.Commit();
            Assert.IsTrue(update > 0);
        }

        [TestMethod]
        public async Task CanDeleteArticle()
        {
            var article = _context.Article.FirstOrDefault();

            _service.Delete(article);
            var result = await _service.Commit();

            Assert.IsTrue(result > 0);
        }

        [TestMethod]
        public async Task CanInsertAndDeleteSubmitter()
        {
            var submitter = new User();
            submitter.Firstname = "firstname " +DateTime.Now.ToString("HH:mm:ss");
            submitter.Lastname = "lastname " + DateTime.Now.ToString("HH:mm:ss");

            _service.Insert(submitter);
            var result = await _service.Commit();

            Assert.IsTrue(result > 0);
            var insertedSubmitter = await _context.Submitter.FindAsync(submitter.Id);
            Assert.IsTrue(insertedSubmitter.Firstname == submitter.Firstname && insertedSubmitter.Lastname == submitter.Lastname);

            _service.Delete(submitter);
            result = await _service.Commit();

            Assert.IsTrue(result > 0);
        }

        [TestMethod]
        public async Task ThrowExceptionWhenInsertingWrongObject()
        {
            try
            {
                int test = 5;
                _service.Insert(test);
                var insert = await _service.Commit();
            }
            catch (Exception ex)
            {
                Assert.IsInstanceOfType(ex, typeof(System.ArgumentException));
            }
        }
    }

Monday 3 August 2015

Memory Issue when Building Cordova Project in Visual Studio 2015

I have just upgraded my desktop to Windows 10 and installed Visual Studio 2015 Community Edition. When trying to build my first Apache Cordova project in VS2015, I got these errors:
Could not create the Java virtual machine
Error occurred during initialization of VM
Could not reserve enough space for object heap


After trying to google for the solution, I found one that is better than the others. It told me to add a new system variable _JAVA_OPTIONS with -Xmx512M as the value.

Below is the detail:
Go to Control Panel -> System -> Advanced, then click Environment Variables. Click New on the System variables section then put:
Variable name: _JAVA_OPTIONS
Variable value: -Xmx512M

Solved my issue right away.

Monday 27 July 2015

Automatically Generate Resized Icons and Splash Screens with Ionic Framework

Rather than manually generating or cropping different size of images of icons and splash screens for different resolutions, orientation and platforms, we can use Ionic Framework to do this work for us. Ionic will use its resizing and cropping server to do this. We will need a recent version of Ionic CLI.

Below are the steps to do this:
1. Prepare the source icon or splash screen file
For icon file:
- the file is named with 'icon' and has either .png, .psd or .ai extension type (i.e. icon.png, icon.psd or icon.ai)
- image's minimum dimensions should be 192 x 192 px
- rounded corners will be applied for specific platforms (e.g. iOS)

For splash screen file:
- the file is named with 'splash' and has either .png, .psd or .ai extension type (i.e. splash.png, splash.psd or splash.ai)
- image's minimum dimensions should be 2208 x 2208 px
- the artwork should be centered within inner 1200 x 1200 px area

2. Use a new or existing Ionic project to do this job
To have the Ionic server doing the resizing and cropping, we will need to put the file inside an Ionic project.

3. Make sure we have the intended platform on the Ionic project.
To add a platform, run ionic platform add command in the root folder of the project, for example:
C:\MyLabs\IonicTemplate\SideMenu>ionic platform add android

4. Create 'resources' folder on the root of the project

5. Put the icon or splash screen file in the folder

6. Run ionic resources command at the project root
To generate icons, run ionic resources --icon command (with double dash characters), below is a screenshot:


To generate splash screens, run ionic resources --splash command (with double dash characters), below is a screenshot:


7. Get the icons from 'resources/PLATFORM_NAME/icon' folder or the splash screens from 'resources/PLATFORM_NAME/splash' folder

Tuesday 14 July 2015

Generating Android Release Keystore for Visual Studio Apache Cordova Project

Below are the steps to generate an Android keystore for publishing a release version of an app built using Visual Studio Apache Cordova:
1. Make sure you have Java SDK installed.

2. Run keytool command like below:
keytool -genkey -v -keystore YOUR_KEY_NAME.keystore -alias KEY_ALIAS -keyalg RSA -keysize 2048 -validity 20000
Use greater than 10,000 days (i.e. 20,000 days) validity to avoid expiration issue when uploading the package to Google App store.
For example:
C:\Program Files (x86)\Java\jdk1.7.0_55\bin>keytool -genkey -v -keystore c:\users\rical\my-release-key.keystore -alias rical_blog_app_key -keyalg RSA -keysize 2048 -validity 20000
Then you will be prompted with some questions:
Enter keystore password: *****
Re-enter new password: *****
What is your first and last name? 
  [Unknown]:  Rical Wirawan 
What is the name of your organizational unit? 
  [Unknown]:  Organisation
What is the name of your organization? 
  [Unknown]:  MyOrg
What is the name of your City or Locality? 
  [Unknown]:  MyCity 
What is the name of your State or Province? 
  [Unknown]:  NSW
What is the two-letter country code for this unit? 
  [Unknown]:  61 
Is CN=Rical Wirawan, OU=Organisation, O=MyOrg, L=MyCity, ST=NSW, C=61 correct? 
  [no]:  yes 

Generating 2,048 bit RSA key pair and self-signed certificate (SHA256withRSA) with a validity of 10,000 days 
        for: CN=Rical Wirawan, OU=Organisation, O=MyOrg, L=MyCity, ST=NSW, C=61 
Enter key password for  
        (RETURN if same as keystore password): 
[Storing my-release-key.keystore] 

3. The key file will be generated in the specified folder.

4. If you use a recent version of Cordova CLI, open build.json file in the root folder of the project. If it does not exist yet then create the file manually. Then put the details in the file, continuing our example:
{
 "android": {
     "release": {
         "keystore":"C:\\users\\rical\\my-release-key.keystore",
         "storePassword":"*****",
         "alias":"rical_blog_app_key",
         "password":"*****",
         "keystoreType":""
       }
   }
}

If your Cordova CLI version is less than 5.0, open ant.properties file (under 'your_project_name\res\cert\android' folder). Then put the key details in the ant.properties file, continuing our example:
key.store=c:\\users\\rical\\my-release-key.keystore
key.alias=rical_blog_app_key
key.store.password=*****
key.alias.password=*****

6. Build the app in Release mode with Device or one of Android emulator platforms option. Do not use any of the Ripple emulators option.

7. The package will be created inside 'bin/Android/Release' folder. The file to be deployed to Google App store is the one that does not end with (-unaligned.apk), e.g. "android-release.apk".

Wednesday 24 June 2015

Looking Deeper into Async and Await

In this post, we will see the concepts of async and await in more details.

async keyword
A simple async method looks like this:
public async Task MyMethodAsync()
{
  . . .
}

An async keyword does not make a method to run asynchronously. What it does, it allows the method to use one or more await keyword to call other asynchronous method(s). The compiler will not generate an error if we fail to provide at least one await, it will only give a warning. We cannot use an await in a method that does not marked with async.

Secondly, it enables the method to return a value or exception into Task or Task<T> return type which will help us a lot in doing asynchronous programming.

A method that is decorated with async will actually start running its codes synchronously like a normal method until it finds an await keyword. Then it will see, if the method called by the await needs to be awaited, only then an asynchronous process will happen. We will see this in more details below.


await Keyword
Below are two examples of using await:
public async Task MyMethodAsync()
{
  // initially this runs synchronously
  . . .

  // 'await' waits for an asynchronous method to complete. It enables the process to be asynchronous,
  //    depending on how soon the method is completing.
  await RunSomethingAsync();

  // the codes past 'await' will only be executed after the awaited method completes,
  //    however 'await' does not block the thread
  . . .
}
// this second variation, shows where 'await' is used a little bit later after some other codes
public async Task MyMethodAsync()
{
  // initially this runs synchronously
  . . .

  var result = RunSomethingAsync();

  // some other codes here still run synchronously
  . . .

  // 'await' waits for an asynchronous method to complete. It enables the process to be asynchronous,
  //    depending on how soon the method is completing.
  await result;

  // the codes past 'await' will only be executed after the awaited method completes,
  //    however 'await' does not block the thread
  . . .
}

This is the keyword that enables the execution process to become asynchronous. If we do not have any await in our method, then the method will be executed synchronously even though the method is marked with async.

The keyword calls an asynchronous method. It allows the asynchronous method to be awaited until it completes then it will continue the codes after the await. While awaiting, it does not block the current thread but returns the control to the caller (i.e. MyMethodAsync() caller). This is when the asynchronous process is happening. The diagram in 'What Happens in an Async Method' section on this page explains this clearly.

Only when the called asynchronous method needs to be awaited, the process becomes asynchronous. It waits for the method to complete but also allow the caller (i.e. MyMethodAsync() caller) to execute other codes. If the outer codes would encounter an await keyword also then similar process would happen as well.

The await keyword does not need to be put together when calling an asynchronous method, it can be called later (note in our second variation example above, the await is not called straight away).

If the awaited method completes right away before the process above happens then all of those codes will be run in synchronous mode.


Task and Task<T>
We should always use either Task or Task<T> as the return type of our asynchronous method. The earlier is used when we do not have anything to be returned. Yes, when the method does not return anything, use Task instead of void (the exception will be explained below).

// below is an example of a method that returns Task<T>
public async Task<int> CalculateAsync()
{
   . . .

   // return an 'int' not 'Task<int>' type
   return 5;
}

Task should be used because this type allows the method to be awaited using await keyword which could lift up the process to be asynchronous. The return type enables the caller as well to know the progress when executing the method. Lastly, it encapsulates any exception that could occur inside the method to allow the exception to be handled easily.

Using void is also possible but it should be used for event handler only. An async void method has to use a different way to handle exception as it does not have a wrapper for the exception. It also does not provide an easy way to notify the caller when it has completed. In addition, this will be difficult to test.


Execution Thread
Our asynchronous method will begin with the caller's thread until it finds a process that needs to be awaited by await keyword (recall that not every asynchronous method that is called by await needs to be awaited). When it happens, the context of the caller's thread will be captured. The awaited process will run on a new thread from thread pool. Then when the awaited task is completed, the control is returned back to the captured context which is using the original thread (caller's thread).

If the awaited task finishes before the signing up process above is completed then the rest of the codes will be run synchronously without opening a new thread (from thread pool). Thus all the codes will always run on the initial thread which is the caller's thread.

public async Task MyMethodAsync()
{
  // initially this runs on the caller's thread
  . . .

  // since the process inside LongOperationAsync() needs to be awaited, 
  //    the original thread is captured and signed up for continuation.
  // The process is run using a new thread from thread pool 
  await LongOperationAsync();
  // after the awaiting is complete, the control is handed back to the original thread (caller's thread)

  // the codes past 'await' will be executed under original thread
  . . .
}

The process to returning back the control back to the captured context has some overhead. Moreover, the original context can suffer more if it has already had a performance issue due to other processes that it handles.

Fortunately, the codes after the await keyword can be run with a different thread unless if they really need the original context to run. For example; if the method is an ASP.NET MVC controller action method, the original context is an ASP.NET context and the codes after the await need to do some controller related stuffs then they will need to be run under ASP.NET context as well.

To enable codes after await to be run under a different context, we use ConfigureAwait(continueOnCapturedContext: false).
public async Task MyMethodAsync()
{
  // initially this runs on the caller's thread
  . . .

  // since 'ConfigureAwait(false)' is used, the process of capturing original context 
  //    and signing up for continuation can be skipped
  // the process in LongOperationAsync() is run using a new thread from thread pool 
  await LongOperationAsync().ConfigureAwait(continueOnCapturedContext: false);
  // after the awaiting is complete, the control will continue under the newly created thread,
  //    the handling back process to the original context can be skipped as well

  // the codes past 'await' will be executed under the newly created thread
  . . .
}

Whenever possible, we should always set ConfigureAwait(continueOnCapturedContext: false), unless if we know that we are going to need the original thread for the codes after the await.


References and further reading:
Async and Await Post by Stephen Cleary
Best Practices in Asynchronous Programming on MSDN
Async/Await FAQ on MSDN Blogs
Asynchronous Programming with Async and Await on MSDN
Tuesday 23 June 2015

Getting Started with Async Await in C#

I was trying to start using async await in my data layer. After reading a few articles such as this one from MSDN, I start writing some asynchronous methods from my original synchronous methods.

A few steps that need to be done to create an asynchronous method from its counterpart synchronous method:
1. make sure System.Threading.Tasks is referred in one of the using statements
2. change the method return type to be async Task<returntype> or simply async Task if the original method was decorated with void
3. call the asynchronous version of the Entity Framework method
4. most of the time, use await keyword just before the Entity Framework asynchronous method. We could assign the result to a Task variable first then call the await keyword a little bit later if we have some operation that can be executed right away and is not dependent on the asynchronous method's result.

Below are a few simple examples:
- an example of a method that does not return anything
// original synchronous method
public void Insert(Person person)
{
 _context.Person.Add(person);
 _context.SaveChanges();
}

// the async version
public async Task InsertAsync(Person person)
{
 _context.Person.Add(person);
 await _context.SaveChangesAsync();
}

- an example of a method returning a value
// original synchronous method
public int GetTotal()
{
    return _context.Person.Count();
}

// the async version
public async Task<int> GetTotalAsync()
{
    return await _context.Person.CountAsync();
}

- an example that shows using await a little bit later:
// original synchronous method
public int GetTotalNumber()
{
    var result = _context.Person.Count();

    DoSomeOtherOperation();

    return result;
}

// the async version
public async Task<int> GetTotalNumberAsync()
{
    var result = _context.Person.CountAsync(); // use await a little bit later

    // do non-related operation to the result above
    DoSomeOtherOperation();

    return await result;
}

On the next post we will see these concepts in more details.

Monday 18 May 2015

Using When, All, Then and Reject functions of $q Service

We will see how to use when, all, then and reject functions of the AngularJS $q service. To learn the basic usage of $q, please see my previous post.

$q.when
$q.when() can be used to wrap an object or function if we are not sure whether it returns a promise or not. If we wrap a value object or a value returned function, the value will be passed as a result argument to the next function. When we wrap a function, the when() method will ensure that the function is executed first before going to the next one.

Below are some code examples:
$q.when('aaa').then(function(result) {
    alert(result);
})

var vm = this;
vm.chars = '';

$q.when(_test()).then(function(){
 vm.chars = vm.chars + 'END'
})

_test = function() {
 for (i = 0; i <= 10000; i++) {
   vm.chars = vm.chars + '.'
 }
}


$q.all
$q.all() is used to combine promise returned functions and only continue to progress further after all of the functions complete successfully. If one of the functions fails, immediately as soon as $q.all() gets a rejected promise from one of the functions, it will end the execution and pass forward to an error callback if there is any.
vm.numbers = '';    
_promiseFunction = function(x) {
 var deferred = $q.defer();

 if (x > 0) {
   deferred.resolve(x * 100);
 } else {
   deferred.reject(x + " is smaller than 0")
 }

 return deferred.promise;
}
 
var first = _promiseFunction(1);
var second = _promiseFunction(5);
var third = _promiseFunction(10);
var four = _promiseFunction(-1);
var five = _promiseFunction(-10)

$q.all([first, second, third /*, four, five*/]).
then(function(results){
  console.log(results.length);
  for(i=0; i < results.length; i++) {
    vm.numbers = vm.numbers + ' ' + results[i];
  }
 },
 function(errors){
  // if there is any error in the sequence, the success callback will not be called
  console.log(errors);
 })


$q.then
$q.then() is useful for executing asynchronous functions (or blocks of codes) sequentially in a chain. If the function inside a then() does not return a promise, it will be wrapped as a resolved promise. Otherwise the resolved or rejected promise will be passed forward.

_promiseFunction(5).then(
 function() { alert('aaa')}
).then(
 function() { alert('bbb');}
).then(
 function() {alert('ccc');}
);

_promiseFunction(5).then(
 function() { return $q.reject('failed')}
).then(
 function(){ alert('result success')},
 function(){ alert('result fail')}
)

Note also that if we return a non-promise value in the error callback inside then(), this will be treated as a resolved promise. So we need to be careful when handling error if our intention is to pass the error forward to the next function.
$q.reject().then(
 // success
 function() {},
 // error
 function(error) {
   return 'i got the error'
 }
).then(
 //success
 function() {
   alert('success');
 },
 // error
 function() {
   alert('error')
 }
)

$q.reject
Last thing, we have $q.reject() that is useful as a quick way to create then send a rejected promise (with a value optionally) to the next function in a chain. For example, in a chain of multiple then(). We can see this in the last two examples.

See the examples in Plunker.

Friday 15 May 2015

Setting Up One to Many Relationship with Fluent API in Code First

Let's say that we would like to have a one to many relationship between two tables, e.g. User and Article. A User can have many Articles. Below are two ways of how we could specify the models and relationship configuration with Fluent API.

1. Without Having Foreign Key Property in Model
public class Article 
{
 public int Id { get; set; }

 [StringLength(150)]
 [Required]
 public string Title { get; set; }

 [Required]
 public string Description { get; set; }

 [StringLength(500)]
 [Required]
 public string Url { get; set; }

 #region navigation properties
 public virtual User Submitter { get; set; }
 #endregion
}


public class User 
{
 public int Id { get; set; }
 
 [StringLength(100)]
 [Required]
 public string Firstname { get; set; }
 
 [StringLength(100)]
 [Required]
 public string Lastname { get; set; }

 #region navigational property
 public virtual ICollection<Article> Articles { get; set; }
 #endregion
}


protected override void OnModelCreating(DbModelBuilder modelBuilder)
{
 #region Article table
 modelBuilder.Entity<Article>().HasKey(t => t.Id);
 // specify the relationship between the two tables
 modelBuilder.Entity<Article>().HasRequired(t => t.Submitter).WithMany(t => t.Articles);
 #endregion

 #region User table
 modelBuilder.Entity<User>().HasKey(t => t.Id);
 #endregion
}
Before we go further, I would like to say that I prefer to use Data Annotation attributes in a model for validation purpose only for its properties. The database related configurations are done inside OnModelCreating() method.

On the codes above, we do not specify any foreign key property such as 'SubmitterId'. We do this purely in 'code first perspective' only which focuses on models and 'code' relationships between them, not their relational database relationships. So we do not worry on specifying any foreign key property here, we only specify the navigational property.

Please note as well that we do not put a [Required] attribute on the navigation property even though we always want this model to have a navigational property object (i.e. an article must have a submitter). This would create an issue for us later when we want to update an article object only without worrying about submitter. It is better to specify this rule when specifying the relationship in Fluent API.

To let Code First know the relationship we want, we put this on OnModelCreating() method:
modelBuilder.Entity<Article>().HasRequired(t => t.Submitter).WithMany(t => t.Articles);
The validation rule that the navigational property (i.e. submitter) is required is set here.

Code First will generate tables like below:


2. With Foreign Key Property in Model
If we prefer to specify foreign key property in our model, then we can do this way:
// add foreign key property to the model (Article)
public int SubmitterId { get; set; }
The advantage of doing it this way is that we can name it with any name we like.

Then on OnModelCreating() method, we write:
modelBuilder.Entity<Article>().HasRequired(t => t.Submitter).WithMany(t => t.Articles).HasForeignKey(t => t.SubmitterId);

Below are the tables and columns that will be generated:


For setting other configurations using fluent API, please see this post.

Monday 11 May 2015

MergeOptions in Entity Framework

Understanding MergeOption when using Entity Framework is important, especially when you do multiple operations of the same object within a context.

If we have codes like these ones and assume the MergeOption is applied to all operations:
// first query
var listOne = Context.Students.OrderBy(s => s.Id).Take(2).ToList();
var studentA = listOne.First();

// first update
studentA.FirstName = "Updated";


// second query
var listTwo = Context.Students.OrderBy(s => s.Id).Take(5).ToList();
var studentB = listTwo.First();

// second update
studentB.FirstName = "UpdatedB";

The four options are:
- NoTracking
Objects are maintained in a Detached state and are not tracked in the ObjectStateManager. As the object is not tracked, object cannot be updated. On the second query, EF will get fresh records from the data source, including the ones that have been retrieved by query one then populate listTwo.

- AppendOnly (default)
Objects that do not exist in the context are attached to the context. Object that is already tracked in the context, will not be overwritten when EF retrieves records again from data source. On the second query, only three other student objects are retrieved from data source.
If there's change in values in the data source between first and second queries, all tracked objects in the context will not have the latest values from data source after retrieving on the second query.

- PreserveChanges
Similar like AppendOnly, but will replace unmodified objects (objects with EntityState Unchanged) from data source. On the second query, the other student object from first query and three new ones will be retrieved from data source.
If there's change in values in the data source between first and second queries, modified objects in the context will not have the latest values from data source after retrieving on the second query. The unmodified objects will be refreshed and have latest values from data source.

- OverwriteChanges
Objects will be replaced with fresh records from data source. If a change is made and not committed to data source yet, when retrieving from data source again the change will be lost and replaced with the retrieved value from data source. In our example, the first update is lost when second query is made. All objects will then reset to Unchanged state.
If there's change in values in the data source between first and second queries, all objects in the context will have the latest values from data source after retrieving on the second query.


References:
https://docs.microsoft.com/en-us/dotnet/api/system.data.objects.mergeoption?view=netframework-4.8
https://community.dynamics.com/crm/b/develop1/posts/do-you-understand-mergeoptions


Wednesday 29 April 2015

AngularJS Custom Validator Example - Comparing Two Dates

Below is an example of AngularJS custom validator to compare an end date with a start date to make sure that the end date is equal or bigger than the start date. To see basic usage of AngularJS validation, please see my previous post.

HTML codes:
<!DOCTYPE html>
<html>

  <head>
    <script src="https://code.angularjs.org/1.4.0-beta.6/angular.js"></script>
    <script src="https://code.angularjs.org/1.3.15/angular-messages.js"></script>
    <script src="script.js"></script>
  </head>

  <body ng-app="validationExample">
    <div ng-controller="MyCtrl as vm">
      <form name="myForm" novalidate="" ng-submit="vm.submitted(myForm, vm.input)">
        <span class="input-label">Start Date</span> 
        <input type="date" name="startDate" ng-model="vm.input.startDate" required />
        <span ng-messages="myForm.startDate.$error" ng-messages-include="errors-template.html"></span>
        <br />       
        <span class="input-label">End Date</span> 
        
        <input type="date" name="endDate" ng-model="vm.input.endDate" start-date="{{vm.input.startDate.yyyymmdd()}}" compare-with-start-date />
        <span ng-messages="myForm.endDate.$error" ng-messages-include="errors-template.html"></span>
        <br />             
        <button>submit</button>
      </form>
    </div>
    
    <!-- error messages template -->
    <script id="errors-template.html" type="text/ng-template">
        <span ng-message="required">* required!</span>
        <span class="form-error" ng-message="checkEndDate">* end date cannot be earlier than start date</span>
    </script>
  </body>

</html>

JavaScript codes:
var myApp = angular.module('validationExample', ['ngMessages'])

myApp.controller('MyCtrl', [function () {
    var vm = this;
    vm.submitted = function(form, input) {
      if(form.$valid) {
        alert('submitted');
      }
    }
} ]);

myApp.directive("compareWithStartDate", function () {
    return {
        restrict: "A",
        require: "?ngModel",
        link: function (scope, element, attributes, ngModel) {
            validateEndDate = function (endDate, startDate) {
                if (endDate && startDate) {
                    startDate = new Date(startDate);
                    startDate.setHours(0, 0, 0, 0);
                    endDate = new Date(endDate);
                    endDate.setHours(0, 0, 0, 0);
                    return endDate >= startDate;
                }
                else {
                    return true;
                }
            }

            // use $validators.validation_name to do the validation
            ngModel.$validators.checkEndDate = function (modelValue) {
                var startdate = Date.parse(attributes.startDate);
                var enddate = modelValue;
                return validateEndDate(enddate, startdate);
            };
            
            // use $observe if we need to keep an eye for changes on a passed value
            attributes.$observe('startDate', function (value) {
                var startdate = Date.parse(value);
                var enddate = Date.parse(ngModel.$viewValue);
                
                // use $setValidity method to determine the validation result 
                // the first parameter is the validation name, this name is the same in ng-message template as well
                // the second parameter sets the validity (true or false), we can pass a function returning a boolean
                ngModel.$setValidity("checkEndDate", validateEndDate(enddate, startdate));
            });
        }
    };
});


// function to parse date time object into yyyy-mm-dd format string
Date.prototype.yyyymmdd = function () {
    var yyyy = this.getFullYear().toString();
    var mm = (this.getMonth() + 1).toString(); // getMonth() is zero-based         
    var dd = this.getDate().toString();

    return yyyy + '-' + (mm[1] ? mm : "0" + mm[0]) + '-' + (dd[1] ? dd : "0" + dd[0]);
};

See the example in Plunker.

Thursday 16 April 2015

Form Validation in Ionic or AngularJS

On this post we will see how to do form validation in AngularJS or Ionic framework. At the moment, Ionic framework does not have its own validation features and relies on the underlying framework.

Basic Usage with Built-In Validators
To begin, first we need to make sure that we have a reference to angular.js file. Then we need to do the following steps:
- give a name to our form
- put novalidate="" attribute on the form
So we should have something like this on our form:
<form name="myForm" novalidate="" ng-submit="" >
 . . .
</form>
- add a unique name to each input field
- add validation attributes that we need on the input fields. AngularJS provides some validation directives such as these; required, pattern, minlength, maxlength, min and max. It also has basic built-in validators for these input types; text, number, url, email and date.
An example on an input field:
<input type="text" name="name" ng-model="vm.input.name" required />
- add an error message to be displayed for each validator checking the corresponding property name on input field's $error object in conditional statement like ng-if or ng-show. Properties under $error object with the same names as the validators' names exist for us to use. The properties are on this format; formName.fieldName.$error.builtInValidatorName. For example:
<span ng-show="myForm.name.$error.required == true">* required</span>
- on a method that is called in ng-submit, check whether the form is valid using formName.$valid before doing any action

Below is a complete example:
<!-- HTML page -->
<body ng-app="validationExample">
    <div ng-controller="MyCtrl as vm">
      <form name="myForm" novalidate="" ng-submit="vm.submitted(myForm, vm.input)">
        <div>
          <input type="text" name="name" ng-model="vm.input.name" required>
          <span ng-show="myForm.name.$error.required == true">test: * required</span>
        </div>
        <button>submit</button>
      </form>
    </div>
</body>

// JavaScript codes
var myApp = angular.module('validationExample', [])

myApp.controller('MyCtrl', [function () {
    var vm = this;
    vm.submitted = function(form, input) {
      if(form.$valid) {
        // post the form
        . . .
      }
    }
} ]);
See these codes on Plunker.


Creating Custom Validator
If we would like to create a custom validator, we would need to do these in addition of the above steps:
- create a directive
- on the directive's link function, use the new AngularJS $validators object on ngModel controller to do the validation. We need to create a function property on ngModel.$validators. By doing so, we register the function as a new validation rule. Each time the model changes, the validation rule is invoked. For example:
link: function(scope, element, attributes, ngModel) {
 ngModel.$validators.wrongInitial = function(modelValue) {
   . . .
 };
}
A corresponding property on input field's $error object is also created that can be used for checking validity.
- similar like in using built-in validator, we need to add an error message to be displayed by checking the newly created corresponding property on the input field's $error object:
<span ng-show="myForm.name.$error.wrongInitial == true">* must start with letter r</span>

Additional codes to be added from the first example:
<!-- HTML page -->
<input type="text" name="name" ng-model="vm.input.name" start-with-r />
<span ng-show="myForm.name.$error.wrongInitial == true">* must start with letter r</span>

// JavaScript codes
myApp.directive("startWithR", function() {
    return {
      restrict: "A",
      require: "?ngModel",
      link: function(scope, element, attributes, ngModel) {
        ngModel.$validators.wrongInitial = function(modelValue) {
          if (modelValue) {
            return modelValue.charAt(0).toUpperCase() == 'R';
          }
          else {
            return true;
          }
        };
      }
    };
});
See a complete example on Plunker.


Using ngMessages to Display Error Messages
In the recent version of AngularJS, started with version 1.3, there is a new feature that we could use to display messages including form error messages. To use this, we need to:
- include a reference to angular-messages.js file in our page
- inject ngMessages module to our AngularJS app
var myApp = angular.module('validationExample', ['ngMessages'])
- if there are only a few fields to be validated, we could specify each error message for each field like this:
<!-- use ng-messages with each field's $error object in this format; formName.fieldName.$error -->
<div ng-messages="myForm.name.$error" >  
        <!-- specify an error message for each validator -->
 <span ng-message="required">Name is required!</span>
 <span ng-message="wrongInitial">Name must start with letter r</span>
</div>
- however if we know that we are going to repeat this multiple times, we could use a template instead:
<!-- create a template by using script tag with type="text/ng-template" and give an Id -->
<script id="errors-template.html" type="text/ng-template" >  
        <!-- specify an error message for each validator -->
 <span ng-message="required">* required!</span>
 <span ng-message="wrongInitial">* must start with letter r!</span>
</script>
Then use the template to display error message(s) on each field:
<!-- use ng-messages with each field's $error object and ng-messages-include referring to the template Id -->
<span ng-messages="myForm.name.$error" ng-messages-include="errors-template.html" />
See the complete example on Plunker.


References:
Working with Validators and Messages in AngularJS
Validation in Ionic Framework Apps with ngMessages

Friday 27 March 2015

How to Pull File from an Android App

The other day when I tested my Apache Cordova based app, I tried to get a file from my Android phone to test that the file was created correctly by the app. I wanted to copy the file to a location somewhere in my Windows based desktop. Below are the steps of how I do this:
- open a command prompt
- enter 'adb shell', you might need to run this inside a folder that has adb.exe if that is not accessible globally
- enter 'run-as    your.application.name'
- enter 'chmod 777    targeted_File_Path' in order to give full access to the file
So after entering these commands, the command prompt would look like this:
C:\Users\Me>adb shell
shell@zara:/ $ run-as your.application.name
run-as your.application.name
shell@zara:/data/data/your.application.name $ chmod 777 /data/data/your.application.name/files/filename.jpg
data/data/your.application.name/files/filename.jpg                   <
shell@zara:/data/data/your.application.name $ 
- quit the adb shell or open a new command prompt window
- enter 'adb pull    targeted_File_Path    destination_Desktop_Folder'
On command prompt, it will be something like:
C:\Users\Me>adb pull /data/data/your.application.name/files/filename.jpg c:/DestinationDirectory
2097 KB/s (19335 bytes in 0.009s)


References:
http://stackoverflow.com/questions/13006315/how-to-access-data-data-folder-in-android-device
http://www.codeproject.com/Articles/825304/Accessing-internal-data-on-Android-device

Thursday 19 March 2015

Example of Writing Image to File in Apache Cordova

Below is an example of how to writing image to a file in Apache Cordova. To have more understanding of basic file operations, please see my previous post.
window.resolveLocalFileSystemURL(my_Directory_Path,
function (dirEntry) {
 dirEntry.getFile(path_Of_File_To_Be_Written, { create: true }, 
  // getFile() success
  function (fileEntry) {
   fileEntry.createWriter(
    // createWriter() success
    function (fileWriter) {
     fileWriter.onwriteend = function (e) {
      . . .
     };

     fileWriter.onerror = function (e) {
      . . .
     };

     fileWriter.write(dataURIToBlob(getBase64Image(image_To_Be_Written, "image/jpeg")));
     // or if we already have a canvas
     //fileWriter.write(dataURIToBlob(canvas.toDataURL("image/jpeg")));
    }, 
    // createWriter() error
    function (error) {
     . . .
    }
   );
  },
  // getFile() error
  function (error) {
   . . .
  }
 );
});

A function to convert an image's base-64 encoded data to Blob type (this is taken from http://stackoverflow.com/questions/12391628/how-can-i-upload-an-embedded-image-with-javascript):
function dataURIToBlob(dataURI) {
 // serialize the base64/URLEncoded data
 var byteString;
 if (dataURI.split(',')[0].indexOf('base64') >= 0) {
  byteString = atob(dataURI.split(',')[1]);
 }
 else {
  byteString = unescape(dataURI.split(',')[1]);
 }

 // parse the mime type
 var mimeString = dataURI.split(',')[0].split(':')[1].split(';')[0]

 // construct a Blob of the image data
 var array = [];
 for (var i = 0; i < byteString.length; i++) {
  array.push(byteString.charCodeAt(i));
 }
 return new Blob(
  [new Uint8Array(array)],
  { type: mimeString }
 );
}
Also a function to get base-64 encoded data from an image:
// type is either "image/png" or "image/jpeg"
function getBase64Image(img, type) {
    // create an empty canvas element
    var canvas = document.createElement("canvas");
    canvas.width = img.width;
    canvas.height = img.height;

    // copy the image contents to the canvas
    var ctx = canvas.getContext("2d");
    ctx.drawImage(img, 0, 0);

    // get the base-64 encoded data
    var dataURL = canvas.toDataURL(type);
 // toDataURL() actually has two optional parameters:
 // - type. The default value is 'image/png'.
 // - jpegQuality. A decimal value ranging from 0 to 1 to determine the quality of the data to be generated from a jpeg type image.
 //   The default value is browser dependant.

    return dataURL;
}

Monday 16 March 2015

Examples of File Operations in Apache Cordova

To be able to do any operation with directory/file in Apache Cordova, we need to access and get hold of the directory/file entry first. Then only after that we will be able to do any directory/file operation. This could be a very different approach from other frameworks that we have used before in dealing with file and file system.


Creating and Writing File
Let start with an example to create and write a file:
window.resolveLocalFileSystemURL(cordova.file.dataDirectory, function (dirEntry) {
 console.log("got directory entry", dirEntry);
 dirEntry.getFile("myFilename.txt", { create: true }, 
  // getFile() success
  function (fileEntry) {
   console.log("got file entry", fileEntry);
   fileEntry.createWriter(
    // createWriter() success
    function (fileWriter) {
     fileWriter.onwriteend = function (e) {
      console.log('write is successful');
      . . .
     };

     fileWriter.onerror = function (e) {
      console.log('write is failed', e);
      . . .
     };

     var blob = new Blob(['. . . some text . . .'], { type: 'text/plain' });
     fileWriter.write(blob);
    },
    // createWriter() error
    function (error) {
     . . .
    }
   );
  },
  // getFile() error
  function (error) {
   . . .
  }
 );
});

In the example above, we use resolveLocalFileSystemURL() function to get a directory or file entry from a directory/file system path (i.e. cordova.file.dataDirectory). resolveLocalFileSystemURL() has two parameters:
- the first parameter is a directory or file path
- the second one is the callback function to be executed once it succeed. A directory or file reference entry object is passed to the callback function.

Once we have hold of the file or directory entry object, we can do a number of operations such as creating, writing, reading, copying, moving, renaming or deleting the file. In this case, we want to create a new file and write into it. To do this, we need to call getFile() function first. The function has four parameters:
- the filename or file path
- function options (optional parameter). It has two properties with boolean values, namely; create and exclusive. create: true will create a file if it does not exist. To make the function throws an error if the file exists, set exclusive: true.
- on success callback function, passing a file reference entry object
- on error callback function (optional parameter), an error object is passed to the callback
Then after we get the file entry object, we call createWriter() function that will create a file writer object once successful. Next we call its write() function. The file writer object also has onwriteend() and onerror() callback functions.


Reading File
window.resolveLocalFileSystemURL(myFilePath, function (dirEntry) {
 fileEntry.file(
  // success
  function(file) {
     var reader = new FileReader();

     reader.onloadend = function(e) {
       console.log('file is read');
       . . .
     };

     reader.readAsText(file);
  }, 
  // error
  function (error) {
    . . .
  }
 );
});
In the example, we see that after we get a file reference entry object, we use file() method in order to create a file object of the intended file to be passed to FileReader readAsText() function.


Deleting File
window.resolveLocalFileSystemURL(myFilePath, 
 function (fileEntry) { 
  fileEntry.remove(
   // success
   function () { 
    console.log('file is removed'); 
    . . .
   }, 
   // error
   function (error) {
    . . .
   }
  ); 
 } 
); 
In this last example, we call file entry object's remove() function to delete a file.

Thursday 5 March 2015

Cropping Image with JavaScript and Canvas

Below is an example of how to crop image using JavaScript and HTML Canvas element.
var canvas = document.createElement('canvas');
canvas.width = 150;
canvas.height = 150;
//var canvas = document.getElementById('myCanvas');  // create a new canvas or use the existing one in document

var context = canvas.getContext('2d');

var sourceImg = new Image();

sourceImg.onload = function () {    // make sure the image is loaded first before cropping it

 context.drawImage(sourceImg, source_starting_x_coord, source_starting_y_coord, 
  width_to_be_cropped_from_source_coord, height_to_be_cropped_from_source_coord, 
  starting_x_coord_on_destination_canvas, starting_y_coord_on_destination_canvas, 
  width_of_cropped_image_to_put_on_canvas, heigth_of_cropped_image_to_put_on_canvas);
 //context.drawImage(sourceImg, 0, 50, 150, 150, 0, 0, 150, 150);

 // display or do anything we like with the result
 //imageDisplay = canvas.toDataURL();

}

sourceImg.src = toBeCroppedImageSource;  // can be an image url or base-64 encoded data

Wednesday 25 February 2015

Cordova Build Fails with Exit Code 2 and 8

When building or debugging an Android app using Apache Cordova and Visual Studio, if you encounter this kind of error below:
Could not create the Java Virtual Machine. C:\...\MyApp\EXEC 1 1 MyApp 
A fatal exception has occurred. Program will exit. C:\...\MyApp\EXEC 1 1 MyApp 
C:\...\MyApp\bld\Debug\platforms\android\cordova\build.bat: Command failed with exit code 2 C:\...\MyApp\EXEC 1 1 MyApp 
The command ""C:\Users\Me\AppData\Roaming\npm\node_modules\vs-mda\vs-cli" build --platform "Android" --configuration "Debug" --projectDir . --projectName "MyApp" --language "en-US" --buildServerUrl "" --buildTarget "AndroidDevice"" exited with code 8. C:\Users\Me\AppData\Roaming\npm\node_modules\vs-mda-targets\Microsoft.MDA.targets 99 5 MyApp
You can try to kill Android Debug Bridge process using task manager or command prompt. To do the first way, open Windows Task Manager (ctrl + shift + esc), find adb.exe and then right click and select 'End Process Tree'. Otherwise using command prompt, type adb kill-server and adb start server commands. For example, in my environment:
C:\Users\Me\AppData\Local\Android\android-sdk\platform-tools\adb kill-server
C:\Users\Me\AppData\Local\Android\android-sdk\platform-tools\adb start server
After that, try to build or debug again. If it is still not good then restart Visual Studio.

If you would like to try other ways before restarting Visual Studio, you can try these steps as well:
- close the emulator if you are using emulator
- clean the build files in Visual Studio using 'Clean Solution'
- if still there are files under 'My_App_Name\bld\Debug\platforms' folder then delete those manually
- then try to rebuild or start debugging again

Wednesday 11 February 2015

Handling Exceptions in ASP.NET MVC Application

There are several ways to handle uncaught exceptions in ASP.NET MVC. We could use the default HandleErrorAttribute filter, extend the filter, create our own error filter, override OnException method in controller or use Application_Error method in global.asax.


Using Default MVC Error Handler
By default an MVC project applies HandleErrorAttribute filter globally in global.asax.
public static void RegisterGlobalFilters(GlobalFiltersCollection filters)
{
    filters.Add(new HandleErrorAttribute());
}
It returns the default error view (Error.cshtml) created inside Views\Shared folder.

To have this error handler working, CustomErrors must be set to 'On' in web.config:
<customErrors mode="On">
</customErrors>


Using HandleErrorAttribute Filter in Controller or Action
If we only want to apply the HandleError filter in some controllers or actions, then we need to remove HandleErrorAttribute filter addition in RegisterGlobalFilters method in global.asax. Then apply the filter on specific controllers or actions only.

We can simply use this one:
[HandleError]
This will handle all possible errors it could catch and show the default error view (Error.cshtml) located inside Views\Shared folder.

Otherwise we can specify what type of error to be handled and what view to be displayed. For example:
[HandleError(ExceptionType=typeof(ArgumentException), View="ArgumentError")]
We can also stack these filters to handle different types of error on controllers or actions.

This filter only catches errors originated from inside controller actions and other filters applied to them. It also only handles HTTP 500 Internal Server error. The filter does not do much. After catching errors, it will only show the error page.

Apart from this filter, if we want to catch other than HTTP 500 error, we can set the customErrors in the config file for a particular view to be loaded when the error happens. This is commonly used for HTTP 404 Not Found error:
<customerrors mode="On">
 <error statuscode="404" redirect="~/Error/PageNotFound">
 </error>
</customerrors>


Extending HandleErrorAttribute Filter
By extending this filter, we can add more capabilities such as to log error and handle errors generated from AJAX requests. Below is an example:
public class ExtendedHandleErrorAttribute : HandleErrorAttribute
{
    public override void OnException(ExceptionContext filterContext)
    {
        // if exception is handled already
        if (filterContext.ExceptionHandled || !filterContext.HttpContext.IsCustomErrorEnabled)
        {
            return;
        }

        // pass other HTTP exceptions to global application error handler
        if (new HttpException(null, filterContext.Exception).GetHttpCode() != 500)
        {
            return;
        }

        if (!ExceptionType.IsInstanceOfType(filterContext.Exception))
        {
            return;
        }

        // if the request is AJAX then return JsonResult else normal view
        if (filterContext.HttpContext.Request["X-Requested-With"] == "XMLHttpRequest" || ((filterContext.HttpContext.Request.Headers != null) && (filterContext.HttpContext.Request.Headers["X-Requested-With"] == "XMLHttpRequest")))
        {
            filterContext.Result = new JsonResult
                    {
                        JsonRequestBehavior = JsonRequestBehavior.AllowGet,
                        Data = new
                        {
                            error = true,
                            message = filterContext.Exception.Message
                        }
                    };
        }
        else
        {
            base.OnException(filterContext);
        }

        // log the error
        //. . .

    }
}
In this example, we are just handling HTTP 500 error (Internal Server error) to comply with HTTP standards. Other errors will be passed to global application error handler (Application_Error() method). If you'd like to return a different view, please see that part of codes in the next example (creating custom error filter).


Creating Custom Error Filter
If extending HandleErrorAttribute above is not enough then we can create our own custom error filter. The filter class will inherit from FilterAttribute and IExceptionFilter.
public class CustomHandleErrorAttribute : FilterAttribute, IExceptionFilter
{
    public void OnException(ExceptionContext filterContext)
    {
        // if exception is handled already
        if (filterContext.ExceptionHandled || !filterContext.HttpContext.IsCustomErrorEnabled)
        {
            return;
        }

        // pass other HTTP exceptions to global application error handler
        if (new HttpException(null, filterContext.Exception).GetHttpCode() != 500)
        {
            return;
        }

        /*if (!ExceptionType.IsInstanceOfType(filterContext.Exception))
        {
            return;
        }*/

        // if the request is AJAX then return JsonResult else ViewResult
        if (filterContext.HttpContext.Request["X-Requested-With"] == "XMLHttpRequest" || ((filterContext.HttpContext.Request.Headers != null) && (filterContext.HttpContext.Request.Headers["X-Requested-With"] == "XMLHttpRequest")))
        {
            filterContext.Result = new JsonResult
                        {
                            JsonRequestBehavior = JsonRequestBehavior.AllowGet,
                            Data = new
                            {
                                error = true,
                                message = filterContext.Exception.Message
                            }
                        };
        }
        else
        {
            // if we want to pass detailed error info to the view
            var controllerName = (string)filterContext.RouteData.Values["controller"];
            var actionName = (string)filterContext.RouteData.Values["action"];
            var model = new HandleErrorInfo(filterContext.Exception, controllerName, actionName);

            filterContext.Result = new ViewResult
            {
                ViewName = "theViewName",
                ViewData = new ViewDataDictionary<HandleErrorInfo>(model),
                TempData = filterContext.Controller.TempData
            };
        }

        // log the error
        //. . .

        filterContext.ExceptionHandled = true;
        filterContext.HttpContext.Response.Clear();
        filterContext.HttpContext.Response.StatusCode = 500;

        filterContext.HttpContext.Response.TrySkipIisCustomErrors = true;
    }
}
The example codes handle AJAX and normal requests, log error and return a particular view for a normal request.


Overriding OnException Method in Controller
Another way to handle error in ASP.NET MVC application is by overriding OnException method in controller. However, like the HandleErrorAttribute filter above, this method only catches errors that happen inside a controller. Other errors such as data binding or route errors will not be caught. We could also return a view by assigning a ViewResult to its ExceptionContext object's Result property. Below is an example:
protected override void OnException(ExceptionContext context)
{
    // pass other errors to global application error handler
    if (context.Exception is InvalidOperationException)
    {
        // do some error logging
        //. . .

        // if we want to pass detailed error info to the view
        var controllerName = (string)context.RouteData.Values["controller"];
        var actionName = (string)context.RouteData.Values["action"];
        var model = new HandleErrorInfo(context.Exception, controllerName, actionName);

        var result = new ViewResult
                {
                    ViewName = "theViewName",
                    ViewData = new ViewDataDictionary(model),
                    TempData = context.Controller.TempData
                };
        context.Result = result;

        // configure the response object
        context.ExceptionHandled = true;
        context.HttpContext.Response.Clear();
        context.HttpContext.Response.StatusCode = 500;
        context.HttpContext.Response.TrySkipIisCustomErrors = true;
    }
}


Using Application Global Error Handler
Lastly, we can also use Application_Error() method in global.asax. This method catches all unhandled errors and is the last resort before the yellow error screen. Many developers only use this method alone to handle all kind of errors in the application. When there is a need to handle errors (or some specific errors) at controller or action method level then the other error handlers mentioned above can be used.

Below is an example of using Application_Error() method and its related error controller and view to catch errors:
global.asax Application_Error() method:
protected void Application_Error(object sender, EventArgs e)
{
    HttpContext httpContext = ((MyApplicationName)sender).Context;
    Exception exception = Server.GetLastError();

    if (httpContext.Request["X-Requested-With"] == "XMLHttpRequest" || ((httpContext.Request.Headers != null) && (httpContext.Request.Headers["X-Requested-With"] == "XMLHttpRequest")))
    {
        // handle AJAX request

        httpContext.ClearError();
        Response.StatusCode = 500;
        Response.ContentType = "application/json";
        Response.StatusDescription = "my custom status description";    // => Response.StatusDescription maps to jqXHR or XMLHttpRequest.statusText

        // => Response.Write() maps to jqXHR or XMLHttpRequest.responseText  
#if DEBUG
        Response.Write(new System.Web.Script.Serialization.JavaScriptSerializer().Serialize(new
        {
            errorMessage = exception.ToString()
        }));
        //Response.Write(exception.ToString());
#else
        Response.Write("an application error has occurred");
#endif
    }
    else
    {
        // non AJAX request

        IController errorController = new MyWebProject.Controllers.ErrorController();
#if DEBUG
        {
            // get information to be passed to view as model
            string currentController = string.Empty;
            string currentAction = string.Empty;
            RouteData currentRouteData = RouteTable.Routes.GetRouteData(new HttpContextWrapper(httpContext));
            if (currentRouteData != null)
            {
                if (currentRouteData.Values["controller"] != null && !String.IsNullOrEmpty(currentRouteData.Values["controller"].ToString()))
                {
                    currentController = currentRouteData.Values["controller"].ToString();
                }

                if (currentRouteData.Values["action"] != null && !String.IsNullOrEmpty(currentRouteData.Values["action"].ToString()))
                {
                    currentAction = currentRouteData.Values["action"].ToString();
                }
            }

            ((Controller)errorController).ViewData.Model = new HandleErrorInfo(exception, currentController, currentAction);
        }
#else
        {
            // only show a message
            ((Controller)errorController).ViewData.Model = "error message . . .";
        }
#endif

        string action = "Error";

        if (exception is HttpException)
        {
            // get the action for different error codes
            switch (((HttpException)exception).GetHttpCode())
            {
                case 404:
                    action = "NotFound";
                    break;

                // other errors
            }
        }

        httpContext.ClearError();
        httpContext.Response.Clear();
        httpContext.Response.StatusCode = exception is HttpException ? ((HttpException)exception).GetHttpCode() : 500;

        // avoid IIS7 getting involved
        httpContext.Response.TrySkipIisCustomErrors = true;

        // execute the error controller
        RouteData routeData = new RouteData();
        routeData.Values["controller"] = "Error";
        routeData.Values["action"] = action;
        //IController errorController = new NSWHealth.ICPBS.Web.Controllers.ErrorController(); // for readability only, this is already done above 
        //((Controller)errorController).ViewData.Model = new HandleErrorInfo(exception, currentController, currentAction); // for readability only, this is already done above
        errorController.Execute(new RequestContext(new HttpContextWrapper(httpContext), routeData));
    }
}

error controller:
public class ErrorController : Controller
    {
        public ActionResult Error()
        {
            return View();
        }

        public ViewResult NotFound()
        {
            //Response.StatusCode = 404;  //could be set to 200 as well
            return View("NotFound");
        }
    }

error view:
@{
    ViewBag.Title = "Error";
    Layout = "~/Views/Shared/_Layout.cshtml";
}

<h2>Error</h2>
<div>
    @if (Html.IsDebug())
    {
        <div>
            <p>
                <b>Exception:</b> @Model.Exception.Message<br />
                <b>Controller:</b> @Model.ControllerName<br />
                <b>Action:</b> @Model.ActionName
            </p>
            <div style="overflow:scroll">
                <pre>
                @Model.Exception.StackTrace
                </pre>
            </div>
        </div>
    }
    else
    {
        <div style="min-height:460px">
            An error has occurred: @Model 
        </div>
    }
</div>


References and further reading:
Handling Errors Effectively in ASP.NET MVC
Exception Handling in ASP.NET MVC
Exception Handling in MVC

Friday 6 February 2015

IsDebuggingEnabled, #if DEBUG, Conditional("DEBUG") and Debugger.IsAttached

HttpContext.IsDebuggingEnabled checks the <compilation debug="..."/> value inside <system.web> node in web.config.
if (HttpContext.Current.IsDebuggingEnabled)
{
    // if debug mode is enabled in web.config
    . . .
}

#if DEBUG or #if RELEASE checks for particular build configuration. Whether a build configuration uses DEBUG or RELEASE, this is defined in the project build properties (right click the project -> Properties -> Build tab).
The drawback with this is if there is a property or method declared outside being renamed (through refactoring) then the property or method called inside one of its if ... else ... conditions might not be renamed as well causing error when the build configuration is switched.
#if DEBUG
. . .
#else
. . .
#endif

The Conditional attribute helps to overcome this issue. An example:
[System.Diagnostics.Conditional("DEBUG")]
public void MyMethod()
{ 
   . . . 
}


System.Diagnostics.Debugger.IsAttached checks whether an active debugger is attached to the system.
if(System.Diagnostics.Debugger.IsAttached)
{
   . . . 
}

Friday 23 January 2015

How to Check Objects References in Visual Studio

We can use a tool in Visual Studio when debugging to check whether two objects point to the same instance. First, add the objects/variables that we want to check to Watch list. Right click one of the variables, then select Make Object ID.

After doing this, an ID will be displayed on the Value column in this format '{ID_Number#}'. At the same time, all other objects that point to the same instance will have this displayed on their values as well.

If two or more variables have the same ID number then it means that they point to the same instance.

If we rather would like to check the objects manually, we could use Object.ReferenceEquals(object1, object2) method that will return a boolean value.

Tuesday 13 January 2015

Using JavaScript Prototype for Object Oriented Approach


Prototype property
Every object in JavaScript has a prototype. This prototype can be seen by accessing __proto__ property in recent modern browsers except IE.
var n = 5;
console.log(n.__proto__);

var myObj = {};
console.log(myObj.__proto__);


Function prototype property
There is another similar term that is quite confusing in JavaScript world, it is the prototype property. This is not the real prototype property like the one above. However this is a property that is found in every function in JavaScript. I prefer to call this property; function prototype.
function Person(firstname, lastname) {
    this.firstname = firstname;
    this.lastname = lastname;
    this.fullName = function () {
        return this.firstName + ' ' + this.lastName;
    }
}
console.log(Person.prototype);

// below will yield 'undefined' because it is not a function
var n = 5;
console.log(n.prototype);

// this will be false as a function prototype is not the same as its prototype property
Person.prototype == Person.__proto__;


Creating object with new keyword
When we initialise a new object with new keyword, the object's real prototype will point to the constructor function's function prototype property.
var john = new Person('john', 'king');

// john's prototype will point to Person's function prototype property
console.log(john.__proto__ == Person.prototype)  // true
The new object will have whatever defined inside the constructor function plus access to whatever in its prototype. So if we add more properties to the constructor function's function prototype, these will be accessible by the created objects. This will be explained more in details below.

A very important rule that need to be remembered from here is:
newObject.__proto__ = TheFunction.prototype


Prototypes chain
In JavaScript, when an object property is called, if it is not found within the object, JavaScript will try to traverse up it's prototypes chain to find it. If it already reaches the root but still cannot find the property, undefined will be returned.
var animal = { name: 'animal', eats: true };

var fish = { name: 'fish', swims: true };
// set fish prototype to animal
fish.__proto__ = animal;

var tuna = { name: 'tuna', canBeCanned: true };
// set tuna prototype to fish
tuna.__proto__ = fish;

console.log(tuna.swims);
console.log(tuna.eats);
Below is the structure created (on Firebug):

As we can see tuna's prototype is fish object and fish's prototype is animal object. The text in bold are properties that are available to the containing objects.


Adding a property to a prototype chain
When we have an established prototypes chain then if we added a new property to one of the prototype objects in the chain, this new property would be accessible by the lower objects in the chain.
// based on the example above we add a new property to animal
animal.moves = true;
console.log(tuna.moves) // lower objects in the chain can access it

// we can also add a new property through a prototype link
// this example below add a new property at animal's level because we have set fish.__proto__ = animal
fish.__proto__.breathes = true;
console.log(tuna.breathes)


Using these prototype behaviours for object oriented approach
Having knowledge of prototype behaviours described above, we can implement object oriented concept in our JavaScript codes. We will also need to use function prototype and new keyword to set up relationships as the __proto__ property is not available in some browsers. As an example, we could have something like this:
function Coder() {
    this.name = 'coder';
    this.code = function () {
        return "coding now";
    }
}

function JSCoder() {
    this.name = 'JSCoder';
    this.writeSomeJSCodes = function () {
        return "writing: this.__proto__ = . . .";
    }
}

// set up the relationship
JSCoder.prototype = new Coder();
// this is saying that every newly created JSCoder object will have its prototype property points to a Coder object

var jack = new JSCoder();
// because we have set above JSCoder.prototype = new Coder()
//  and because of the rule: newObject.__proto__ = TheFunction.prototype
//  then this one below is implemented implicitly when jack is created:
//  jack.__proto__ = JSCoder.prototype  which equals to a Coder object ( new Coder() )

console.log(jack.writeSomeJSCodes());
console.log(jack.code());

// we can also add a new property to a function prototype then it will be accessible by existing child object(s)
JSCoder.prototype.debugging = function () { return 'debugging some codes' };
// this is saying that because of the rule: newObject.__proto__ = TheFunction.prototype
//  when a new JSCoder object is created: var jack = new JSCoder()
//  then this will apply: jack.__proto__ = JSCoder.prototype
//  and JSCoder.prototype has been set to a Coder object ( new Coder() )
//  so when a new property is added,
//  JSCoder.prototype is a Coder object plus the new property
//  thus jack's prototype ( jack.__proto__ ) is a Coder object plus the new property

console.log(jack.debugging());

What will happen if we modify the function prototype to point to a new object? Existing objects will not be affected, however new objects created after the modification will have their prototypes point to the new object.
// modify JSCoder function prototype to point to a new object
JSCoder.prototype = { sing: function () { return 'singing' } };
console.log(jack); // existing objects' prototypes do not change

// however new objects' prototypes will point to the new object
var jim = new JSCoder();
console.log(jim);


References and further readings:
A Plain English Guide to JavaScript Prototypes
Understanding “Prototypes” in JavaScript
Understanding JavaScript Prototypes
Prototypal inheritance
OOP in JS, Part 2 : Inheritance

Monday 5 January 2015

Implementing Asynchronous Tasks with $q in AngularJS

AngularJS has provided $q service that can be used to implement asynchronous tasks. It uses deferred objects and the promises they return to accomplish asynchronous runs.

A basic example of using $q:
function myAsyncFunc() {
  // create a deferred object
  var deferredObject = $q.defer();

  . . .

  // if for a reason, we want to cancel this task
  if (errorOccured) {
        deferredObject.reject('an error has occured');
        return deferredObject.promise;
  }

  // after the job is completed, call resolve()
  deferredObject.resolve();

  . . .

  // return the promise
  return deferredObject.promise;
}

// then on the caller
myAsyncFunc().then(
  // success (when resolve() was called)
  function() {
    alert('success')
  },
  // error (when reject() was called)
  function(reason) {
    alert('failed: ' + reason)
  }
)

We can also return an object when the task is completed. To do this, just pass the object as an argument to the resolve() function instead of nothing. Below is an example:
function myAsyncFunc() {
  var myObject = . . .
  deferredObject.resolve(myObject);
}

// then on the caller, we can use the passed object
myAsyncFunc().then(
  // success
  function(passedObj) {
    . . .
  }
);

When resolving a deferred object, we can use deep nesting functions if required. As long as the deferred object variable is accessible, this should not be an issue:
var deferredObject; // need to make sure that this deferred object variable will be accessible from inside nesting function

function myAsyncFunc() {
  // create a deferred object
  deferredObject = $q.defer();

  . . .

  nestedOne();

  // return the promise
  return deferredObject.promise;
}

function nestedOne() {
  nestedTwo();
}

function nestedTwo() {
  deferredObject.resolve();
}