Wednesday, 16 August 2023

Angular Jasmine Unit Test - Child Component with Input and Output Properties

We are going to write some unit tests for an Angular component that calls child components. Our main component template is as follow:
. . .
. . . some content of the main component . . .
. . .
<ng-container *ngFor="let id of studentIds">
  <app-student-profile [studentId]="id"  (alertEmitter)="displayAlert($event)></app-student-profile>
</ng-container>
. . .
Our child component:
<div *ngIf="student" class="studentDetails">
  <button id="btnTest" (click)="sendAlert()">send alert</button>
  <div>
    <div>Student ID</div>
    <div>{{student.studentId}}</div>
  </div>
  <div>
    <div>First Name</div>
    <div>{{student.firstName}}</div>
  </div>
  <div>
    <div>Last Name</div>
    <div>{{student.lastName}}</div>
  </div>
  <div>
    <div>Email Address</div>
    <div>{{student.email}}</div>
  </div>
</div>
The child component also has input and output properties. The input is expecting Student ID to be passed from the parent component and the output will pass a message to the parent component to be displayed.

Some of the codes from child component class:
. . .
@Input() studentId!: number;
@Output() alertEmitter: EventEmitter<string> = new EventEmitter<string>();

sendAlert(): void {
  this.alertEmitter.emit("an alert from student profile component with Student Id: " + this.studentId);
}
. . .

To test the child component, we can use ng-mocks testing library, which is popularly used for Angular testing. Our tests will look like:
describe('MainComponent', () => {
  let component: MainComponent;
  let childComponent: StudentComponent;
  let fixture: ComponentFixture<MainComponent>;

  beforeEach(async () => {

    await TestBed.configureTestingModule({
      declarations: [MainComponent, 
	                 MockComponent(StudentComponent)],
      //schemas: [NO_ERRORS_SCHEMA]
    })
    .compileComponents();

    fixture = TestBed.createComponent(MainComponent);
    component = fixture.componentInstance;
    fixture.detectChanges();
  });

  it('should create', () => {
    expect(component).toBeTruthy();
  });

  it("should have correct numbers of <app-student-profile> child component(s)", () => {
    let childComponents = fixture.debugElement.queryAll(By.directive(StudentComponent));
    expect(childComponents.length).toEqual(studentIds.length)
  })

  it("should pass right argument to child components", () => {
    let childComponents = fixture.debugElement.queryAll(By.directive(StudentComponent));
    for (var i = 0; i < component.studentIds.length; i++) {
      let childComponent: StudentComponent = childComponents[i].componentInstance;
      expect(childComponent.studentId).toEqual(component.studentIds[i]);
    }
  })
});
On line 10, we mock the child component with MockComponent().

[NO_ERRORS_SCHEMA] is also not needed in the declaration like in other approaches without using ng-mocks library.

On line 25, we use fixture.debugElement.queryAll(By.directive(CHILD_COMPONENT_NAME)) to find all child components. Notice that with the library, we can find the child component by class name (type). Other approaches need to use a fake component class or querying the html element (using By.css() function).

Line 32, we get the child component object with .componentInstance. Then we will be able to access all its properties and methods. We can check the argument passed to its input property by directly inspecting its class property.


Lastly, we need to test the output property. It will relay an event then call this function on parent component:
displayAlert(message: string): void {
  console.log(message);
}
We can test this interaction with something like:
it("should be able to catch alert from child component", () => {
  const alertMessage: string = "test alert";
  spyOn(console, 'log');
  //spyOn(component, 'displayAlert');   // if we want to test the parent component function is called
  epProfileComponent = fixture.debugElement.query(By.directive(StudentEPProfileComponent)).componentInstance;
  epProfileComponent.alertEmitter.emit(alertMessage);
  //expect(component.displayAlert).toHaveBeenCalledWith(alertMessage);   // if we want to test the parent component function is called
  expect(console.log).toHaveBeenCalledWith(alertMessage);
})
Notice on line 6, we can call the emit() function and then on line 8, check that the parent's function we want to be called is called (in our example is console.log).

Friday, 11 August 2023

Angular Jasmine Unit Test - Faking Service and its Methods

On this post, we will try to create Jasmine unit tests to fake a service and its function that is used in an Angular component.
Used Angular version is 15 and Jasmine is 4.5.0.

Our component page:
export class HomeComponent implements OnInit {
  student?: StudentWithBasicProfile;

  constructor(
    private studentService: StudentService,
    private route: ActivatedRoute) { }

  ngOnInit(): void {
    let studentId = this.route.snapshot.params['id'];

    this.studentService.getStudentBasicProfile(studentId)
      .subscribe(student => {
          this.student = student;
      });
  }  
}
This component retrieves an id from query string then call a method of a service then display the result.

Our tests look like this:
describe('HomeComponent', () => {
  let component: HomeComponent;
  let fixture: ComponentFixture<HomeComponent>;
  let studentServiceSpy: jasmine.SpyObj<StudentService>;
  let response: StudentWithBasicProfile;
  let routeId: number = 123;

  beforeEach(async () => {
    studentServiceSpy = jasmine.createSpyObj('StudentService', ['getStudentBasicProfile']);
    response = {
      studentId: routeId,
      firstName: '',
      lastName: '',
      email: '',
      mobilePhone: ''
    };
    studentServiceSpy.getStudentBasicProfile.and.returnValue(of(response));

    await TestBed.configureTestingModule({
      declarations: [HomeComponent],
      providers: [
        { provide: StudentService, useValue: studentServiceSpy },
        { provide: ActivatedRoute, useValue: { snapshot: { params: { 'id': routeId } } } }  // this one is to fake "this.route.snapshot.params['id']" code
      ]
    })
    .compileComponents();

    fixture = TestBed.createComponent(HomeComponent);
    component = fixture.componentInstance;
    fixture.detectChanges();
  });

  it('should create', () => {
    expect(component).toBeTruthy();
  });

  it("should call getStudentBasicProfile() with correct parameter and return data", () => {
    expect(studentServiceSpy.getStudentBasicProfile).toHaveBeenCalledTimes(1);
    expect(studentServiceSpy.getStudentBasicProfile).toHaveBeenCalledWith(routeId);
    expect(component.student).toEqual(response);
  });
});
On lines 4, 9, and 17, we set up a fake StudentService and its function 'getStudentBasicProfile' and set up a return value. Then on line 22, we use this fake service instead of the real service.

On line 23, we fake the query string value in route with "{ snapshot: { params: { 'id': [VALUE] } } }".

Friday, 24 March 2023

Using Entity Framework Core with Existing Database

We can use an existing database with Entity Framework Core (in this example is a MSSQL Database and EF Core 7). Say we need to create a new app that is accessing data from an established database. First we need to generate models and context class from our database. Then our codes can interact with these generated classes.

First of all, install Microsoft.EntityFrameworkCore, Microsoft.EntityFrameworkCore.Tools and Microsoft.EntityFrameworkCore.SqlServer packages to our project.

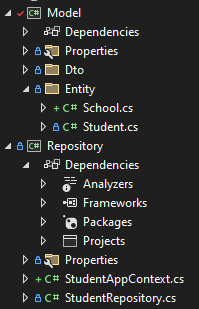
Then run Scaffold-DbContext command to generate models and context class. I would like to structure my projects like this:

To have this, I need to use some flags when running the command:
Scaffold-DbContext "Server=[SERVER_NAME];Database=[DATABASE_NAME];TrustServerCertificate=True;Trusted_Connection=True" Microsoft.EntityFrameworkCore.SqlServer -OutputDir "[MY_APP_DIRECTORY]\StudentApp\Model\Entity" -Namespace Model.Entity -Context StudentAppContext -ContextDir . -ContextNamespace Repository -Tables Student,School -Force
In my case, I use an Active Directory account that can access my database, so I use 'Server=[SERVER_NAME];Database=[DATABASE_NAME];TrustServerCertificate=True;Trusted_Connection=True'.
The flags used here:
- OutputDir - folder location where the generated model classes will be put
- Namespace - the namespace of the generated model classes
- Context - the name of the context file to be generated
- ContextDir - folder location where the context file will be put. I use '.' for current directory (I run the command from Repository project).
- ContextNamespace - namespace of the context file
- Tables - specify all table names in the database that we want to map
- Force - useful when we want to add new model(s) to be generated or simply to generate the whole thing again if we made mistake

Later when we want to add another model(s) from different table(s), we run the same command again with the new table name(s) added. For example if we want to add Teacher and Subject models:
Scaffold-DbContext "Server=[SERVER_NAME];Database=[DATABASE_NAME];TrustServerCertificate=True;Trusted_Connection=True" Microsoft.EntityFrameworkCore.SqlServer -OutputDir "[MY_WORK_DIRECTORY]\StudentApp\Model\Entity" -Namespace Model.Entity -Context StudentAppContext -ContextDir . -ContextNamespace Repository -Tables Student,School,Teacher,Subject -Force

Tuesday, 14 March 2023

.NET Core Built In Dependency Injection

.NET has built in tool for dependency injection. 'Microsoft.Extensions.DependencyInjection' library has common features needed for IoC that is usually good enough for most applications. However if you need more advanced features, consider using other DI tools.

To use, first install 'Microsoft.Extensions.DependencyInjection' package in our project.

To register the interfaces and objects, use either AddTransient(), AddScoped() or AddSingleton() methods. Their lifetimes are:
  • AddTransient - new instance is created each time requested
  • AddScoped - new instance is created per client request/session
  • AddSingleton - created once only through application life, subsequent requests will access the same instance
To understand the lifetimes better, please check this article .

Then we use GetService() method to get an instance.

An example of how to use the tool in a unit test:
[TestClass]
public class ExampleTest
{
    private readonly IStudentRepository studentRepository;

    public ExampleTest()
    {
        var services = new ServiceCollection();
        services.AddTransient<IStudentRepository, StudentRepository>();

        var serviceProvider = services.BuildServiceProvider();

        studentRepository = serviceProvider.GetService<IStudentRepository>();
		
		. . .
    }
}

To use it in different projects, we can create an extension method of IServiceCollection in the particular project. For example, in service project:
public static class IServiceCollectionExtension
{
	public static IServiceCollection AddServicesConfiguration(this IServiceCollection services)
	{
		services.AddTransient<IStudentService, StudentService>();
		return services;
	}
}
and in repository project:
public static class IServiceCollectionExtension
{
	public static IServiceCollection AddRepositoriesConfiguration(this IServiceCollection services)
	{
		services.AddTransient<IStudentRepository, StudentRepository>();
		return services;
	}
}
Some people like to do this approach but then a project that wants to use the extension method(s) needs to directly reference the other project(s). For example; a web project will need to reference service and repository projects.

Personally, I prefer to create a bootstrap project that contains all DI mappings and has references to all projects needed. Then a project just need to reference the bootstrap project.

In this example, the WebAPI project just need to reference Bootstrap project, not Service and Repository projects.

All DI configurations are in one place:
public static class BootstrapConfig
{
	public static IServiceCollection RegisterRepositories(this IServiceCollection services)
	{
		services.AddTransient<IStudentRepository, StudentRepository>();
		return services;
	}

	public static IServiceCollection RegisterServices(this IServiceCollection services)
	{
		services.AddTransient<IStudentService, StudentService>();
		return services;
	}
}

Monday, 20 February 2023

User Authentication with AWS Cognito with Web API Backend and Frontend Web
Part 3 - Authentication between frontend and Web API backend

This is the last part of the series of setting up a simple Angular frontend web app with ASP.NET Core Web API backend (.NET 5.0) using AWS Cognito as authentication provider. Users will be able to sign up, confirm sign up/verify and sign in. The backend WebAPI will be the point of contact and interaction with AWS Cognito. The frontend Angular web app will simply pass user information and then keep the Cognito Access Token passed by the backend WebAPI.

This series is divided into three parts:
  1. Set up AWS Cognito and backend Web API user functions - previous post
  2. Configure CORS in Web API backend - previous post
  3. Authentication between frontend and Web API backend - this post

We have done our user sign in method that will return an Access Token to the caller (frontend). Now we only want authenticated users access our app. To do this we need to adjust our configurations a little bit.

In our backend Web API, add app.UseAuthentication() in Configure() method in Startup.cs between UseCors() and UseAuthorization():
public void ConfigureServices(IServiceCollection services)
{
	. . .
	app.UseCors();

	app.UseAuthentication();

	app.UseAuthorization();
	. . .
}
The order for the middlewares is specify in this ASP.NET Core documentation.


Next, add this line in our existing authentication configurations. We need to disable the default feature that is validating token audience as AWS Access Token does not include 'audience' (aud). So the frontend can present the token to backend without any issues.
public void ConfigureServices(IServiceCollection services)
{
	// AWS Cognito
	services.AddAuthentication("Bearer")
	.AddJwtBearer(options =>
	{
		options.Audience = "[APP_CLIENT_ID]";
		options.Authority = "https://cognito-idp.[REGION_NAME].amazonaws.com/[USER_POOL_ID]";
        options.TokenValidationParameters = new TokenValidationParameters { ValidateAudience = false };
	});

	. . .
}

To secure any methods, we just need to decorate with [Authorize] attribute. For example:
[Authorize]
public IEnumerable<WeatherForecast> Get()
{

	. . .
	
}

Then, in our frontend app, we create sign in functionality that will receive an access token once successful. The token is then stored in local storage that will be used for subsequent requests to the backend.
signin(): void {
  const params = new HttpParams()
    .set('username', this.model.Username)
    .set('password', this.model.Password);

  var user = this.model;

  this.http.post<any>('https://localhost:5001/api/signin', {username: this.model.Username, password: this.model.Password})
  .subscribe({
    next: token => {
      console.log(token);
      let atoken = token;
      localStorage.setItem("atoken", atoken);
    },
    error: error => {
      console.log(error);
    }
  })    
}

For further interaction with the backend, we retrieve the token and pass in request header:
getItems(): void {
  let token = localStorage.getItem("atoken");
  this.http.get("https://localhost:5001/weatherforecast", {
    headers: new HttpHeaders({
      "Authorization": "Bearer " + token
    })
  }).subscribe(response => console.log(response));
}

Now we have working frontend and backend that utilise AWS Cognito as authentication provider.

Friday, 27 January 2023

User Authentication with AWS Cognito with Web API Backend and Frontend Web
Part 2 - Configure CORS in Web API backend

This is the second part of the series of setting up a simple Angular frontend web app with ASP.NET Core Web API backend (.NET 5.0) using AWS Cognito as authentication provider. Users will be able to sign up, confirm sign up/verify and sign in. The backend WebAPI will be the point of contact and interaction with AWS Cognito. The frontend Angular web app will simply pass user information and then keep the Cognito Access Token passed by the backend WebAPI.

This series is divided into three parts:
  1. Set up AWS Cognito and backend Web API user functions - previous post
  2. Configure CORS in Web API backend - this post
  3. Authentication between frontend and Web API backend - next post

Since our frontend Angular app may be in different domain or at least port number in development (using localhost), we need to allow Cross-Origin Resource Sharing (CORS) in the backend Web API. There are two approaches for this, whether to allow only some methods by using a named policy or apply to all methods.

In ConfigureServices method inside Startup.cs file, to allow CORS for selected methods only, we put:
services.AddCors(options =>
{
	options.AddPolicy("EnableCORS", builder =>
			  builder.WithOrigins("http://localhost:4200", "https://localhost:4200")  // frontend domain(s)
				.AllowAnyHeader()
				.AllowAnyMethod()
				.AllowCredentials()
				//.WithMethods("OPTIONS", "GET")
	);
});

Then in Configure method, add:
. . .

app.UseCors("EnableCORS");

. . .
Important! Make sure to put app.UseCors() code in the right order as specify in the ASP.NET Core documentation


Then on the controller methods, we add EnableCors attribute, for example:
[EnableCors("EnableCORS")]
[HttpGet]
public IEnumerable<WeatherForecast> Get()
{
	. . .
}

If we want to enable CORS for all methods, we use AddDefaultPolicy() instead AddPolicy():
services.AddCors(options =>
{
	options.AddDefaultPolicy(builder =>
			  builder.WithOrigins("http://localhost:4200", "https://localhost:4200")  // frontend domain(s)
				.AllowAnyHeader()
				.AllowAnyMethod()
				.AllowCredentials()
				//.WithMethods("OPTIONS", "GET")
	);
});
Then in Configure method, just put:
app.UseCors();

On the next post, we will configure the Authentication part in the project.

Tuesday, 24 January 2023

User Authentication with AWS Cognito with Web API Backend and Frontend Web
Part 1 - Setting up AWS Cognito and backend Web API user functions

We will set up a simple Angular frontend web app with ASP.NET Core Web API backend (.NET 5.0) using AWS Cognito as authentication provider. Users will be able to sign up, confirm sign up/verify and sign in. The backend WebAPI will be the point of contact and interaction with AWS Cognito. The frontend Angular web app will simply pass user information and then keep the Cognito Access Token passed by the backend WebAPI.

This writing will be divided into three parts:
  1. Set up AWS Cognito and backend Web API user functions - this post
  2. Configure CORS in Web API backend - next post
  3. Authentication between frontend and Web API backend - next post

On this first series, we will set up AWS Cognito and ASP.NET Core Web API backend (.NET 5.0) with some user sign up an sign in functions.

1. First, create a new user pool in AWS Cognito then create a new App Client. Make sure 'Enable username password auth for admin APIs for authentication (ALLOW_ADMIN_USER_PASSWORD_AUTH)' is selected:


2. Create an ASP.NET Core Web API project. On Startup.cs file inside ConfigureServices method set options.Audience and options.Authority
public void ConfigureServices(IServiceCollection services)
{
	// AWS Cognito
	services.AddAuthentication("Bearer")
	.AddJwtBearer(options =>
	{
		options.Audience = "[APP_CLIENT_ID]";
		options.Authority = "https://cognito-idp.[REGION_NAME].amazonaws.com/[USER_POOL_ID]";
	});

	. . .
}
App Client Id is shown on:

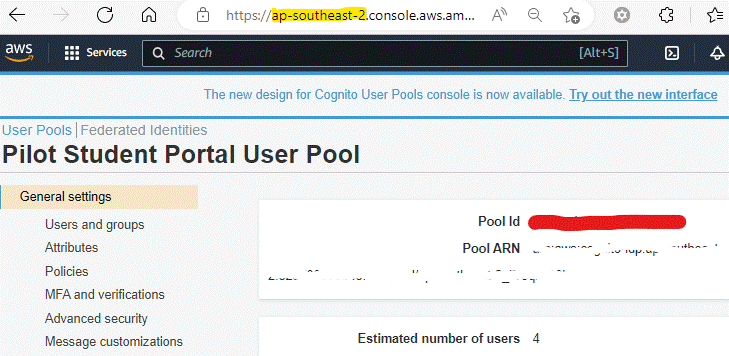
Then for the Authority field, we can get Region and User Pool Id from


3. In Configure(IApplicationBuilder app, IWebHostEnvironment env) method, add
app.UseAuthentication();
after app.UseRouting() is called.

4. Make sure your project has this AWSSDK.CognitoIdentityProvider package installed

5. Then we can add sign up feature in a controller
[HttpPost]
[Route("api/signup")]
public async Task<ActionResult<string>> SignUp(User user)
{
	var cognito = new AmazonCognitoIdentityProviderClient(_region);

	var request = new SignUpRequest
	{
		ClientId = _clientId,
		Password = user.Password,
		Username = user.Username
	};
    
	// Cognito email attribute
	var emailAttribute = new AttributeType
	{
		Name = "email",
		Value = user.Email
	};
	request.UserAttributes.Add(emailAttribute);

	var response = await cognito.SignUpAsync(request);

	return Ok(response);
}

6. When a user sign up with the method above, its Account Status is "Unconfirmed" and Email Verified is "false". A confirmation email will be sent with a code. We need to add another function to handle this.
[HttpPost]
[Route("api/confirmSignUp")]
public async Task<ActionResult<string>> ConfirmSignUp(string username, string confirmationCode)
{
	var cognito = new AmazonCognitoIdentityProviderClient(_region);

	var request = new ConfirmSignUpRequest
	{
		ClientId = _clientId,
		Username = username,
		ConfirmationCode = confirmationCode
	};

	var response = await cognito.ConfirmSignUpAsync(request); // after calling this method, user's Account Status will become 'Confirmed' and Email Verified become 'true'

	return Ok(response);
}

7. Then the sign in function. This will return an Access Token if successful.
[HttpPost]
[Route("api/signin")]
public async Task<ActionResult<string>> SignIn([FromBody] User user)
{
	var cognito = new AmazonCognitoIdentityProviderClient(_region);

	var request = new AdminInitiateAuthRequest
	{
		UserPoolId = _userPoolId, // User Pool Id
		ClientId = _clientId, // App Client Id
		AuthFlow = AuthFlowType.ADMIN_USER_PASSWORD_AUTH
	};

	request.AuthParameters.Add("USERNAME", user.Username);
	request.AuthParameters.Add("PASSWORD", user.Password);

	var response = await cognito.AdminInitiateAuthAsync(request);

	return Json(response.AuthenticationResult.AccessToken);
}

Additional resend confirmation code and find user functions:
[HttpPost]
[Route("api/resendConfirmationCode")]
public async Task<ActionResult<string>> ResendConfirmationCode(string username)
{
	var cognito = new AmazonCognitoIdentityProviderClient(_region);

	var request = new ResendConfirmationCodeRequest
	{
		ClientId = _clientId,
		Username = username
	};

	var response = await cognito.ResendConfirmationCodeAsync(request);

	return Ok(response);
}


[HttpPost]
[Route("api/findUser")]
public async Task<ActionResult<string>> FindUser(string username)
{
	var cognito = new AmazonCognitoIdentityProviderClient(_region);

	var request = new AdminGetUserRequest
	{
		UserPoolId = _userPoolId,
		Username = username
	};
	var response = await cognito.AdminGetUserAsync(request);

	return Ok(response);    
}

On the next post, we will set up CORS (Cross-Origin Resource Sharing) in the project.

Friday, 8 April 2022

How to Set Up AWS Authentication UI from Amplify for an Angular Project

This post shows how to set up an Angular project that uses Amazon Web Service Cognito as the identity provider with provided Authentication UI from Amplify. At the time of writing, the Angular version is 13.2 and Amplify version is 4.3.16.

1. First make sure Angular CLI has been installed
   npm install -g @angular/cli

2. Create a new Angular project, in our example here is called angular-amplify-frontend
   ng new angular-amplify-frontend

3. Add AWS Amplify to the project and the UI module for Angular
   npm install aws-amplify
   npm install --save aws-amplify @aws-amplify/ui-angular

4. Then install Amplify CLI
   npm install -g @aws-amplify/cli

5. Initialise a new Amplify project.
   amplify init
Make sure that the AWS user account set has AdministratorAccess-Amplify permission. Otherwise, you will get this error "AccessDeniedException: User:... is not authorized to perform: amplify:CreateApp on resource".

6. Now we can add the authentication module
   amplify add auth

7. Then run
   amplify push

8. Add the following to src/polyfills.ts file to avoid error when rendering in browser:
   (window as any).global = window;
   (window as any).process = {
      env: { DEBUG: undefined },
   };

9. Import Amplify and AmplifyAuthenticatorModule modules and configuration from 'aws-exports' on app.module.ts file.
. . .
import Amplify from 'aws-amplify';
import { AmplifyAuthenticatorModule } from '@aws-amplify/ui-angular';
import awsconfig from 'src/aws-exports'

Amplify.configure(awsconfig);

@NgModule({
   declarations: [
      AppComponent
   ],
   imports: [
      . . .
      AmplifyAuthenticatorModule
   ],
   providers: [],
   bootstrap: [AppComponent]
})
export class AppModule { }
To avoid this TypeScript error "Could not find a declaration file for module './aws-exports'. 'aws-exports.js' implicitly has an 'any' type.", create a aws-exports.d.ts file on the same level as aws-exports.js file with the following content:
   declare const awsmobile: Record<string, any>
   export default awsmobile;

10. Import authenticator stylesheet on the styles file
@import '~@aws-amplify/ui-angular/theme.css';

11. Finally put the following on app.component.html file
<amplify-authenticator>
   <ng-template amplifySlot="authenticated"
    let-user="user"
    let-signOut="signOut">
      <h1>Welcome {{ user.username }}!</h1>
      <button (click)="signOut()">Sign Out</button>
  </ng-template>
</amplify-authenticator>

Then run the project
   ng serve --o


If you got an error “bundle initial exceeded maximum budget”.
Open angular.json file on the project's root then find ‘budgets’ keyword. Then change the values for ‘maximumWarning’ and ‘maximumError’.
   "budgets": [
      {
         . . .
         "maximumWarning": "2mb",
         "maximumError": "5mb"
      }
   ]

Wednesday, 21 July 2021

Android Back Button to Exit App in Ionic

There are at least two ways to have Android hardware back button to exit app. I am using Ionic 5 at the time of writing this.

1) Using IonRouterOutlet to check through history stack
import { IonRouterOutlet, Platform } from '@ionic/angular';
import { Plugins } from '@capacitor/core';
const { App } = Plugins;

export class HomePage {
   constructor(private platform: Platform, private routerOutlet: IonRouterOutlet){
   
      . . .
   
      this.platform.backButton.subscribeWithPriority(-1, () => {
         if (!this.routerOutlet.canGoBack()) {
            navigator['app'].exitApp();
            //App.exitApp();   // if using Capacitor framework, we can use Plugins component
         }
      });
   }

   . . .
}

2) Using Location from Angular library
import { Platform } from '@ionic/angular';
import { AfterViewInit, OnDestroy } from "@angular/core";
import { Subscription } from "rxjs";
import { Location } from '@angular/common';

export class HomePage implements OnDestroy, AfterViewInit {
   backButtonSubscription: Subscription;
    
   constructor(private platform: Platform, private location: Location){   
      . . .
   }
   
   ngAfterViewInit() {
      this.backButtonSubscription = this.platform.backButton.subscribe(() => {
         if (this.location.isCurrentPathEqualTo("HOME_PAGE_URL")){
            navigator['app'].exitApp();
         }
      });
   }
   
   ngOnDestroy() {
      this.backButtonSubscription.unsubscribe();
   }

   . . .

}

References:
Ionic Framework Documentation - Hardware Back Button
How To Exit App On Back Press | Ionic 4

Further reading:
Ionic 5 handle back hardware event to confirm exit by user

Wednesday, 23 June 2021

Merge Specific Changeset in Azure Repos or Git with Visual Studio Code

To get a specific checked in changeset item in Azure Repos (Git) in Visual Studio Code, we use git cherry-pick command. It can be a changeset belong to a different branch. There is Merge Branch menu, but this will get and merge all the new changesets into our working branch.

By default when running git cherry-pick command, it will automatically merge and check in the codes in the repository for us. Use -n option to have the codes staged and we can check in manually.

Run in Terminal window:
git cherry-pick -n [commithashcode]

Friday, 16 April 2021

Config File in .Net Core

To add a configuration file in a .NET Core project, first add a new file JavaScript JSON Configuration File.

Set the file properties; Copy to Output Directory: 'Copy if newer' or 'Copy always'.

Say we put this inside the file:
{
  "ApplicationKey": "a_secret_value",
  "ConnectionStrings": {
    "StudentBoundedContextConnectionString": "server=Server_Name;database=DB_Name;trusted_connection=true",
    "CourseBoundedContextConnectionString": "server=Server_Name;database=DB_Name;trusted_connection=true"
  } 
}

On Package Manager, add Microsoft.Extensions.Configuration.Json.

Then to read the values on our codes:
var config = new ConfigurationBuilder()
				 .AddJsonFile("your_filename.json")
				 .Build();

var appkey = config["ApplicationKey"];
var studentConnectionString = config["ConnectionStrings:StudentBoundedContextConnectionString"];

Monday, 12 April 2021

Easily Generating Icon and Splash Images with Cordova Resource Generation Tool

A tool/plugin called cordova-res (https://github.com/ionic-team/cordova-res) is great to automatically generate icon and splash images if you develop an app using Capacitor.

1. First install the plugin
npm install -g cordova-res

2. Prepare the base icon and splash screen images
icon.(png|jpg) must be at least 1024×1024 px
splash.(png|jpg) must be at least 2732×2732 px
For iOS, the icon image should be squared and not masked https://developer.apple.com/design/human-interface-guidelines/ios/icons-and-images/app-icon/.

3. Then place the image files in resources folder. The plugin expects files structure like this:
resources/
├── icon.png
└── splash.png
config.xml (optional)


For iOS
4. Run this command
cordova-res ios --skip-config –copy
The result will be something like:
Generated 47 resources for iOS
Copied 21 resource items to iOS

5. Assign the images in Xcode
On Xcode, navigate to App > App > Assets.xcassets. Replace the icon and splash images with the newly generated images.
https://www.joshmorony.com/adding-icons-splash-screens-launch-images-to-capacitor-projects/


For Android
4. Run the command
cordova-res android --skip-config –copy
Splash and legacy icon images will be generated.

5. Generate adaptive icons
Since Android 8.0 (API level 26), adaptive icon is used as launcher icons for variety of Android devices.
Open Android Studio then select app folder.
Click File -> New -> Image Asset.
Set Foreground and Background Layers.
For adaptive icon source image, the centre area is smaller than the one for legacy icon.

6. Replace splash images (if using Capacitor framework)
The current Capacitor version replaces all the icons but not the splash screens. We need to replace all the default images under 'splash' folder ourselves.

These default images are in separated folders located inside 'app\src\main\res' folder.

We just need to replace each 'splash.png' file inside each folder with our generated splash images:


Monday, 15 February 2021

Starting Entity Framework Core with Code First

On this post we will see how to use Code First development with EntityFramework Core and SQL Server.

Add Microsoft.EntityFrameworkCore.SqlServer (current version at time of writing is v5.0.2) in Package Manager.

Create the model class:
public class Trainee
{
    public long TraineeId { get; set; }
    public string Firstname { get; set; }
    public string Lastname { get; set; }
}

Then create a context class derived from DbContext:
public class TraineeBoundedContext : DbContext
{
    public DbSet<Trainee> Trainees { get; set; }

    /* using default constructor is enough
    public TraineeBoundedContext(DbContextOptions<TraineeBoundedContext> options) : base(options)
    {
    }*/
    
    protected override void OnConfiguring(DbContextOptionsBuilder optionsBuilder)
    {
        optionsBuilder.UseSqlServer("Server=YOUR_SERVER_NAME;Database=YOUR_DATABASE_NAME;Integrated Security=True");  // put your server and database names
    }
}

Add Microsoft.EntityFrameworkCore.Tools (current version at time of writing is v5.0.3) package for EF migration feature.

Then run 'Add-Migration MIGRATION_NAME' command on Package Manager Console:
PM> Add-Migration InitialMigration
Build started...
Build succeeded.
To undo this action, use Remove-Migration.

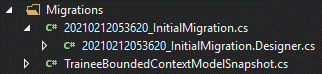
It will create some files. In my case, I chose 'InitialMigration' as the name.

One of the generated file shows this:

Then we can apply this to the database with 'Update-Database' command.
PM> update-database
Build started...
Build succeeded.
Applying migration '20210212053620_InitialMigration'.
Done.

When you check your database, it should have new tables:

Friday, 25 September 2020

Async Await in TypeScript

TypeScript 1.7 now supports async await keywords for asynchronous programming. This makes the codes more readable and simpler than using the older syntax.
If we have this before:
getItems() {
 return new Promise((resolve, reject) => {
   . . .
   resolve(items);
 });
};
Now can be written as:
async getItems() {
 . . .
 // return items; // this will automatically wrap with Promise type
 return Promise.resolve(items);
}
An async function always return Promise type. If there is an object to be returned and not explicitly written with Promise, it will wrap the object.

To run async method synchronously or to wait until it finishes, we use await keywords.
// previous way
getItems()
 .then((items) => {
    print(items);
     . . .
 });
 
// new way
let items = await getItems();
print(items);
Similarly if we would like to run a number of async methods synchronously, like how we used to do that with a chain of .then( . . .), now we do:
let resultOne = await functionOne();
let resultTwo = await functionTwo(resultOne);
let resultThree = await functionThree(resultTwo);

// or if the functions do not return anything
await functionOne();
await functionTwo();
await functionThree();

To handle error, now we use try catch.
getItems() {
   try {
      . . .
      return Promise.resolve(items);
   }
   catch(error) {
      . . .
      return Promise.reject(error_message);
   }
 });
};
Then when we call the function, the returned Promise.reject() will be treated as an error:
try {
   . . .
   getItems();
}
catch(error_message) {
   print(error_message);
}

To run a bunch of async functions without any particular order we use Promise.all():
Promise.all([functionOne(), functionTwo(), functionThree()]);
Promise.all() returns a Promise that has an array of resolved values from each function.

Finally, Promise.race() is used to run a bunch of async functions and return the first one resolves or rejects. It will return a new Promise with the value of the first function finishes.


Further reading:
Keep Your Promises in TypeScript using async/await

Wednesday, 12 August 2020

Checking Host Platform in Ionic 5

We can use Platform service in Ionic library to check the host platform. Below are the codes:
import { Platform } from '@ionic/angular';   // first import this library

constructor(private plt: Platform) {
	this.plt.ready().then(() => {

		if (this.plt.is('android') || this.plt.is('ios')) {
			console.log("running on Android or ios device!");

		}

		if (this.plt.is('mobileweb')) {
			console.log("running in a browser on mobile!");
		}
		
		if (this.plt.is('desktop')) {
			console.log("running on desktop");
		}
	});
}
Possible values are (from Ionic website):
Platform Name Description
android a device running Android
capacitor a device running Capacitor
cordova a device running Cordova
desktop a desktop device
electron a desktop device running Electron
hybrid a device running Capacitor or Cordova
ios a device running iOS
ipad an iPad device
iphone an iPhone device
mobile a mobile device
mobileweb a web browser running in a mobile device
phablet a phablet device
pwa a PWA app
tablet a tablet device


Wednesday, 8 July 2020

Passing Data from Ionic PopoverController

Since Ionic version 5, Events is no longer supported and will give compilation error. I have posted Using Popover Controller in Ionic but there's a proper way to pass data back from the popover controller to the caller.

We should leverage onDidDismiss() function in the caller component and passing the data as an argument of dismiss() function in the popover.

Caller component create and show popover:
async showCalculateWeeklyRent(ev) {
 const popover = await this.popoverCtrl.create({
  component: CalculateRentComponent, // the popover component that we created
  event: ev,
  componentProps: { 
     // data to be passed
     . . .
  },
  cssClass: 'popoverClass',
 });

 // get data returned from the popover
 popover.onDidDismiss().then(returnedValue => {
  if (returnedValue.data) {   // need to access the 'data' property to get the returned value
   this.model.weeklyRent = returnedValue.data;
   this.calculateYearlyRent();
  }
 });

 return await popover.present();
}
Note that we need to use the data property to get the value.

Then on the popover component, we can simply pass an argument when closing it:
. . .
     
closeAndReturnData() {
    // pass data to caller
    this.popoverCtrl.dismiss(this.shouldBeWeeklyRent);
}

closePopOver() {
    // simply close it
    this.popoverCtrl.dismiss();
}

. . .

Wednesday, 20 November 2019

Using Popover Controller in Ionic

We will learn how to use Popover Controller in Ionic. Popover is more versatile compares to Alert Controller or Modal Controller. We can put different input fields and elements and have customised template with two ways data binding. Pretty much like a Component.

On this post we will learn how to create a popover with an input field, a select dropdown with a function and buttons. The popover takes data from main page and returns data to the main page.

This is how the popover looks like:


First, create the popover Component:
import { Component } from "@angular/core";
import { PopoverController, Events } from '@ionic/angular';

@Component({    
    templateUrl: './calculate-rent.component.html',
    styleUrls: ['../base/property.page.scss'],
})

export class CalculateRentComponent {
     // some variables to be bound to the template 
    shouldBeWeeklyRent: number;

    constructor(private popoverCtrl: PopoverController, private events: Events) {
        
    }
     
    popoverEvent() {
        this.events.publish('fromPopoverEvent', this.shouldBeWeeklyRent);
        this.popoverCtrl.dismiss();
    }

    closePopOver() {
        this.popoverCtrl.dismiss();
    }
}
We use Events to pass data back to the caller component. Note this.events.publish(‘[name]’, [data]) on the codes.

The template:
<ion-grid>
    <ion-row>
        <ion-col class="text-header" style="text-align: center">Calculate Weekly Rent</ion-col>
    </ion-row>
    <ion-row>
        <ion-col size="8">Desired rental yield:</ion-col>
        <ion-col size="3">
            <input type="text" class="textinput" style="border:1px solid #b2b2b2; background-color: #fff; padding: 0 3px 0 3px; text-align: right; width: 100%"
                   number-input [(ngModel)]="desiredYield" (ngModelChange)="calculateWeeklyRent()" />
        </ion-col>
        <ion-col size="1"><span style="padding-top: 6px; padding-left: 0px">%</span></ion-col>
    </ion-row>
    <ion-row>
        <ion-col size="8">From which type:</ion-col>
        <ion-col size="3">
            <select [(ngModel)]="desiredYieldType" (ngModelChange)="calculateWeeklyRent()">
                <option value="gross">Gross</option>
                <option value="net">Net</option>
            </select>
        </ion-col>
        <ion-col></ion-col>
    </ion-row>
    <ion-row>
        <ion-col size="8">New weekly rent:</ion-col>
        <ion-col><b>{{shouldBeWeeklyRent | currency}}</b></ion-col>
    </ion-row>
    <ion-row>
        <ion-col></ion-col>
    </ion-row>
    <ion-row>
        <ion-col size="4">
            <button type="submit" class="button custom-button" (click)="closePopOver()">
                Close
            </button>
        </ion-col>
        <ion-col size="8">
            <button type="submit" class="button custom-button" (click)="popoverEvent()">
                Put in Rental Field
            </button>
        </ion-col>
    </ion-row>
</ion-grid>

We then add variables for data binding and the function that will be called on the component.

Then on the main page:
async showCalculateWeeklyRent(ev) {
 const popover = await this.popoverCtrl.create({
  component: CalculateRentComponent, // the popover component that we created
  event: ev,
  componentProps: { // data to be passed
   totalCost: this.model.totalCost,
   totalExpense: this.model.totalExpense,
   totalIncomeWithoutRent: this.model.totalIncomeWithoutRent
  },
  cssClass: 'popoverClass',
 });

 // sync event from popover component
 this.events.subscribe('fromPopoverEvent', (shouldBeWeeklyRent) => {
  this.model.weeklyRent = shouldBeWeeklyRent;
  this.calculateYearlyRent();
 });

 return await popover.present();
}

Note the componentProps property can be used to pass data to popover component. It can contain objects that have more complex structure as well.
We use Events and its subscribe() method to receive data back.

On popover component, to receive data from the main page, we just need to declare local variables then they will be bound automatically with the data passed from the main page. We just need to make sure the variable names are similar.
// codes in main page
async showCalculateWeeklyRent(ev) {
 const popover = await this.popoverCtrl.create({
  . . .
  componentProps: { // data to be passed
   totalCost: this.model.totalCost,
   totalExpense: this.model.totalExpense,
   totalIncomeWithoutRent: this.model.totalIncomeWithoutRent
  },
  . . .
 });

 . . .
}

// codes in popover
export class CalculateRentComponent {
    . . .
    totalCost: number;
    totalExpense: number;
    totalIncomeWithoutRent: number;

    // note that even we don’t need to state the variables in the constructor
    constructor(private popoverCtrl: PopoverController, private events: Events) {
        . . .
    }
    . . .
}

Now the full codes in popover component:
import { Component } from "@angular/core";
import { PopoverController, Events } from '@ionic/angular';

@Component({    
    templateUrl: './calculate-rent.component.html',
    styleUrls: ['../base/property.page.scss'],
})
export class CalculateRentComponent {
    desiredYield: number;
    desiredYieldType: string = 'gross';
    shouldBeWeeklyRent: number;
    totalCost: number;
    totalExpense: number;
    totalIncomeWithoutRent: number;

    constructor(private popoverCtrl: PopoverController, private events: Events) {
    }
    
    calculateWeeklyRent() {
        . . .
        this.shouldBeWeeklyRent = …;
        . . .
    }

    popoverEvent() {
        this.events.publish('fromPopoverEvent', this.shouldBeWeeklyRent);
        this.popoverCtrl.dismiss();
    }

    closePopOver() {
        this.popoverCtrl.dismiss();
    }
}


Reference:
https://edupala.com/ionic-4-popover/

Monday, 28 October 2019

Getting and Listing Latest Data in Angular

We will look on how to get and have up to date records to be displayed on a view in Angular 8. Assume we divide our codes with repository, service and presentation layers.

First, on repository, we have our codes returning a Promise:
getAllItems() : Promise<ItemInfo[]> {
 return new Promise((resolve, reject) => {
  this.dbInstance.executeSql("SELECT * FROM Item", [])
   .then((rs) => {
    . . .
    resolve(itemsList);
   })
   .catch((err) => reject(err));   
 });
};

We also have this on the repository layer that will be used by service layer to know that the database is ready to be used:
private dbReady: BehaviorSubject<boolean> = new BehaviorSubject(false);

constructor(private plt: Platform) {
 this.plt.ready().then(() => {
  this.initialise()
   .then(() => {
    this.dbReady.next(true);
   })
   .catch((err) => console.error(err)); 
 });
}

getDatabaseState() {
 return this.dbReady.asObservable();
}

Then on the service. Notice that we will be using BehaviorSubject type and its next() method to announce to listeners that there's a change.
export class ItemService {

    // this is a handy variable used to keep the latest data in memory
    private _itemsData: ItemInfo[] = [];

    private _items: BehaviorSubject<ItemInfo[]> = new BehaviorSubject<ItemInfo[]>([]);

    // getter that will be used by the presentation layer to get the items
    get items(): Observable<ItemInfo[]>  {
        return this._items.asObservable();
    }

    constructor(private databaseService: DatabaseService) {
        this.databaseService.getDatabaseState().subscribe(ready => {
            if (ready) {
                this.databaseService.getAllItems()
                    .then((items) => {
                        this._itemsData = items;

                        this._items.next(this._itemsData);
                    })
                    .catch(error => {
                        console.error(error);
                    });
            }
        });
 }

    addItemDetails(item: ItemForm) {
        return new Promise((resolve, reject) => {
            this.databaseService.insertItemDetails(item)
                .then((newItemId) => {                   
                    this._itemsData.push(new ItemInfo(. . .));
                    this._items.next(this._itemsData);
                    resolve();
                })
                .catch(error => {
                    console.error(error);
                    reject('Error: item cannot be inserted into database.')
                });
        });
    }

    editItemDetails(item: ItemForm) {
        return new Promise((resolve, reject) => {
            this.databaseService.updateItemDetails(item)
                .then(() => {
                    for (let i of this._itemsData) {
                        if (i.itemId == i.itemId) {
                            . . .
                        }
                    }
                    this._items.next(this._itemsData);
                    resolve();
                })
                .catch(error => { reject("Error: item cannot be updated in database."); });
        });
    }

    // similarly when deleting, the local variable _itemsData will need to be updated then call the BehaviorSubject next() method to tell the listeners that there is a change.
}

On our presentation (component .ts file), we use:
export class ListItemsPage implements OnInit {
    items: Observable<ItemInfo[]>;

    constructor(private service: ItemService) {
    }

    ngOnInit() {
        this.items = this.service.items;
    }
}

Finally, on the template .html page, we have:
<ion-list>
 <ion-item *ngFor="let i of items | async">
  <ion-label>
   <div>{{i.name}}</div>
  </ion-label>
 </ion-item>
</ion-list>

Tuesday, 17 September 2019

Converting AngularJS $q to JavaScript Promise

Since I had to upgrade my app from AngularJS to Angular, I would also need to change my promise returned codes. I needed to change all of my codes that were using $q AngularJS service to the new JavaScript Promise.
These codes:
getItems = function () {
  var deferred = $q.defer();

  try {
   . . .
   deferred.resolve(itemsToBeReturned);
  }
  catch(error) {
   . . .
   deferred.reject(error);
  }
  
  return deferred.promise;
};
are converted into:
getItems() {
 return new Promise((resolve, reject) => {
   try {
    . . .
    resolve(itemsToBeReturned);
   }
   catch(error) {
    . . .
    reject(error);
   }
 });
};
The consuming function can remain the same:
this.getItems()
 .then((items) => {
  // success
  . . .
 })
 .catch(error => {
  // error
  . . .
 });

The new JavaScript Promise also allowed the promises returned to be chained:
getItems() {
 return new Promise((resolve, reject) => {
  this.doSomething()
   .then((rs) => {
    . . .
    return Promise.resolve(123); 
   })
   .then((rs) => {
    . . .
    return 456;   // this returns a promise as well
   })
   .then((rs) => { 
    . . .
    resolve(result); 
   })
   .catch(error => reject(error));
 });
};


Reference:
Promise - TypeScript Deep Dive

Wednesday, 4 September 2019

Easy Way to Highlight Invalid Fields in Submitted Angular Form

Here is one way to highlight invalid input fields after submitting a form in Angular (Template Driven Form approach) to help user quickly seeing the invalid input fields.

First we create a variable to indicate whether the form has been submitted or not:
export class PropertyPage {
    isSubmitted: boolean;

    constructor() {
        this.isSubmitted = false;
        . . .
    }
 
    addPropertyDetails(form: NgForm) {
        this.isSubmitted = true;
        . . .
        if (form.valid) {
            . . .
        }  
    }
}

Then use this variable to assign a CSS class to the form using ngClass:
<form #propertyDetailsForm="ngForm" (ngSubmit)="addPropertyDetails(propertyDetailsForm)" [ngClass]="{'submitted': isSubmitted}">
    . . .
</form>

Finally, add the style in the page stylesheet. By default, invalid input field will be assigned ng-invalid class by Angular.
.submitted input.ng-invalid {
    border: 1px solid #f00;
}