Wednesday, 10 December 2014

Some Guidelines to Design Clean Controller and Service

An AngularJS controller should not be burdened with other tasks other than mediating interaction between view and data that comes from one or more services. The data model, data management and application business logic should be written in services. I also like to use controllerAs with 'this' approach. Also include as few services as possible in the controller. If a controller has too many services then this should be questioned. Instead we should try to use services that aggregate other required services inside.

Below is an example of a controller:
myApp.controller('MedicineCtrl', ['medicineService',
 function (medicineService) {
     var vm = this;
     vm.medicineNames = medicineService.medicineNames;
     vm.addMedicine = function (input) {
         medicineService.addMedicine(input);
     };
     vm.updateMedicine = function (input) {
         medicineService.updateMedicine(input);
     };
     vm.deleteMedicine = function (id) {
         medicineService.deleteMedicine(id);
     };
}]);
Of course, this is a simplified example however this should give us a picture of what a controller should be designed like.

For the service, it's recommended to have 'private' variables and functions needed and only expose publicly the ones that are necessary as service object's properties. Also whenever possible, try to design the functions to run asynchronously using AngularJS promise (will show an example in the next post). Below is an example of a service:
myApp.factory('medicineService', ['otherService1', 'otherService2', 
  function (otherService1, otherService2) {
    // 'private' variables and functions
    var _medicines = [];
    var _privateVarOne;
    var _privateVarTwo;
    
    _addMedicine = function (input) {
       . . .
       // some business logic
       . . .
    };

    _updateMedicine = function (input) {
       . . .
       // some business logic
       . . .
    };

    _deleteMedicine = function (id) {
       . . .
       // some business logic
       . . .
    };

    _anotherPrivateFunction = function () {
       . . .
       // some business logic
       . . .
    };

    // only expose publicly the required members
    return {
        medicineNames: _medicineNames,
        addMedicine: _addMedicine,
        updateMedicine: _updateMedicine,
        deleteMedicine : _deleteMedicine 
    }
}]);

Wednesday, 3 December 2014

AngularJS ControllerAs and Scope

If we set up a view and controller with controllerAs like below:
// in routing configuration
. . .
.when('/pageOne', {
        templateUrl: 'partials/page-one.html',
        controller: 'CtrlOne',
        controllerAs: 'vm'
})
. . .
// the controller
userApp.controller('CtrlOne', [function () {
    var vm = this;
    vm.nameOne = "test";
    vm.getName = function () {
        return 'aaa';
    };

    this.nameTwo = "blah";
    var nameThree = "ggg"; // not visible from outside
}]);
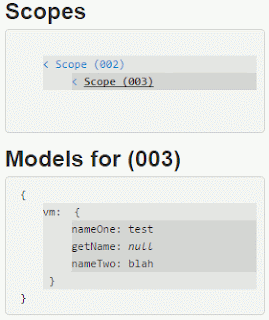
then we will have these scopes when the page loads:


The first scope is the root scope and the one underneath it is the scope created for the controller. As the picture shows, the variables are created as properties of 'vm' object. If we had used the traditional approach by defining variables on $scope such as $scope.myVariable = ... then these variables would be created on the first level on controller scope (not wrapped inside an object). We can also see when we use controllerAs, other variable that is defined directly not through 'this' object will not be visible from outside.


Adding a Child Controller

Let us add a child controller inside our controller. The child controller:
userApp.controller('ChildCtrl', [function () {
    var vm = this;
    vm.dataOne = 'sss';
    vm.getData = function () {
        return 'bbb';
    }
}]);
And change our view to be like this:
<div>
    Page One
    <div>
        <div>{{parentVm.nameOne}}</div>
        <div ng-controller="ChildCtrl as childVm">
            {{childVm.dataOne}}
            {{parentVm.nameOne}}
        </div>
    </div>
</div>

Now we can see that a new scope is created for the child controller:


Accessing Parent Controller's Variables

On the view, we can simply use '{{parentVm.variableName}}' to refer to a parent controller's variable.

In the child controller script function, accessing parent's variables which controller uses controllerAs is not as easy as if the parent controller had used $scope to register its properties. One way to do this is by using $scope help in the child controller. We need to inject $scope to the controller then refer to the parent controller's instance name to be able to access its variables/properties. Below is an example:
$scope.parentVm.nameOne = 'modify parent var';
//$scope.$parent.parentVm.nameOne = 'modify parent var';    // or could use $parent
The code on the first line is utilising JavaScript prototypal inheritance where it will try to find the property 'parentVm.nameOne' on the current scope then if it is not found, it will try to find on the parent scope and so on until it reaches the root scope. This AngularJS documentation 'Understanding Scope' explains it in more details.
The second code is finding the property on the parent scope. We could append many $parent if required.

If we had tried to do these below inside child controller:
vm.nameOne = 'modified';
$scope.nameOne = 'hhh';
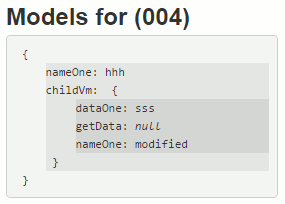
new variables would be created on the current scope. One is on the scope's root level and the other one is inside an object. The picture below shows this:


Creating Local Variables that Hold References

If we want to create a local variable that holds reference to a variable in parent controller then we need to create that variable as an object in parent controller. This is explained as well in the referred AngularJS documentation above. For example:
// create an object variable in parent controller
vm.objVar = { name: 'aaa' };
then in our child controller:
// create the local variable in child controller
vm.childRefVar = $scope.$parent.parentVm.objVar;

// try to do some update
$scope.$parent.parentVm.objVar.name = 'jjj'; // when we update the variable in parent controller, this will reflect in both parent and local variables
vm.childRefVar.name = 'bbb'; // when we modify the local variable, this will reflect in parent variable as well


Best Practices

As we have seen above, accessing variables in parent controller is not straight forward. If you are going to have nested controllers in your view, it is recommended to use a service to share data between the controllers rather than using variables/properties in your controller.

If you do not want to use a service then I think it is better to register the variables or functions that are going to be shared on $scope rather than on 'this' object unless you are going to decide/know the controller's alias object name in advance to be used from codes inside child controller.

Thursday, 13 November 2014

Cordova Plugin is not Available when Application Starts

If you use a plugin and execute its method when your application starts and have this error:
TypeError: Cannot read property '[your_plugin_name]' of undefined at Object.[plugin_method]
then it is likely that the plugin has not been initialised fully when the method is called.

To solve this issue, wait until deviceready event is fired before calling the plugin's method.

With AngularJS, I like to wait until deviceready event is fired before loading the whole application. To do this, make sure that ng-app declaration is removed from the HTML, then bootstrap the app when deviceready event has fired. document.addEventListener is used to determine whether the event has been fired.
document.addEventListener("deviceready", function() {
    angular.bootstrap(document, ["myApp"]);
}, false);
If you want to apply this to a particular element instead of the whole HTML document (or body), you could use:
var theElement = document.findByID(...) // or document.querySelector(...);
angular.bootstrap(theElement, ["myApp"]);

Then you can call the rest scripts:
var myApp= angular.module('myApp', [. . .]);

myApp.config(
  . . .
);

Friday, 7 November 2014

Concatenating Results in SQL Query

Below is an example to concatenate results in an SQL query:
SELECT S.FirstName, S.LastName,
  STUFF( 
    ( SELECT ',' + S1.FirstName + ' ' + S1.LastName FROM Student S1 WHERE S1.FirstName = S.FirstName FOR XML PATH('') ), 
    1, 
    1, 
    ''
  ) AS AnyStudentsWithSimilarNames
FROM Student S

In the example, we use FOR XML PATH('') to concatenate the result from multiple rows into a single value.

We also use STUFF() function to simply remove the first occurrence of ',' character. The syntax is STUFF( expression, starting_character_position, length, replace_with_expression ).

If we have '<', '>' or '&' characters in our projection and want to avoid those getting encoded, we can replace the codes inside STUFF() function to:
(SELECT ... FOR XML PATH(''), TYPE).VALUE('.','VARCHAR(MAX)')
Here we add TYPE to have the query with FOR XML PATH() returns XML data type then we use VALUE() function to get the value. Both are used as a work around to avoid the characters getting encoded.

Thursday, 23 October 2014

Adding ngCordova Plugin to Visual Studio Cordova Project

We will see how to add a plugin from ngCordova which has a collection of Cordova API plugins wrapped in AngularJS. ngCordova will help even more Cordova developers who are using AngularJS.

1. First, include ng-cordova.js or ng-cordova.min.js file into our project structure. We can use bower to install that or download the zip file from its GitHub repository then find the js file inside.

2. On our project main page, add a reference to it before the reference to cordova.js file.
<script src="some_path/ng-cordova.min.js"></script>
<script src="cordova.js"></script>

3. Include 'ngCordova' in our app module. For example:
var myApp = angular.module('myApp', ['ngCordova', . . .]);

4. Add the intended plugin wrapped by <vs:feature></vs:feature> inside <vs:features> node in our project config.xml file like below:
<vs:features>
  <vs:feature>plugin_id@version_number</vs:feature>
  <vs:feature>plugin_2_id@version_number</vs:feature>
  . . .
</vs:features>
Right click config.xml file then select View Code to do this.

To find the plugin Id and version number, we can check from plugins.cordova.io site or from the plugin.xml file on the plugin repository site. However if we are getting the information from plugin.xml file, that will always be the latest version which sometimes is not the stable one.

An example for the latter one, say we would like to use Local Notification plugin. Go to its site https://github.com/katzer/cordova-plugin-local-notifications then open plugin.xml file located on the root. Inside the plugin element there are 'id' and 'version' attributes.

When building the project, Visual Studio will download the plugin and add to the project if it has not done so.


5. Inject the plugin service into our controller then we can start using it.
For example, to use Local Notification, we need to inject $cordovaLocalNotification like this:
myApp.controller('MyCtrl', ['$cordovaLocalNotification', . . . ,
  function ($cordovaLocalNotification, . . .) {
  . . .
}]);

Friday, 10 October 2014

Basic Navigation in Ionic

On this post we will see how to do basic navigation in Ionic Framework.

1. First we need to configure the routes in AngularJS:
app.config(function($stateProvider, $urlRouterProvider) {
  $stateProvider
  .state('home', {
    url: '/',
    templateUrl: 'home.html'
  })
  .state('pageOne', {
    url: '/page1',
    templateUrl: 'one.html'
  })
  .state('anotherPage', {
    url: '/whatever',
    templateUrl: 'myhtml.html'
  });
  
   $urlRouterProvider.otherwise("/");
});
In the example we use UI Router to manage our routes. Each route has a state name, a defined url and an actual path for the view content. In the end, we also define the default url to be called when a url targeted does not match any in configurations.


2. Then on our main page, we just need to use
<ion-nav-view></ion-nav-view>
It will be useful to add a navigation bar with back button and also to have an animation effect like this:
<ion-nav-bar class="bar-positive">
        <ion-nav-back-button class="button-icon ion-arrow-left-c">
        </ion-nav-back-button>
    </ion-nav-bar>

    <ion-nav-view animation="slide-left-right"></ion-nav-view>
When we use Ionic navigation back button, the scripts behind it automatically do the job in storing page histories and pulling out the previous page as well as redirecting to the page when clicking the element.


3. Finally create each partial view using
<ion-view>
  <ion-content>
    . . .
  </ion-content>
</ion-view>


For a complete working example, please see here in Plunker.

Friday, 3 October 2014

Navigation in MVVM Light using Messenger

There are a few ways to implement navigation in MVVM Light based application. One of them is to use the Messaging framework of the toolkit. We will see a simple example of how to do this on Windows Phone.

1. First, in our view, we need to register to listen for a message that we want to receive :
Messenger.Default.Register<uri>(
this,
"MyToken",
(uri) => NavigationService.Navigate(uri)
);
We can put this in the view constructor or OnNavigatedTo() method. This code is saying that I want to register to receive any message that delivers uri type that uses 'MyToken' token. If there is any then I will execute an action which in this case is calling NavigationService.Navigate(uri).


2. Then in the view model, we need to create a command to trigger the message that will be broadcasted.
We add a RelayCommand property for a navigation command:
public RelayCommand NavigateCommand { get; private set; }
Then in the view model constructor we initialise that (or could be on the property getter above):
NavigateCommand = new RelayCommand(() =>
{
Messenger.Default.Send<uri>(new Uri("/PageName.xaml", UriKind.Relative), "MyToken");
});


3. Finally bind the command property to a control on the view xaml file using:
Command="{Binding NavigateCommand}"


Soon we will have many repetitive codes in our views, so we could put the codes to register for the message in a base class like this:
public class BasePage : PhoneApplicationPage
{
 protected override void OnNavigatedTo(System.Windows.Navigation.NavigationEventArgs e)
 {
 Messenger.Default.Register<uri>(this, "MyToken", uri => NavigationService.Navigate(uri));
 base.OnNavigatedTo(e);
 }

 protected override void OnNavigatedFrom(System.Windows.Navigation.NavigationEventArgs e)
 {
 Messenger.Default.Unregister<uri>(this);
 base.OnNavigatedFrom(e);
 }
}
So we just need to make our views inherit from this class.

On our xaml files, we also need to replace
<phone:PhoneApplicationPage
to
<phone:BasePage

and also
xmlns:phone="clr-namespace:Microsoft.Phone.Controls;assembly=Microsoft.Phone"
to
xmlns:phone="clr-namespace:YourNamespace"


Another way to do navigation is by creating our custom navigation service to be used in our view models. This nice article, explains how to implement it in details.

Thursday, 2 October 2014

Getting Started with Cordova and Ionic in Visual Studio

On this post, we will see how to install Visual Studio Apache Cordova tool and Ionic framework and get started with a sample application.

1. First we need to download and install Apache Cordova tool from here. At the time of writing, the version is CTP 2.0.

2. Then once completed, open Visual Studio to create a new project. On the New Project dialog, go to JavaScript project templates then Multi-Device Hybrid App. Select Blank App (Apache Cordova) then create a project.

3. Install Ionic through NuGet. At the time of writing, the latest version is v1.0.0.0-beta.1. This will add many AngularJS and Ionic files into our project.

4. Install Ionic on local machine so that we could create some sample applications with particular templates and use some of the files in our project. To do this, open Node.js command prompt then run this command:
npm install ionic -g
-g is used to install the package globally

5. On the command prompt, go to a directory where you want to have Ionic sample applications then run this command:
ionic start SideMenuAppExample sidemenu
This command will generate a sample Ionic application with side menu navigation.

6. Go to the generated app folder then to 'www\js' folder then copy app.js and controllers.js into our project.

7. Also copy the whole 'templates' folder and its content into our project.

8. Then on our project index.html file:
- add a reference to 'Content/ionic.css'
- add a reference to 'scripts/ionic.bundle.js'
- add references to the two JavaScript files that we have copied over (app.js and controllers.js)
- add 'ng-app="starter"' in the body
- add <ion-nav-view></ion-nav-view> inside the body content

Once finished, we will have something like this on our index.html:
<!DOCTYPE html>
<html>
<head>
    <meta charset="utf-8" />
    <title>BlankCordovaApp2</title>

    <link href="Content/ionic.css" rel="stylesheet" />
    <link href="css/index.css" rel="stylesheet" />
</head>
<body ng-app="starter">
    <ion-nav-view></ion-nav-view>


    <!--library scripts references-->
    <script src="scripts/ionic.bundle.js"></script>
    <script src="cordova.js"></script>
    <script src="scripts/platformOverrides.js"></script>
    
    <!--custom scripts references-->
    <script src="app.js"></script>
    <script src="controllers.js"></script>
</body>
</html>

Then run the application. We should see a sample app with side menu running.

Wednesday, 17 September 2014

ObservableCollection Example

ObservableCollection is a built in collection type that raises change notification if any element in the collection is changed or deleted or a new element is added to the collection. If we want to create a custom collection type that raises change, we need to use INotifyCollectionChanged.

Below is a simple example of using ObservableCollection:
private ObservableCollection<string> names = new ObservableCollection<string>() { "aaa", "bbb", "ccc" };

public MainWindow()
{
 InitializeComponent();
 
 listBox1.ItemsSource = names;
}

private void Button_Click(object sender, RoutedEventArgs e)
{
 names.Add(textBox1.Text);
        names[0] = "ABC";
}
and on the view:
<ListBox x:Name="listBox1" HorizontalAlignment="Left" Height="100" VerticalAlignment="Top" Width="100" />
<TextBox x:Name="textBox1" HorizontalAlignment="Left" Height="23"  TextWrapping="Wrap" VerticalAlignment="Top" Width="120"/>
<Button Content="Add Name" HorizontalAlignment="Left"  VerticalAlignment="Top" Width="100" Click="Button_Click"/>            

Thursday, 11 September 2014

Using INotifyPropertyChanged to Notify Value Change

Recently I start learning more on Windows development so will write more about this topic from now to the near future.

Among the first things that I have learned is how to use INotifyPropertyChanged to raise notification whenever a property value of a single object changes.

How to Implement The Interface
The steps of how to use this interface:
- first we need to inherit our class from this interface
- include the interface's PropertyChanged event property
- write a method to raise value change notification, i.e.; RaisePropertyChanged()
- call that method from each property that we would like it to have this feature
public class User : INotifyPropertyChanged
{
 private string _firstName;

 public string FirstName
 {
  get { return _firstName; }
  set { 
   _firstName = value; 

   // this is the old way to do
   //RaisePropertyChanged("FirstName"); 

   // this is now possible in C# 5 that we don't need to specify the property name
   RaisePropertyChanged();
  }
 }

 public string LastName { get; set; }

 public event PropertyChangedEventHandler PropertyChanged;

 /* // this is the old way to do
 private void RaisePropertyChanged(string propertyName)
 {
  if (this.PropertyChanged != null)
  {
   this.PropertyChanged(this, new PropertyChangedEventArgs(propertyName));
  }
 }*/

 // this is now possible in C# 5 that we don't need to specify the property name
 private void RaisePropertyChanged([CallerMemberName] string caller = "")
 {
  if (PropertyChanged != null)
  {
   PropertyChanged(this, new PropertyChangedEventArgs(caller));
  }
 }
}

Then on the view we specify the class instance as the data context. One simple way to do this is by initialising it in the view code behind constructor. Note that we are only using the simple way here, not a MVVM approach.
DataContext = user;

Then in our .xaml file we can bind the property(ies) to a control(s).
<StackPanel>
 <TextBlock Text="{Binding FirstName, Mode=OneTime}" HorizontalAlignment="Left"  TextWrapping="Wrap" VerticalAlignment="Top"/>
 <TextBlock Text="{Binding FirstName, Mode=OneWay}" HorizontalAlignment="Left"  TextWrapping="Wrap" VerticalAlignment="Top"/>
 <TextBlock Text="{Binding FirstName}" HorizontalAlignment="Left"  TextWrapping="Wrap" VerticalAlignment="Top"/>
 <TextBox Text="{Binding FirstName, Mode=TwoWay}" HorizontalAlignment="Left" Height="23"  TextWrapping="Wrap" VerticalAlignment="Top" Width="120"/>
 <Button Content="Button" HorizontalAlignment="Left"  VerticalAlignment="Top" Width="75"/>
</StackPanel>
In the example above, when we try to change the value in the textbox, the new value will be propagated to other controls after we move focus from the textbox. A button is included so that we could click the button after changing the textbox value or press 'tab' key to move the focus away from the textbox.


Binding Modes
Notice that the binding modes specify the direction the change flows:
- TwoWay - data change flows in both directions between source and target properties.
- OneWay - data change only flows from source to target property. This is commonly used for readonly controls.
- OneTime - data change only flows once from source to target property when the control is initialised
- OneWayToSource - the reverse of OneWay mode
- Default - use the default binding mode of the control. If a mode is not specified then the default value is used.
To avoid performance overhead, we should use the mode that is really needed. From the lightest to the heaviest are OneTime, OneWay and TwoWay.


Usage in Collection
If we have a collection of objects which class implements INotifyPropertyChanged then when one of its properties value changes, the change will propagate too. As long as the property raises changes (by calling a raise notification method) like our FirstName property calls RaisePropertyChanged() method, then it will propagate.

Below is a codes example of a collection of users in a List type that will notify change when one of its first names is changed:
<ListView Name="listView1">
 <ListView.ItemTemplate>
  <DataTemplate>
   <WrapPanel>
    <TextBlock Text="{Binding FirstName}" FontWeight="Bold" />
   </WrapPanel>
  </DataTemplate>
 </ListView.ItemTemplate>
</ListView>
<Button Content="Change User" HorizontalAlignment="Left"  VerticalAlignment="Top" Width="100" Click="Button_Click"/>

private List<User> users = new List<User> { new User { FirstName = "first", LastName = "last" }, new User { FirstName = "second", LastName = "last2" } };

public MainWindow()
{
 InitializeComponent();

 listView1.ItemsSource = users;
}

private void Button_Click(object sender, RoutedEventArgs e)
{
 users[0].FirstName = "CHANGED";
}

Friday, 15 August 2014

Bundling and Minification Feature in MVC

On this post we will see how to implement CSS and JavaScript files bundling and minification feature in MVC.

1. Add files
First, we need to add the files inside RegisterBundles() method of App_Start\BundleConfig.cs class. Make sure that our web project has installed Microsoft.AspNet.Web.Optimization library. If not then we can use NuGet to install it.

1.1. Adding CSS files
We use StyleBundle class to add the CSS files. First we specify the bundle name and the relative path where it is going to be generated from. Then we add the intended files to it using relative path url.
StyleBundle cssBundle = new StyleBundle("~/Styles/bundledcss");
cssBundle.Include(
 "~/Styles/mystylesheet1.css",
 "~/Styles/mystylesheet2.css",
 . . .
 );
bundles.Add(cssBundle);

1.2. Adding JavaScript files
This time we use ScriptBundle class. The process is similar as adding CSS files above.
ScriptBundle scriptsBundle = new ScriptBundle("~/Scripts/bundlescripts"); 
scriptsBundle.Include(
 "~/Scripts/myscript1.js",
 "~/Scripts/myscript2.js",
 . . .
);
bundles.Add(scriptsBundle);
We can also use -{version} syntax when including a file. For example; ~/Scripts/jquery-{version}.js
When using this, the '.min' version will be used in release mode and normal version will be used in debug mode. The '-vsdoc' version for IntelliSense will be ignored.

In addition, wildcard character '*', can be used as well when including files to include all matching files.


2. If using Debug mode, set BundleTable.EnableOptimizations
If we want to see bundling and minification in action in debugging mode ('compilation debug="true"' is set in web.config file) then we need to set
BundleTable.EnableOptimizations = true;
otherwise each file will be called individually like before.

In my development environment, I set up a release and a debug build configurations with 'compilation debug="true"' in my web.config. In the Build section of the project properties, the debug build configuration has 'Define DEBUG constant' checked. Then I do
#if !DEBUG
BundleTable.EnableOptimizations = true;
#endif
so that I could have the bundling and minification work when I use release build configuration and off when using debug build configuration.

Below are the complete codes from the steps above.
public class BundleConfig
{
 public static void RegisterBundles(BundleCollection bundles)
 {
  StyleBundle cssBundle = new StyleBundle("~/Styles/bundledcss");
  cssBundle.Include(
   "~/Styles/mystylesheet1.css",
   "~/Styles/mystylesheet2.css",
   . . .
   );
  bundles.Add(cssBundle);

  ScriptBundle scriptsBundle = new ScriptBundle("~/Scripts/bundledscripts"); 
  scriptsBundle.Include(
   "~/Scripts/myscript1.js",
   "~/Scripts/myscript2.js",
   . . .
  );
  bundles.Add(scriptsBundle);

  #if !DEBUG
  BundleTable.EnableOptimizations = true;
  #endif
 }
}

3. Include that method in Application_Start() in Global.asax.cs
protected void Application_Start()
{
 . . .
 BundleConfig.RegisterBundles(System.Web.Optimization.BundleTable.Bundles);
 . . .
}

4. Render the bundle on the view
We render the styles bundle with Styles.Render() method and JavaScript files bundle with Scripts.Render() method, passing the same bundle name and path as when it was created.
@Styles.Render("~/Styles/bundledcss")

@Scripts.Render("~/Scripts/bundledscripts")


Files ordering
The optimisation library uses some predefined rules for ordering the files that we include. If we found that our site breaks because of the files were ordered differently from the ones we specify then we need to do a little tweak to override the default ordering. To do this, we need to implement a custom class inherited from IBundleOrderer, then just simply return the files as they are in its OrderFiles() method.
public class AsListedOrderer : IBundleOrderer
{
 public IEnumerable<BundleFile> OrderFiles(BundleContext context, IEnumerable<BundleFile> files)
 {
  return files;
 }
}
Then set the custom orderer in our bundle. For example:
public class BundleConfig
{
 public static void RegisterBundles(BundleCollection bundles)
 {
  ScriptBundle scriptsBundle = new ScriptBundle("~/Scripts/bundledscripts"); 
  scriptsBundle.Orderer = new AsListedOrderer();
  scriptsBundle.Include(
   . . .
  );
  . . .
 }
}


What about the minification?
When we are using StyleBundle or ScriptBundle type to create a bundle, the minification feature is already included in it. However if there is a syntax error in one of our files then the minification might not be applied and we could see the warning when we open the bundle uri on a browser to see the content.

If for a reason, we do not want to apply minification in our bundle, then we could use Bundle type instead. In fact, StyleBundle and ScriptBundle types inherit from Bundle type.


Bundle versioning
When the library creates a bundle, it will add calculated hash result of the files content as a querystring. For example; "/Scripts/bundledscripts?v=8mW7h5gn2CgW9MkumYwMSzClMgRORVfdSNBsizgxyoU1"
So if we make a change in our files, the generated hash value will be different. This is another good benefit for us so that we do not need to worry about our content being cached by browsers thus the latest changes will always be rendered.

Friday, 8 August 2014

Some Selenium Code Examples

Below are some Selenium code examples:
var driver = new FirefoxDriver();

// select an option on a dropdown list by its text
new SelectElement(driver.FindElement(By.Id("lstStatus"))).SelectByText("Active");
// another example
driver.FindElements(By.CssSelector("#dvSelectListItems li")).Where(elem => elem.Text.Trim() == "some text").FirstOrDefault().Click();

// get text from a table in its second row and second column
driver.FindElement(By.CssSelector("#tbSearchResults tr:nth-child(2) td:nth-child(2)")).Text

// check whether an element is displayed
driver.FindElement(By.CssSelector("div.accordionContent")).Displayed == false

// fill an input field with text
driver.FindElement(By.Id("Name")).SendKeys("Fullname");

// get a td element that has a particular title attribute value
driver.FindElement(By.CssSelector("td[title='a title']"));

// trick to do hover on a menu
Actions actions = new Actions(driver);
var profileMenu = driver.FindElement(By.LinkText("Profiles"));
actions.MoveToElement(profileMenu);
actions.Click();
actions.Perform(); 

// wait for maximum ten seconds until an element is displayed
var wait = new WebDriverWait(driver, TimeSpan.FromSeconds(10));
wait.Until(d => d.FindElement(By.Id("divDashContainer")).Displayed);

// navigate to an url
driver.Navigate().GoToUrl("some url");

Monday, 21 July 2014

TFS 2013 - Limiting Users List in User DropDown

Below is an example of how to limit users in a user selection dropdown:
<field name="Assigned To" refname="System.AssignedTo" type="String" syncnamechanges="true" reportable="dimension">
   <!-- show users that are part of the team only -->
   <validuser group="[Project]\Contributors" />

   <!-- below is another way to do that
   <allowedvalues expanditems="true">
      <listitem value="[Project]\Contributors" />
   </allowedvalues> -->

   <default from="currentuser" />   <!-- this one to have the logged on user to be automatically selected by default -->
</field>

Thursday, 17 July 2014

Modifying and Creating Work Item Type in TFS 2013

To modify a work item type in TFS 2013, we need to these steps:
- export the work item type xml file to our machines
- modify that file
- then import back the modified xml file to the TFS server

To create a new work item type, we need to:
- create a new work item type xml file
- import the new xml file to TFS server

We use Visual Studio Command Prompt to do this.

To export work item type, run this command:
witadmin exportwitd /collection:[team project collection URI] /p:[project_name] /n:[work item type name] /f:[destination file]
examples:
C:\Program Files (x86)\Microsoft Visual Studio 12.0\Common7\IDE>witadmin exportwitd 
/collection:"http://myTFSserver/tfs/DefaultCollection" /p:MyProject /n:Bug /f:C:\Users\me\Desktop\bug.xml

C:\Program Files (x86)\Microsoft Visual Studio 12.0\Common7\IDE>witadmin exportwitd 
/collection:"http://myTFSserver/tfs/DefaultCollection" /p:MyProject /n:"Product Backlog Item" /f:c:\Users\me\Desktop\pib.xml

To import work item type, run this command:
witadmin importwitd /collection:[team project collection URI] /p:[project_name] /f:[source file]
example:
C:\Program Files (x86)\Microsoft Visual Studio 12.0\Common7\IDE>witadmin importwitd 
/collection:"http://myTFSserver/tfs/DefaultCollection" /p:MyProject /f:c:\Users\me\Desktop\task.xml

To delete work item type:
witadmin destroywitd /collection:[team project collection URI] /p:[project_name] /n:[work item type name]
example:
witadmin destroywitd /collection:"http://myTFSserver/tfs/DefaultCollection" /p:"My Project" /n:"Impediment"

To rename work item type:
witadmin renamewitd /collection:[team project collection URI] /p:[project_name] /n:[existing work item type name] 
/new:[new work item type name]
example:
C:\Program Files (x86)\Microsoft Visual Studio 12.0\Common7\IDE>witadmin renamewitd 
/collection:"http://myTFSserver/tfs/DefaultCollection" /"My Project" /n:"Product Backlog Item" /new:"Enhancement"
Are you sure you want to rename the work item type Product Backlog Item to the new name of Enhancement? (Yes/No) Yes
The work item type was renamed. 

To export process configuration:
witadmin exportprocessconfig /collection:[team project collection URI] /p:[project_name] /f:[destination file]
example:
C:\Program Files (x86)\Microsoft Visual Studio 12.0\Common7\IDE>witadmin exportprocessconfig 
/collection:"http://myTFSserver/tfs/DefaultCollection" /p:MyProject /f:c:/Users\me\Desktop\ProcessConfiguration.xml

To import process configuration:
witadmin importprocessconfig /collection:[team project collection URI] /p:[project_name] /f:[source file]
C:\Program Files (x86)\Microsoft Visual Studio 12.0\Common7\IDE>witadmin importprocessconfig  
/collection:"http://myTFSserver/tfs/DefaultCollection" /p:MyProject /f:c:/Users\me\Desktop\ProcessConfiguration.xml


Reference:
MSDN: Import, export, and manage work item types [witadmin]

Thursday, 26 June 2014

Watching Attribute Value with $observe

Below is an example of how to watch for an attribute's value and do something every time it has changed. To do this we would use $observe function.

<!-- origin markup in the view -->
enter a colour: <input class="observe-test" data-ng-model="inputValue" title="{{inputValue}}"/> 
<br />
value typed: <span></span>

// directive codes
myApp.directive('observeTest', function () {
    return {
        restrict: 'C',
        link: function (scope, element, attrs) {
            attrs.$observe('title', function (newValue) {
              attrs.$set('style', 'color:' + newValue);
              element.parent().find('span').text(newValue);
            })
        }
    }
});

See the example in Plunker

Monday, 23 June 2014

More Advanced AngularJS Directive

Isolate Scope
scope option is useful for creating directive's internal variables or functions from outer values or functions.
<!-- origin markup in the view -->
<scopetest a-value="controllerData" the-value="{{controllerData}}" show-value="showPopup()"></scopetest>

// these codes are inside the controller
$scope.controllerData = 'Oii';
$scope.showPopup = function () {
    alert($scope.controllerData);
}

// directive codes
myApp.directive('scopetest', function () {  // would work as well if I had used myApp.directive('showValue' . . . restrict: 'A'
    return {
        restrict: 'E',
        template: "<p>controllerData: {{controllerData}}</p> <p>data: {{data}}</p> <p>theData: {{theData}}</p> <p>sameData: {{sameData}}</p> <button type='button' ng-click='showData()'>Click Me!</button>",
        scope: {
            data: "=aValue",
            theData: "@theValue",
            sameData: "&aValue",    // doesn't work. Seems only work for method.
            showData: "&showValue"
        }
    }
})

See the example in Plunker

In this example we use '=' to pass the value of an outer variable specified in an attribute in the origin markup. I.e., data: "=aValue" will create an internal variable called 'data' and get the value of the outer variable (an AngularJs $scope variable) specified in the 'a-value' attribute in the origin markup. The attribute name referred to follows the same matching pattern as the matching pattern of a directive name (i.e, 'aValue' matches 'a-value' in the origin markup).

'@' is used if we want to copy the literal value (copy the text) of an attribute in the origin markup. If we want to pass a value of an AngularJs variable then we need to use {{ . . . }} to get the value first before passing it to the directive. I.e., <scopetest the-value="{{controllerData}}" />

'&' is used to pass a function of an attribute in the origin markup.

If the attribute name being referred to is the same as the internal variable name then when defining the internal variable, we don't need to specify the attribute name after the symbol. E.g., aValue: "="; is the same as aValue: "=aValue";

When we are using isolate scope, external variables will not be available inside the directive. Only the variables that are declared inside scope: { . . . } will be available.


Transclude
This option is used to pass the matched origin markup and its inner content into a directive template. The parent-to-be element in the template needs to be decorated with ng-transclude attribute. All the inner content of the parent-to-be element will be overwritten with the passed markup. The directive also needs to set transclude: true to activate this option.

<!-- origin markup in the view -->
<trancsludetest>
  <div>
 This is a content from origin markup. 
 <br />
 Try to print a value: {{value}}
  </div>
</trancsludetest>

// code inside controller
$scope.value = 'controller value';

// directive codes
myApp.directive('transcludetest', function () {
  return {
    restrict: 'E',
    transclude: true,
    template: '<div class="fancy-class" style="border: 2px solid black; padding: 2px"><div class="another--class" style="border: 1px dashed blue" ng-transclude>content inside this div will be ignored</div></div>',
    link: function (scope, element) {
      scope.value = 'directive value';
    },
    //scope: {}   // if this is used then only external values are considered
  };
})

See the example in Plunker


Priority and Terminal
priority option is useful for directives (more than one) that are defined in a single DOM element. The option is used to determine the order of how they are going to be applied, especially for their link and compile functions. The compile and pre-link functions are executed from the greatest number while post-link functions are executed from the smallest number.

If not defined, the priority default value is 0. If the directives have same priority values then it seems that they are executed in alphabetical order.

If terminal option is used then directives that have lower priorities will be disregarded.

<!-- origin markup in the view -->
<div second-priority first-priority></div>

// directive codes
myApp.directive('secondPriority', function () {
    return {
        restrict: 'A',
        link: {
          pre: function (scope, element, attrs) {
            alert('preLink - two');
            element.append("<br/>preLink - two");
          },
          post: function (scope, element, attrs) {
            alert('postLink - two');
            element.append("<br/>postLink - two");
          }
        },
        priority: 1
    }
})
.directive('firstPriority', function () {
    return {
        restrict: 'A',
        link: {
                pre: function (scope, element, attrs) {
                  alert('preLink - one');
                  element.append("preLink - one");
                },
                post: function (scope, element, attrs) {
                  alert('postLink - one');
                  element.append("<br/>postLink - one");
                }
        },
        priority: 2,
        //terminal: true
    }
});

See the example in Plunker


Require
This option is used to pass other directive's controller into the link function of the directive where the option is specified. The other directive could be a sibling directive or a directive in one of parent elements.
The require option can take a single string or an array of strings of directive names to be found.
The string name can be:
- not prefixed - to find a sibling directive
- prefixed with '?' - return 'null' if the intended sibling directive is not found
- prefixed with '^' - find the directive in one of parent elements
- prefixed with '^?' - return 'null' if the intended directive is not found in any parent elements

<!-- origin markup in the view -->
<div parent-directive>
  <div>
 <div>
   <div sibling-directive require-test></div>
 </div>
  </div>
</div>

// directive codes
myApp.directive('parentDirective', function () {
    return {
      restrict: 'A',
      controller: function ($scope) {
        this.parentData = "<br />parentDirective data.. ";
        this.parentFunction = function(param) {
            return param + "<br />   - Hi there, this is parentDirective";
        };
      }
    };
})
.directive('siblingDirective', function () {
    return {
      restrict: 'A',
      require: '^parentDirective',
      link: function (scope, element, attrs, controller)
      {
        element.append(controller.parentData);
        var test = controller.parentFunction('<br />Hello this is siblingDirective');
        element.append(test);
      },
      controller: function ($scope) {
        this.siblingFunction = function(param) {
            return param + "<br />   - Hi there, this is your sibling directive";
        };
      }
    };
})
.directive('requireTest', function () {
    return {
        restrict: 'A',
        require: ['?^parentDirective','siblingDirective'],
        link: function (scope, element, attrs, controller)
        {
          element.append(controller[0].parentData);
          var test = controller[0].parentFunction('<br />Hello this is requireTest');
          element.append(test);
          test = controller[1].siblingFunction('<br />Hello this is requireTest');
          element.append(test);
        }
    };
});

See the example in Plunker
Thursday, 15 May 2014

Basic AngularJS Directive

Below is a basic example of using AngularJS directive:
<!--HTML markup-->
<div my-directive></div>

//JavaScript codes
var myApp = angular.module('myApp', []);

myApp.directive('myDirective', function () {
    return {
        restrict: 'A',      // possible values: A, C, E, M
        template: "{{controllerData}} <mark>This is my custom directive. '{{directiveData}}'</mark>",
        link: function (scope, element, attrs) {
            //execute a function then assign a value
            scope.directiveData = "Good morning!";
            // can change any scope value in the outside as well
            // scope.controllerData = "test";

            element.on('mouseover', function () {
                element.css('font-size', '18px');
        },
        replace: false  // remove the outer container
    };
});
restrict property is used to determine which part of origin HTML markup to be matched. The possible values are:
- A - attribute
- C - class, i.e. <div class="my-directive"/>
- E - element, i.e. <my-directive/>
- M - comment, i.e. <!--directive:my-directive-->
The values can also be combined.

template property is used to specify the markup to be added as part of the directive. The markup will be added to the existing container or replace it depending on the replace property value.
Note from the example that we can pass data that is specific to the directive or data from the controller.
If the additional markup is much then we should use templateUrl property instead.

link is used to manipulate scope variables and the directive markup (after combined with the additional markup inside template or templateUrl property if used). It accepts three required and one optional parameters:
- scope - this is the AngularJS scope object
- element - the origin element that is matched, if it is replaced then this is the new element from the template
According to AngularJS documentation, the element is actually a jqLite (a light version of jQuery library from AngularJS) wrapped element. The library contains core functionalities of jQuery and has almost identical API.
However, important to note that if jQuery library is loaded prior to AngularJS libraries then the element will be jQuery wrapped instead so it will have full jQuery functionalities.
- attrs - attributes of the origin element that is matched, if it is replaced then the attributes of the new element from the template
- controller [optional] - to pass the directive's controller instance to be accessible inside the function

On the next post, we will see more advanced examples of AngularJS directive.


References:
AngularJS Developer Guide - Directives
GitHub - AngularJS - Understanding Directives

Friday, 25 April 2014

Passing Objects in JSON through ViewBag

Below is an example of how to pass a collection of objects in JSON format through ViewBag.
List<Student> studentsList = new List<Student>();
studentsList = GetStudents();
ViewBag.Students = System.Web.Helpers.Json.Encode(studentsList);
We use System.Web.Helpers.Json.Encode() function to do the formatting and on the view, we just need to render the passed content like this:
@Html.Raw((String)ViewBag.Students)

A different way to do this is by passing the collection directly through ViewBag
ViewBag.Students = studentsList;
then we do the formatting on the view
@Html.Raw(Json.Encode((IList<Student>)ViewBag.Students))
However this way is less efficient than the earlier one.

Wednesday, 23 April 2014

Building Single Page Application with AngularJS and Web API - Part 2

On this post, we will continue building our single page application with AngularJS and Web API. For the first part of this topic, please see my previous post.

Update Functionality
Now we want to add update user functionality. First, we add a new route in our AngularJS routing configuration:
. . .
.when('/edit/:userId', {
 templateUrl: 'Partials/create-edit.html',
 controller: 'UserCtrl'
}).
. . .
Note that we use a parameter ':userId' in the path. This is used to get a value from the url and will be stored into $routeParams object. A new property called 'userId' will be created in $routeParams object (i.e. $routeParams.userId).

Other types of parameter can be used as well in a routing path:
- ':name*' is used to store all values from the path of the parameter up to the next matching string path. For example; if we set a route like '/edit/:user*/end' then when we have a url '/edit/1/type/admin/end', :user will have value '1/type/admin'
- 'name?', we can use '?' to specify that this is an optional parameter

Then add logic for updating user in our WebAPI controller:
// PUT api/UserRegistration/5
public async Task<IHttpActionResult> PutUser(int id, User user)
{
 if (!ModelState.IsValid)
 {
  return BadRequest(ModelState);
 }

 if (id != user.UserId)
 {
  return BadRequest();
 }

 db.Entry(user).State = EntityState.Modified;

 try
 {
  await db.SaveChangesAsync();
 }
 catch (DbUpdateConcurrencyException)
 {
  if (!UserExists(id))
  {
   return NotFound();
  }
  else
  {
   throw;
  }
 }

 return StatusCode(HttpStatusCode.NoContent);
}

Also add this in our AngularJS user service:
. . .
getById: function (id) {
 //return $resource('/api/UserRegistration/' + id).get();
 return $resource('/api/UserRegistration/:userId', { userId: '@userId' }).get({ userId: id });   // this is another way to build the string to be passed
},
updateUser: function (user) {
 return $resource('/api/UserRegistration/' + user.UserId, {},
  {
  customUpdate: { method: 'PUT', isArray:false }
  }
 ).customUpdate(user);
},
. . .
Notice that in updateUser function, we need to specify a custom action to invoke our Web API method. By default AngularJS $resource service has these default methods:
{ 'get': {method:'GET'},
'save': {method:'POST'},
'query': {method:'GET', isArray:true},
'remove': {method:'DELETE'},
'delete': {method:'DELETE'} };
Each method will invoke a call with the specified HTTP method. We need to specify an additional one with HTTP PUT method to invoke the Web API method. isArray is true if we expect the call to return an array of objects.

Then in our AngularJS user controller:
. . .
userService.getById($routeParams.userId).$promise.then(
//success
function (data) {
 $scope.user = data;
},
//error
function (response) {
 //console.log(response.status)
 $scope.error = true;
})
. . .
userService.updateUser(user).$promise.then(
 //success
 function () { $location.url('/'); },
 //error
 function () { $scope.error = true }
);
. . .

Finally, we add this link to the view:
<td><a data-ng-href="#edit/{{user.UserId}}">Edit</a></td>


Delete Functionality

Our delete function does not require a routing because it does not have its on view. The delete function will be executed on the main view.

We specify our Web API method:
// DELETE api/UserRegistration/5
[ResponseType(typeof(User))]
public async Task<IHttpActionResult> DeleteUser(int id)
{
 User user = await db.Users.FindAsync(id);
 if (user == null)
 {
  return NotFound();
 }

 db.Users.Remove(user);
 await db.SaveChangesAsync();

 return Ok(user);
}

Then in our AngularJS user service, we invoke the Web API method with $resource delete method.
. . .
removeUser: function (userId) {
 return $resource('/api/UserRegistration/' + userId).delete();
}
. . .

We add these codes as well to our controller:
. . .
$scope.remove = function (index) {
 if (confirm('Are you sure to delete this user?')) {
  //console.log(index);
  var userId = $scope.users[index].UserId;
  //console.log(userId);
  userService.removeUser(userId).$promise.then(
    //success
    function () { $scope.users.splice(index, 1); },
    //error
    function () { $scope.error = true }
   );
 }
}
. . .

Finally add this delete link to the view:
<td><a href="" data-ng-click="remove($index)">Delete</a></td>
Notice that we use $index property of ng-repeat in the view and pass it to the controller function to be able to know which particular record is being clicked. Then we can get any property's value of the record.

The complete source codes can be downloaded from here.

Monday, 24 March 2014

Building Single Page Application with AngularJS and Web API - Part 1

On this post, we will see the first part of building a simple single page CRUD application using AngularJs and Web API. The application will manage user registrations data. Complete source codes can be downloaded from here.

First we configure AngularJS routing for our views. See this post to learn more about AngularJS routing.
userApp.config(['$routeProvider',
function ($routeProvider) {
    $routeProvider
    .when('/', {
        templateUrl: 'Partials/home.html',   // this is the partial view for listing page
        controller: 'UserCtrl'
    })
    .when('/create', {
        templateUrl: 'Partials/create-edit.html',   // this is the partial view for creating user page
        controller: 'UserCtrl'
    })
    otherwise({
        redirectTo: '/'
    });
}]);

Create Functionality
Create the partial html page for creating a user.
<div>
  <span style="color:red" data-ng-show="error">An error has occured.</span>
</div>
<div>
  <label>First Name</label>
  <input type="text" data-ng-model="user.Firstname" />
</div>
<div>
  <label>Last Name</label>
  <input type="text" data-ng-model="user.Lastname" />
</div>
<div>
  <label>Organisation</label>
  <input type="text" data-ng-model="user.Organisation" />
</div>
<div>
  <label>Position</label>
  <input type="text" data-ng-model="user.Position" />
</div>
<div>
  <label>Email</label>
  <input type="text" data-ng-model="user.Email" />
</div>
<button data-ng-click="submit(user)">Save</button>
Note that there are some ng-model attributes on the input fields to instruct AngularJS to bind the value. The attributes were prefixed with 'data-' to be HTML5 compliant. ng-click attribute is also used to tell AngularJS to execute a function.

Then create our Web API method (this one is scaffoled by Visual Studio when creating a new controller):
// POST api/UserRegistration
[ResponseType(typeof(User))]
public async Task<IHttpActionResult> PostUser(User user)
{
  if (!ModelState.IsValid)
  {
    return BadRequest(ModelState);
  }

  db.Users.Add(user);
  await db.SaveChangesAsync();

  return CreatedAtRoute("DefaultApi", new { id = user.UserId }, user);
}

Now, we create our AngularJS custom service to call the Web API method:
userApp.factory('userService', ['$resource', function ($resource) {
    return {
        createUser: function (user) {
            return $resource('/api/UserRegistration').save(user);
        }
    }
}]);
Here AngularJS $resource service is used to interact with the Web API method. $resource service is useful for interacting with RESTful based services such as Web API. It is simpler to use than $http service. To use this service, ngResource module will need to be included as well in our application. In this JavaScript function, we call the save() method of the $resource service, passing user object as the argument. The service will invoke a HTTP POST call to the specified url.

Finally we create our AngularJS controller:
userApp.controller('UserCtrl', ['$scope', '$location', '$routeParams', 'userService', function ($scope, $location, $routeParams, userService) {
   
    $scope.submit = function (user) {
        $scope.error = false;        
        userService.createUser(user).$promise.then(
          //success
          function (data) { $location.url('/'); },
          //error
          function (response) { 
                         //console.log(response);
                         //console.log(response.status);
                         $scope.error = true }
        );        
    }
}]);
Here we create a submit function that calls the user service that we have just created. The submit function is called by the save button in our partial view through ng-click attribute.

Note that $promise is also used to determine what action to take if the service call is successful and if it has error. $promise is part of $resource service. If it is successful, $promise will return data object (similar to the one we passed to the service call). If it fails, it will return a HTTP response object. It might be useful to see the headers and status properties of the response object.

$scope.error variable is used to show an error message if an error has occurred. This variable is referred to by ng-show in our partial view.


Listing Functionality
We have already implemented the create user functionality, now let us do the listing function.

First, create the partial view.
<div>
    <span style="color:red" data-ng-show="error">An error has occured.</span>
</div>
<table>
    <thead>
        <tr>
            <th>Firstname</th>
            <th>Lastname</th>
            <th>Email</th>
        </tr>
    </thead>
    <tbody ng-repeat="user in users">
        <tr>
            <td>{{ user.Firstname }}</td>
            <td>{{ user.Lastname }}</td>
            <td>{{ user.Email }}</td>
        </tr>
    </tbody>
</table>

Then the Web API method:
// GET api/UserRegistration
public IQueryable<User> GetUsers()
{
  return db.Users;
}

Add our user service with this method:
getAllUsers: function () {
  return $resource('/api/UserRegistration').query();
}
Here we use the $resource service's query() method that will invoke a HTTP GET call.

Then add the following codes in our controller:
$scope.init = function () {
  // Get all users
  userService.getAllUsers().$promise.then(
    //success
    function (data) {
      $scope.users = data;
    },
    //error
    function (response) {
      //console.log(response);
      //console.log(response.status);
      $scope.error = true;
    }
  );
}

In the coming post, we will see the edit and delete functionality.

Thursday, 6 March 2014

Validating Model with Data Annotations in Unit Test

We could use the classes inside System.ComponentModel.DataAnnotations to help us in testing model with data annotations.

First, include the assembly in the test project reference libraries.

Then we can use this method of Validator class to do the validation, along with a ValidationContext instance and a collection of ValidationResult type as parameters.
public static bool TryValidateObject(
 Object instance,
 ValidationContext validationContext,
 ICollection<ValidationResult> validationResults,
 bool validateAllProperties
)
We need to pass a validation context instance, a collection to hold the result of each failed validation and a boolean value to indicate whether to validate all properties that are decorated with data annotations or only properties that are decorated with [Required] attribute only. To create a new instance of validation context, we could simply pass the object to be validated into ValidationContext() constructor method:
ValidationContext context = new ValidationContext(object_to_be_validated);

Below is a full example:
List<ValidationResult> validationResults = null;
var itemSellingDto = new ItemSellingDto() { InvoiceId = 0, ItemId = 1, ItemName = "", ItemSellingId = 0, Price = 0, Quantity = 10 };
var validationContext = new ValidationContext(itemSellingDto);

var isValid = Validator.TryValidateObject(itemSellingDto, validationContext, validationResults, validateAllProperties: true);

isValid.should_be(false);
validationResults.Any(vr => vr.ErrorMessage == "Price must be bigger than 0").should_be(true);


Saturday, 1 March 2014

TransactionScope and SaveChanges in Entity Framework

TransactionScope class in .Net is great but if not used properly can cause table locks for long time and suffer application performance.

When using it with Entity Framework, only use TransactionScope when operation cannot be done within one SaveChanges() method or involves more than one data context.

Let's see the following codes. Imagine for some reasons, two data contexts are used.
using (var scope = new TransactionScope(TransactionScopeOption.Required))
{
    // some codes that do not involve database

    // some queries
	var student = contextOne.Students.Where( . . . );
	var schoolList = contextTwo.Schools;
	
	// more queries and validations
	//		check if student is allowed to move out ...
	//		check if student is allowed to move in ...
	
	// update student
	student.School = newSchool;
	
	// update some data in school context
	. . .
	
	
	contextOne.SaveChanges();
	contextTwo.SaveChanges();
	
    scope.Complete();
}
When we check SQL Profiler with tracing transactions enabled, we can see that Begin Transaction is executed immediately before the first database related operation. In this case is before the first data context querying a student (line #6). The transaction is wrapped up after the two data contexts are updated. This is a long time of locking and far beyond the necessary.

To enable tracing transactions, go to 'Events Selection' tab, click 'Show all events' then scroll to almost the end, expand 'Transactions' and tick the ones starting with 'TM: ...'

What should have been done is like the following:
    // some codes that do not involve database

    // some queries
	var student = contextOne.Students.Where( . . . );
	var schoolList = contextTwo.Schools;
	
	// more queries and validations
	//		check if student is allowed to move out ...
	//		check if student is allowed to move in ...
	
	// update student
	student.School = newSchool;
	
	// update some data in school context
	. . .
	

    using (var scope = new TransactionScope(TransactionScopeOption.Required))
    {	
	    contextOne.SaveChanges();
	    contextTwo.SaveChanges();
	
        scope.Complete();
    }
You can add try catch as well around the codes and discard the changes when there is an error.


Secondly, if there is only one data context needs to be updated, TransactionScope is not needed. Calling SaveChanges() method alone is enough and will create a transaction in database and execute any changes that have been made to the objects within the context.


For more information about TransactionScope, please see my previous article.

Wednesday, 19 February 2014

Routing in AngularJs

On this post we will see the basic of how to create Single Page Application with AngularJs.

First we need to add reference to AngularJs routing library.
<script src="Scripts/angular.min.js"></script>
<script src="Scripts/angular-route.min.js"></script>

Then we add dependency to ngRoute module in our application module.
var myApp = angular.module('myApp', ['ngRoute']);

Next, use $routeProvider service that will be available after we include the new module to configure the routes that we have. The basic syntax is as follow:
$routeProvider.when('desired_path'), {
    templateUrl: 'location_of_the_partial_view_file',
    controller: 'controller_name_for_this_partial_view'
}
The path can contain route parameter(s) which is specified with colon (:) and could end with a star (*). Also we could have an optional parameter with a question mark (?). For more information, please see $routeProvider documentation.

Below is an example of a routes configuration:
myApp.config(['$routeProvider', function ($routeProvider) {
    $routeProvider
    .when('/pageOne', {
        templateUrl: 'partials/page-one.html',
        controller: 'PageOneCtrl'
    })
    .when('/pageTwo', {
        templateUrl: 'partials/page-two.html',
        controller: 'PageTwoCtrl'
    })
    .otherwise({
        redirectTo: '/'
    });
} ]);

Finally we use ng-view directive to apply the configuration in our main view. For example:
<div data-ng-view></div>

Below is an example of the complete main view:
<!DOCTYPE html>
<html xmlns="http://www.w3.org/1999/xhtml" data-ng-app="myApp">
<head>
    <title></title>
    <script src="http://code.angularjs.org/1.2.9/angular.min.js" type="text/javascript"></script>
    <script src="http://code.angularjs.org/1.2.9/angular-route.min.js" type="text/javascript"></script>
    <script src="Scripts/app.js" type="text/javascript"></script>
    <script src="Scripts/Home/page-one-controller.js" type="text/javascript"></script>
    <script src="Scripts/Home/page-two-controller.js" type="text/javascript"></script>
</head>
<body>
    <a href="#">Home</a> | <a href="#pageOne">Page One</a> | <a href="#pageTwo">Page Two</a>
    <div data-ng-view></div>
</body>
</html>

If we want to use HTML5 url mode that is supported by recent browsers, on myApp.config(...) method add a dependency to $locationProvider service then add this line inside the method:
$locationProvider.html5Mode(true)

Tuesday, 18 February 2014

Example of Using SQL Script Directly in Entity Framework

Below is a code example of how to use direct SQL script command and normal entity operation in Entity Framework 5. TransactionScope is used to cover the operations to do all if both are successful or nothing at all:

using (var scope = new TransactionScope(TransactionScopeOption.Required))
{
                context.ExecuteStoreCommand("UPDATE Class Set Number = 20");
                context.Student.Add(new Student{ StudentId = 1, Firstname = "first", Lastname = "last" });
                context.SaveChanges();
                scope.Complete();
}

Friday, 7 February 2014

Getting Started with AngularJS

On this post we will see a simple example of an AngularJS application.

First we need to reference the library on our application. We could copy the files into our project or use the Angular CDN http://code.angularjs.org/

Then create a module. Using module is not required but it is useful to have better code organisation and for reusability.
angular.module('myApp', []);
The square brackets on the second argument is for specifying any dependencies required. At the moment we don't have any.

Next create a controller:
angular.module('myApp').controller('GreetingCtrl', ['$scope', function ($scope) {
    $scope.greeting = 'Hola!';

    $scope.echoThis = function (value) {
        var processedWord = "";
        if (value) {
            processedWord = 'Echo ' + value;
        }
        return processedWord;
    };

    $scope.print = function (value) {
        $scope.result = $scope.word + value + " is printed";
    };
} ]);
Note that we use angular.module('myApp') to retrieve our module that we have created. If we have used angular.module('myApp',[]) instead, this would have recreated 'myApp' module again thus overwrited the previous module declaration. Use angular.module('myApp').controller() to define a controller inside a module.

We have also used an inline dependency injection to provide $scope service to the controller. To inject one or more components using inline annotation, we just need to put square brackets around the function, specify the components before the function and put the referred components in the same order in the function's arguments. For example:
['dep1', 'dep2', 'depN', function(dep1, renamedDep2, depN){ ... }]
Note also that the argument names can be different than the specified component names as long as they have the same order. $scope is a built-in Angular service that in simple term can be said similar to a global container object that has properties and/or functional properties (have methods attached). $scope properties will be available on the views. Line 1 shows a normal property while line 4 and 12 show functional properties.

Then we create our view:
<!DOCTYPE html>
<html xmlns="http://www.w3.org/1999/xhtml" data-ng-app="myApp">
<head>
    <title></title>
    <script src="http://code.angularjs.org/1.2.9/angular.min.js" type="text/javascript"></script>
    <script src="Scripts/app.js" type="text/javascript"></script>
    <script src="Scripts/Home/greeting-controller.js" type="text/javascript"></script>
</head>
<body>
    <span>{{ "Hello" + " World"}}</span>
    <div data-ng-controller="GreetingCtrl">
        {{ greeting }}
        <br /><br />
        <input data-ng-model="word" /> {{ echoThis(word) }}
        <br />
        <br />
        <button data-ng-click="print(' some text ')">Print</button>
        {{ result }}
    </div>
</body>
</html>
We have some attributes (which they called directives) in our view; ng-app is used to bootstrap AngularJs and the value is used to specify the root module to be used in the view, ng-controller to specify which controller to use for that particular section of the view, ng-model to bind input value and ng-click to execute a function when the element is clicked.

If you notice I have put the first code snippet on this post (for creating the application module) inside app.js file and the controller codes inside greeting-controller.js file.


Further reading:
Code Organization in Large AngularJS and JavaScript Applications
AngularJS Dependency Injection

Friday, 17 January 2014

Checking Debug Mode on an MVC View

To check whether our project is in debug/release mode on a particular view, we would not be able to use #if DEBUG #endif on our view because a view is not compiled. To do this, we need to run the logic from the back end. Below is an example of an extension method to check that:
public static bool IsDebug(this HtmlHelper htmlHelper)
{
  #if DEBUG
  return true;
  #else
  return false;
  #endif                  
}

Then on our view, we could call the method:
@if (Html.IsDebug())
{
  @Html.Raw("<span style='color: red'>DEBUGGING MODE IS ON</span>");
}

Friday, 10 January 2014

Some Notes about TransactionScope in .NET

Basic usage of TransactionScope is as follow:
using (var scope = new TransactionScope())
{
    // some codes here . . .

    scope.Complete();
} 

By default, the isolation level used is Serializable and timeout is 1 minute.

According to this post on MSDN Blogs, the default isolation level is likely to introduce deadlock issues. The recommended isolation level is Read Committed.

If our codes are using more than one database (distributed transaction) then they will be much slower compare to only using one database (local transaction).

The maximum timeout of TransactionScope when setting this up via code (Timeout property) is 10 minutes. If we set the property to have a value larger than this, it would fall back to 10 minutes. If we want longer timeout value, we will need to set this in machine.config file. However that will affect other applications on the server.

Below is how to set isolation level and timeout in codes:
var transactionOptions = new TransactionOptions();
transactionOptions.IsolationLevel = IsolationLevel.ReadCommitted;
transactionOptions.Timeout = TransactionManager.MaximumTimeout;
var transactionScope = new TransactionScope(TransactionScopeOption.Required, transactionOptions);

If we want to change the timeout in machine.config:
<system.transactions>
   <machineSettings maxTimeout="00:30:00" />
</system.transactions>

When using SQL server, we also need to concern about the timeout of running query/command or stored procedure. The default timeout is 30 seconds. We can extend the timeout by setting CommandTimeout property.