Thursday, 5 October 2017

Some Visual Studio 2015 Apache Cordova Project iOS Deployment Issues

Recently, I tried to deploy my Visual Studio Tools for Apache Cordova project into iOS mobile device. The project is built in Visual Studio 2015 using Cordova CLI 6.0.0. The Visual Studio is on a Windows machine. I also have a Mac laptop with XCode 8.3. After following the steps on this page https://taco.visualstudio.com/en-us/docs/ios-guide, I ran into some issues.

The first error message I received is "Remotebuild requires your projects to use cordova-ios 4.3.0 or greater with XCode 8.3. Please update your cordova-ios version".
It seemed that the iOS version of the project is less than 4.3.0 and XCode expected the version to be at least 4.3.0.
The solution:
1. on my Windows machine, went to command prompt and installed Cordova; npm install -g cordova
2. changed package.json file in the project to have the later version of iOS:
{
  "android": "5.1.1",
  "ios": "4.3.0"
}
3. then on the command prompt, went to the 'platforms' folder of the project and deleted and recreated the iOS version of the project. I ran the command; cordova platform add ios@4.3.0

After passing that, I got another error, "Severity Code Description Project File Line Suppression State Error Warning developmentTeam is missing from your build.json.".
The solution:
- added some configuration settings on my build.json file based on the information on this link https://cordova.apache.org/docs/en/latest/guide/platforms/ios/#using-flags.
So my build.json had something like this:
{
  "android": {
    . . .
  },
  "ios": {
    "debug": {
      "codeSignIdentity": "iPhone Developer",
      "provisioningProfile": "xxxxxxxx-xxxx-xxxx-xxxx-xxxxxxxxxxxx",
      "developmentTeam": "XXXXXXXXXX",
      "packageType": "development"
    },
    "release": { }
  }
}
According to the article, codeSignIdentity should use "iPhone Developer" value for both debug and release mode. provisioningProfile is the profile that I set on Apple Developer website. The filename of the downloaded profile has the same key value. developmentTeam is the team name that is set on Apple Developer website. packageType values are either 'development', 'enterprise', 'ad-hoc', and 'app-store'.

Once this is solved, I got another error:
Severity Code Description Project File Line Suppression State
Error Error: Remote build error from the build server Build failed with error ios-deploy was not found. Please download, build and install version 1.9.0 or greater from https://github.com/phonegap/ios-deploy into your path, or do 'npm install -g ios-deploy' - 1

Solution:
- on my Windows machine I ran; npm install -g ios-deploy.

Then another error:
No certificate matching 'iPhone Development' for team 'XXXXXXXXXX': Select a different signing certificate for CODE_SIGN_IDENTITY, a team that matches your selected certificate, or switch to automatic provisioning.
Code signing is required for product type 'Application' in SDK 'iOS 10.3'

Solution:
- on the Mac computer, I went to Applications > Utilities > KeyChain Access folder and found there were more than one certificates related to the profile downloaded. This was due to a mistake I did earlier when generating provisioning profile. So I deleted the incorrect one.

Finally I got this error:
Failed to launch iOS remote for build C:\myProjectDirectory\bld\ios\Debug\buildInfo.json to http://192.168.1.118:3000/cordova :
Http 404: Error mounting developer disk image
------ Cordova tools 6.0.0 already installed.
Requesting debug on remote iOS device for buildNumber 23139 on server http://192.168.1.118:3000/cordova...
Failed to Debug iOS remote for build C:\myProjectDirectory\bld\ios\Debug\buildInfo.json to http://192.168.1.118:3000/cordova :
Http 500: No devices found to debug. Please ensure that a device is connected and awake and retry.

Solution:
- on my Mac machine I ran; brew upgrade libimobiledevice --HEAD


References and further details:
https://github.com/Microsoft/remotebuild/issues/5
https://stackoverflow.com/questions/43944273/apache-cordova-visual-studio-2015-xcode-8-3-cannot-remotebuild

Thursday, 15 June 2017

Open Link on Browser in Ionic Framework

To be able to open a link in an Ionic Framework based app, we need to install InAppBrowser plugin. If you use Visual Studio Tools for Apache Cordova, you can open config.xml file and find in Plugins section.

After installing the plugin, we don’t need to pass any new module in the code function constructor. All we need to do is just to call the functions directly like:
cordova.InAppBrowser.open('http://www.google.com', '_system');
// or we can use
window.open('http://www.google.com', '_system');
_system target is used so that the link will be opened on system's web browser.

In HTML code, we can call like this:
<a href="#" onclick="window.open('https://www.google.com', '_system');">my link</a>
Don’t forget to include the ‘http://’ otherwise you will get an error like ‘Cannot display PDF (… cannot be opened).

Thursday, 9 February 2017

Ionic Modal with this Controller

Below is a simple example of using Ionic Modal with this controller (Controller As):
var vm = this;
    . . .
    . . .
    . . .

    /* modal */
    vm.showModal = function () {
        $ionicModal.show();
    };

    $ionicModal.fromTemplateUrl('my-modal.html', {
        scope: $scope,
        animation: 'slide-in-up'
    }).then(function (modal) {
        vm.modal = modal;
    });

    vm.openModal = function () {
        vm.modal.show();
    };

    vm.closeModal = function () {
        vm.modal.hide();
    };

    // Clean up the modal
    $scope.$on('$destroy', function () {
        vm.modal.remove();
    });

    // Execute action on hide modal
    $scope.$on('modal.hidden', function () {
        . . .
    });

    // Execute action on remove modal
    $scope.$on('modal.removed', function () {
        . . .
    });
Note that we still need to use $scope for particular function.

The modal template:
<ion-modal-view>
    <ion-header-bar>
        <h1 class="title">My Modal title</h1>
    </ion-header-bar>
    <ion-content>
        Hello!
        <button ng-click="vm.closeModal()">Close</button>
    </ion-content>
</ion-modal-view>

Tuesday, 8 November 2016

Quick Guide to Use Ionic Framework Side Menu

This post will guide you to quickly set side menu in Ionic Framework.

Firstly, we need to set up the routes in app.js file. In this case we have our menu template in menu.html file. We need to name the menu state (e.g. app) and then all other pages will have states with this syntax menuStateName.pageStateName. We will also need to set abstract: true for the menu state.

Below is an example:
ionicApp.config(['$stateProvider', '$urlRouterProvider',
    function ($stateProvider, $urlRouterProvider) {
        $stateProvider
            .state('app', {
                url: '/app',
                abstract: true,
                templateUrl: 'menu.html'
            })
          .state('app.add', { // add item page
              url: "/add",
              views: {
                  'menuContent': {
                      templateUrl: 'add-item.html'
                  }             
              }
          })
          .state('app.list', { // list items page
              url: "/list",
              views: {
                  'menuContent': {
                      templateUrl: 'list.html'
                  }             
              }
         })
         .state('app.edit', { // edit item page
             url: "/edit/:itemId",
             views: {
                 'menuContent': {
                     templateUrl: 'edit-item.html'
                 }             
             }
         });
        // if none of the above states are matched, use this as the fallback
        $urlRouterProvider.otherwise('/app/add');
    }
]);

On index.html, we just need to put <ion-nav-view></ion-nav-view>.
<body ng-app="ionicApp">
      <ion-nav-view></ion-nav-view>
  </body>

Then on each page file, we have ion-view and ion-content:
<ion-view view-title="PageTitle">
  <ion-content>
    ... your markup content ...
  </ion-content>
</ion-view>

Then on the menu markup file (menu.html), we have something like this:
<ion-side-menus enable-menu-with-back-views="true">
    <ion-side-menu-content>
        <ion-nav-bar class="bar">
            <!--<ion-nav-back-button>
            </ion-nav-back-button>-->
            <ion-nav-buttons side="left">
                <button class="button button-icon ion-navicon" menu-toggle="left"></button>
            </ion-nav-buttons>
        </ion-nav-bar>
        <ion-nav-view name="menuContent"></ion-nav-view>
    </ion-side-menu-content>
    <ion-side-menu side="left">
        <ion-header-bar class="custom-brown">
            <div class="title">Menu Title</div>
        </ion-header-bar>
        <ion-content>
            <ion-list>
                <ion-item menu-close href="#/app/add">
                    <b>Add Item</b>
                </ion-item>
                <ion-item menu-close href="#/app/list">
                    <b>List Items</b>
                </ion-item>
                <ion-item menu-close href=". . .">
                    <b>. . .</b>
                </ion-item>
                <ion-item menu-close href=". . .">
                    <b>. . .</b>
                </ion-item>
            </ion-list>
        </ion-content>
    </ion-side-menu>
</ion-side-menus>
On the example above, I use enable-menu-with-back-views="true" so that the menu icon will always be displayed. I also commented out <ion-nav-back-button></ion-nav-back-button> to hide the back button so only the menu icon will be displayed.

We can also have the menu items populated dynamically. We could use something like below:
                <ion-item menu-close ng-repeat="item in vm.items" ui-sref="app.edit({itemId: {{item.itemId}}})">
                    <b>Edit :</b> {{item.name}}
                </ion-item>

Thursday, 20 October 2016

Setting HTTP Strict Transport Security (HSTS) in ASP.NET Application

Setting HSTS on a website application is one way to avoid Man in the Middle attack which modifies server response to use insecure connection to gain user information.
One online tool that can be used to check whether our website has HSTS or not is https://www.ssllabs.com/ssltest . If on the report, it shows that:
'Strict Transport Security (HSTS) : No'
then it means that it is not set.

To set HSTS in web.config file, add these configurations below inside <system.webServer> node:
<rewrite>
 <rules>
  <rule name="HTTP to HTTPS redirect" stopProcessing="true">
   <match url="(.*)" />
   <conditions>
    <add input="{HTTPS}" pattern="off" ignoreCase="true" />
   </conditions>
   <action type="Redirect" url="https://{HTTP_HOST}/{R:1}"
    redirectType="Permanent" />
  </rule>
 </rules>
 <outboundRules>
  <rule name="Add Strict-Transport-Security when HTTPS" enabled="true">
   <match serverVariable="RESPONSE_Strict_Transport_Security"
    pattern=".*" />
   <conditions>
    <add input="{HTTPS}" pattern="on" ignoreCase="true" />
   </conditions>
   <action type="Rewrite" value="max-age=31536000" />
  </rule>
 </outboundRules>
</rewrite>

However if we do not have URL Rewrite module installed in IIS, we will have a 500 internal server error. This is because IIS does not understand <rewrite> node in the codes.

We can download URL Rewrite module from https://www.iis.net/downloads/microsoft/url-rewrite


References:
http://www.hanselman.com/blog/HowToEnableHTTPStrictTransportSecurityHSTSInIIS7.aspx
http://serverfault.com/questions/417173/enable-http-strict-transport-security-hsts-in-iis-7/629594
https://www.tbs-certificates.co.uk/FAQ/en/hsts-iis.html
https://www.iis.net/learn/extensions/url-rewrite-module/creating-rewrite-rules-for-the-url-rewrite-module

Monday, 19 September 2016

Directive to Parse and Format Number from and to Currency

This post will show an example of an AngularJS directive that will automatically format a plain number inserted into an input field into a currency format. As the number is typed into the input field, the value will be formatted into its local currency representation. The directive also converts a number value from model to its currency format in the view.
$formatters, $parsers and $filter are used as part of the codes.
myApp.directive('formatCurrency', ['$filter', '$locale', function ($filter, $locale) {
    return {
        require: '?ngModel',
        link: function (scope, elem, attrs, ctrl) {
            if (!ctrl) return;

            // $formatters is used to process value from code to view
            ctrl.$formatters.unshift(function (modelValue) {
                var formattedValue;
                if (modelValue) {
                    formattedValue = $filter('currency', null, 2)(modelValue);  // use $filter to do some formatting
                } else {
                    formattedValue = '';
                }
                return formattedValue;
            });

            // $parsers is used to process value from view to code
            ctrl.$parsers.unshift(function (viewValue) {
                var plainNumber;
                var formattedValue;
                
                var decimalSeparatorIndex = viewValue.lastIndexOf($locale.NUMBER_FORMATS.DECIMAL_SEP);  // $locale.NUMBER_FORMATS.DECIMAL_SEP variable is the decimal separator for the current culture
                if (decimalSeparatorIndex > 0) {
                    // if input has decimal part
                    var wholeNumberPart = viewValue.substring(0, decimalSeparatorIndex);
                    var decimalPart = viewValue.substr(decimalSeparatorIndex + 1, 2);
                    plainNumber = parseFloat(wholeNumberPart.replace(/[^\d]/g, '') + '.' + decimalPart).toFixed(2); // remove any non number characters and round to two decimal places

                    formattedValue = $filter('currency', null, 2)(plainNumber);
                    formattedValue = formattedValue.substring(0, formattedValue.lastIndexOf($locale.NUMBER_FORMATS.DECIMAL_SEP) + 1);
                    formattedValue = formattedValue + decimalPart;
                } else {
                    // input does not have decimal part
                    plainNumber = parseFloat(viewValue.replace(/[^\d]/g, ''));
                    formattedValue = $filter('currency', null, 0)(plainNumber);     // the 0 argument for no decimal does not work (issue with Angular)

                    if (formattedValue) {
                        // remove the decimal part
                        formattedValue = formattedValue.substring(0, formattedValue.lastIndexOf($locale.NUMBER_FORMATS.DECIMAL_SEP));
                    } else {
                        formattedValue = viewValue;
                    }
                }

                elem.val(formattedValue);
                return plainNumber;
            });
        }
    };
}]);

To use it on an input field:
<input type="text" ng-model="vm.myVariable" format-currency/>

For a working example, please see this on Plunker.

Friday, 2 September 2016

Passing Controller Function to Directive

Below is an example of how to call a controller function from inside an AngularJS directive:
myApp.directive('myDirective', function () {
    return {
        scope: { controllerFunction: '&callbackFunction' },
        link: function (scope, element, attrs) {
            scope.controllerFunction({ arg: '123' });
        },
    }
});
And the markup:
<div ng-controller="MyCtrl as vm">
      <span my-directive callback-function="vm.theControllerFunction(arg)" ></span>
</div>

We can also call the controller function whenever a value in the directive changes. An example of such directive:
myApp.directive('observeValueChange', function () {
    return {
        scope: { controllerFunction: '&callbackFunction' },
        link: function (scope, element, attrs, ngModel) {
            attrs.$observe('theValue', function (newValue) {
                scope.controllerFunction({ arg: newValue });
            })
        },
    }
});
The markup:
<input type="text" ng-model="vm.myVariable" />
      <span observe-value-change the-value="{{vm.myVariable}}" callback-function="vm.theControllerFunction(arg)" ></span>

See the working example in Plunker.

Thursday, 11 August 2016

Some Notes about SQL Index Fragmentation

This post is about a recent reading/research that I have made regarding of how to identify ‘bad’ indexes that have been defragmented much and how to fix those to be optimal again. There are many references put on this post such as useful scripts and articles for further reading.

Identifying Defragmented Indexes
Firstly, we would need to find the indexes that have much fragmentation. Below is a useful script from Microsoft Script Center site. This script shows average fragmentation for each index in all tables and indexed views.
SELECT OBJECT_NAME(ind.OBJECT_ID) AS TableName,
ind.name AS IndexName, indexstats.index_type_desc AS IndexType,
indexstats.avg_fragmentation_in_percent
FROM sys.dm_db_index_physical_stats(DB_ID(), NULL, NULL, NULL, NULL) indexstats
INNER JOIN sys.indexes ind 
ON ind.object_id = indexstats.object_id
AND ind.index_id = indexstats.index_id
WHERE indexstats.avg_fragmentation_in_percent > 0--You can specify the percent as you want
ORDER BY indexstats.avg_fragmentation_in_percent DESC

What to Do with the Result?
From the result we can either choose to ignore, reorganise or rebuild each index.

Reorganising an index is to reorder and clean up the index with pre-existing settings. While rebuilding an index is to recreate the index from scratch. When rebuilding an index, new settings can be set as the old index will be deleted. Rebuilding an index is usually more effective than reorganising an index. However rebuilding an index will cost more.

Reorganising an index is always done online while rebuilding is offline (except if using SQL Server Enterprise edition). Stopping a rebuilding operation will make the operation to be rolled back while stopping reorganising operation will just stop the process and leave the done parts.

According to Microsoft guideline, if an index has
- less than 5 % fragmentation -> ignore
- between 5% to 30% fragmentation -> reorganise
- greater than 30 % fragmentation -> rebuild


How to Reorganise / Rebuild Index?
An index can be reorganised or rebuilt with Alter Index command. For example:
ALTER INDEX IX_MyTable_IndexName ON MyTable REORGANIZE;   
ALTER INDEX IX_MyTable_IndexName ON MyTable REBUILD;
To see all options for the command, see this MSDN documentation.


Reorganise / Rebuild all Indexes in the Database
To do this, we can use Maintenance Plan Wizard provided by SQL Server or script.

To create a maintenance plan:
1. expand the Management folder in the target database server
2. right click Maintenance Plans folder and select Maintenance Plan Wizard

For more details about using Maintenance Plan Wizard to rebuild indexes, please see this article 'Rebuilding Indexes using the SSMS Database Maintenance Wizard'.

Otherwise we can use script to reorganise/rebuild indexes. An example of simple script to rebuild all indexes of tables and indexed views in a database (source is http://www.sqlservercentral.com/blogs/juggling_with_sql/2011/06/20/rebuild-all-the-indexes-of-a-sql-database-in-one-go/):
DECLARE @tsql NVARCHAR(MAX) 
DECLARE @fillfactor INT

SET @fillfactor = 90

SELECT @tsql =
STUFF(( SELECT DISTINCT
';' + 'ALTER INDEX ALL ON ' + o.name + ' REBUILD WITH (FILLFACTOR = ' + CONVERT(VARCHAR(3),@fillfactor) + ')'
FROM
sysobjects o
INNER JOIN sysindexes i
ON o.id = i.id
WHERE
o.xtype IN ('U','V')
AND i.name IS NOT NULL
FOR XML PATH('')), 1,1,'')

--PRINT @tsql         
EXEC sp_executesql @tsql

Or we can use more sophisticated script that has been used and proven by many people like Index Defrag Script.


I have Done Rebuilt but the Index Fragmentation is Still High
Fragmentation in an index of a small table may not be reduced even after reorganising or rebuilding because they may be stored on mixed extents that are shared with different objects. We might want to check as well whether by having the index is actually helping to improve query performance or not. If not then this index can be considered to be removed.


References and further reading:
Reorganize and Rebuild Indexes
Rebuild or Reorganize: SQL Server Index Maintenance

Friday, 8 July 2016

Some Notes about ASP.NET Request Validation and Cross Site Scripting

ASP.NET framework has a built-in feature enabled by default to protect application against Cross Site Scripting (XSS) attack. It uses Request Validation feature that checks query string, cookie and posted form values to make sure that those inputs do not contain malicious script. It will throw an error if it encounters malicious script.


Request Validation version
For the recent version of ASP.NET framework, we should use the latest validation mode. In our web.config file, it should have something like:
<httpRuntime requestValidationMode="4.5" targetFramework="4.5" />
ASP.NET version 4.0 should use   requestValidationMode="4.0"


Turning off Request Validation feature in the application
We could also turn off Request Validation feature and only have this feature on some pages. To do this, in web.config set
<pages validateRequest="false" /> 
then set the validation feature on the pages that we would like to have it
<@ Page ValidateRequest="true" %> 


Disable Request Validation in a Controller
We also can disable Request Validation feature for a particular controller by setting [ValidateInput(false)] attribute:
[ValidateInput(false)] 
public ActionResult Index(MyModel m) 
{ 
    . . . 
} 


Disable Request Validation on a class property
To disable the feature at a more granular level, we can use [AllowHtml] attribute on a class property:
public class MyModel 
{ 
    public string MyProperty1 { get;  set; } 

    [AllowHtml] 
    public string MyProperty2 { get; set; } 

    . . . 

} 


Encoding input data
If we would like to allow input data that contains HTML or JavaScript codes, we can encode the input with HtmlEncode() function that are provided by ASP.NET framework. In ASP.NET version 4.5 or above, they have included AntiXss Library in the System.Web.Security.AntiXss namespace. This library prevents XSS better as it uses whitelisting approach compared to the default one which uses blacklisting approach. To set AntiXss Library as the default library for encoding, specify the encoderType in httpRuntime node in web.config:
<httpRuntime  . . .  encoderType="System.Web.Security.AntiXss.AntiXssEncoder" />


Sanitising data
When we need to accept HTML format data, then we should sanitise the data first from any malicious codes. The AntiXss Library 4.3.0 contains sanitiser functionalities however this has reached an end of life. The newer version that is included with ASP.NET 4.5 does not contain sanitiser.

We have some options to add sanitation functionality, a couple of those are:
- Write our own custom method using HTML Agility Pack. See this article for an example
- Use a third party library such as the open source HtmlSanitizer

Using the open source HtmlSanitizer library is easy. We can download the package from NuGet. Below is an example of a simple usage of it:
var sanitiser = new HtmlSanitizer(); 
sanitiser.Sanitize(inputString); 

If we would like to disallow some HTML tags, just use .AllowedTags.Remove() method. For example:
sanitiser.AllowedTags.Remove(“img”); 

Below is an example of a method that uses reflection to sanitise string properties of an object passed to it:
public object CleanStringsFromXSS(object data) 
        {  
            var sanitiser = new HtmlSanitizer(); 

            PropertyInfo[] properties = data.GetType().GetProperties(); 
            foreach (PropertyInfo property in properties) 
            { 
                Type propertyType = property.PropertyType; 
                if ((propertyType == typeof(string)) && (propertyType != null)) 
                { 
                    object value = property.GetValue(data); 
                    if (value != null && property.CanRead && property.CanWrite) 
                    { 
                        string sanitisedValue = sanitiser.Sanitize(value.ToString()); 
                        property.SetValue(data, sanitisedValue); 
                    } 
                } 
            } 

            return data; 
        } 


Request Validation vulnerabilities
There is a known vulnerability in Request Validation. Some types of JSON (JavaScript Object Notation) postback can bypass this feature. Therefore it is important to scan JSON input manually. The sanitation library above can be used to check or sanitise malicious codes.


References:
OWASP: ASP.NET Request Validation
Preventing XSS in ASP.NET Made Easy

Friday, 6 May 2016

Projecting Rows into Columns

Say we have some data in different rows of a column that we would like to project in different columns. For example we have this:

and would like to transform into this:


To do the projection we can use Pivot feature:
SELECT StudentId, DisciplineId, [1] AS Course1, [2] AS Course2, [3] AS Course3, [4] AS Course4, [5] AS Course5
FROM 
(
 SELECT  StudentId, DisciplineId, CompletionDate, CourseId
 FROM TrainingDetails
) AS T1
PIVOT 
( 
 MAX (CompletionDate) FOR CourseId IN ([1], [2], [3], [4], [5])
) AS T2
Pivot will project the rows into columns. It will also automatically apply grouping to the rest of the columns. So it is important to only feed the query with same columns that will be used in the Select result. In this example, we narrow down the source to only have columns that will be used in query (StudentId, DisciplineId, CompletionDate and CourseId) from other unrelated columns in the source (TrainingDetails table). If there is any extra column, the grouping will not be done correctly.

However, we can also achieve the same result with a more standard query:
SELECT StudentId, DisciplineId
, MAX(CASE WHEN CourseId = 1 THEN CompletionDate END) AS CompletionDateCourse1
, MAX(CASE WHEN CourseId = 2 THEN CompletionDate END) AS CompletionDateCourse2
, MAX(CASE WHEN CourseId = 3 THEN CompletionDate END) AS CompletionDateCourse3
, MAX(CASE WHEN CourseId = 4 THEN CompletionDate END) AS CompletionDateCourse4
, MAX(CASE WHEN CourseId = 5 THEN CompletionDate END) AS CompletionDateCourse5
FROM TrainingDetails
GROUP BY StudentId, DisciplineId

Tuesday, 26 April 2016

Migrating Existing TFS Database to Another TFS Server Instance

This post explains how to have a new TFS 2013 server with existing database copied from an existing TFS 2013 server.

These are the steps:
1. Backup each existing TFS database
2. Restore the databases in the new server environment. Make sure the databases names are similar like the old ones.
3. Install TFS in the new server by running TFS installer or executable file.
Choose 'Application Tier Only' or 'Upgrade' option on the wizard. Use 'Application Tier Only' if the new server has exactly the same version as the existing server. Use 'Upgrade' option if they have different versions, i.e; different version of service packs installed.
4. Once the installation is successful, go to the TFS Admin Console and change the configurations that still refer to the old server. Also change other configurations such as in Build Configuration and Backups.

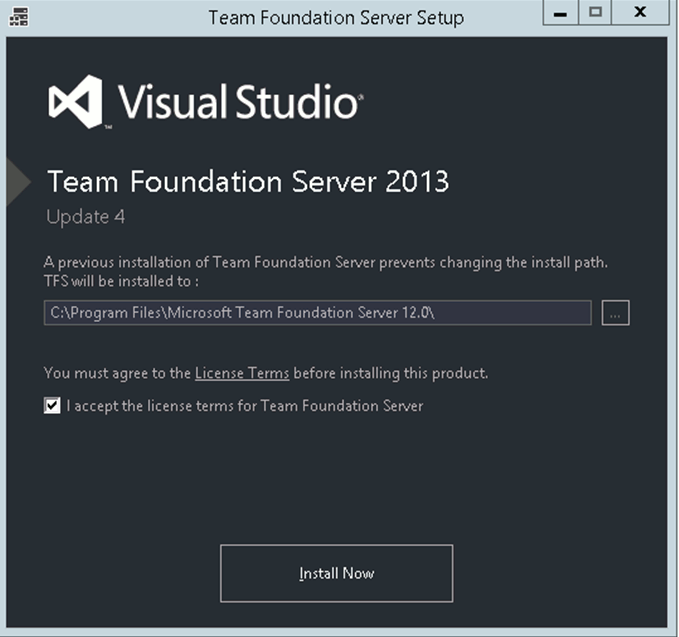
Below are the screenshots of step by step running the installation wizard:
1. run the installer


2. choose 'Application Tier Only' option on left hand side menu if the TFS servers versions are similar

otherwise 'Upgrade' option if the versions are different


3. continue with the installation wizard


4. the wizard will detect local SQL instance and TFS databases


5. confirm the url and service account


6. keep progressing until the wizard finishes installation

Sunday, 10 January 2016

Config File Changes for AppFabric Upgrade

When upgrading from AppFabric 1.0 to 1.1, there are some configurations that need to be changed.

In configuration configSections node:
<!-- Old --> 
<section name="dataCacheClient" 
type="Microsoft.ApplicationServer.Caching.DataCacheClientSection, Microsoft.ApplicationServer.Caching.Core, Version=1.0.0.0, Culture=neutral, PublicKeyToken=31bf3856ad364e35" 
allowLocation="true" allowDefinition="Everywhere"/>

<!-- New -->
<section name="dataCacheClients"
type="Microsoft.ApplicationServer.Caching.DataCacheClientsSection, Microsoft.ApplicationServer.Caching.Core"
allowLocation="true" allowDefinition="Everywhere"/>

Also the dataCacheClient node can be more than one now:
<!-- Old --> 
<dataCacheClient>
    <hosts>
      <host name="oldcacheserver" cachePort="22233"/>
    </hosts>
</dataCacheClient>

<!-- New -->
<dataCacheClients> <!-- new parent node -->
    <dataCacheClient name="default">
    <hosts>
      <host name="newcacheserver" cachePort="22233"/>
    </hosts>
  </dataCacheClient>
</dataCacheClients>

If using AppFabric as session state provider, this needs to be changed as well:
<!-- Old --> 
<sessionState mode="Custom" customProvider="AppFabricCacheSessionStoreProvider">
  <providers>
 <add name="AppFabricCacheSessionStoreProvider" 
 type="Microsoft.ApplicationServer.Caching.DataCacheSessionStoreProvider, Microsoft.ApplicationServer.Caching.Client, Version=1.0.0.0, Culture=neutral, PublicKeyToken=31bf3856ad364e35"                         
  cacheName="CacheName" sharedId="SomeID" />
  </providers>
</sessionState>

<!-- New -->
<sessionState mode="Custom" customProvider="AppFabricCacheSessionStoreProvider">
  <providers>
 <add name="AppFabricCacheSessionStoreProvider"
 type="Microsoft.Web.DistributedCache.DistributedCacheSessionStateStoreProvider, Microsoft.Web.DistributedCache"
 cacheName="CacheName" sharedId="SomeID"/>
  </providers>
</sessionState>


References:
How to: Configure the AppFabric Session State Provider for ASP.NET (AppFabric 1.1 Caching)
Configuration Settings for the ASP.NET 4 Caching Session State Provider (AppFabric 1.1 Caching)
Application Configuration Settings (AppFabric 1.1 Caching)
Preparing the Cache Client Development Environment (AppFabric 1.1 Caching)
Managing Security (Windows Server AppFabric Caching)

Wednesday, 30 December 2015

How to Move EF Database First Template .tt File to Another Project

On this post, we will see how to have Entity Framework .tt template file generated by an .edmx file in a different project. By default .tt files are created under the same project where the .edmx file is. Usually this is our data layer project. However, for most of the time, we would want the POCO models that are generated by a model .tt file to be put under a separate project (i.e. domain or model project) for a better practice.

There are a few steps to make this happen (I am using VS 2013 here):
1. Add a new model template .tt file in the other project through 'add a new item' then select EF DbContext Generator file type under 'Data'.


2. Open the new .tt file then change the value of 'inputFile' to point to the .edmx file in the original project.

In this case, my data project is called 'MySolution.Data.StudentBoundedContext'.

3. To ensure that all of the to be be generated POCO classes have right namespaces, we need to tell the template file the new namespace to use. Right click the .tt file and select 'Properties' then put the new namespace on 'Custom Tool Namespace' value.


4. Delete the model .tt file on the original project.

5. I prefer to leave the context .Context.tt template file on the data layer project and only move the model .tt file to a domain/model project. Therefore, I will need to tell the context template file to refer to the models in the other project.
To do this:
- add a project reference to the other project (domain/model project)
- open the .Context.tt file and add a 'using' statement referring to the models namespace


6. Regenerate the models and context files by right clicking the template files and selecting 'Run Custom Tool'.

Monday, 14 December 2015

Bulk Insert in Web SQL

Below is a snippet of how to do bulk insert of records in Web SQL:
// db is the database object that is usually initialise with openDatabase() function
db.transaction(function (tx) {  
  // insert each record
  $.each(myArray, function (i, item) {
   tx.executeSql("INSERT INTO MyTable(name, value) VALUES (?, ?)", [item.name, item.value]);
  });   
},
// error
function (error) {
 . . .
},
// success - the transaction() function does not pass any object to its success callback
function () {
 . . .
});

Web SQL does not understand the Standard SQL bulk insert syntax such as
Insert Into tbl (col1, col2) Values ('val1', 'val2'), ('val3', 'val4'), ...
but each insert statement needs to be executed using executeSql() function. A transaction is usually used to wrap these insert commands.

Tuesday, 27 October 2015

A Form Validation Example in AngularJS - Show Error Style After Submitted

Below is a basic example of a form validation in AngularJS that shows error style after the form is submitted.

To do this, we need to use novalidate attribute on the form to avoid browser validating the form but is passed to JavaScript to perform manual validation. In addition, we can utilise ng-submitted class that is added to the form by AngularJS after it is submitted.

The view:
<body ng-app="validationExample">
    <div ng-controller="MyCtrl as vm">
      <form name="myForm" novalidate ng-submit="vm.submitted(myForm, vm.input)">
        <input type="text" name="name" ng-model="vm.input.name" placeholder="please enter text" required/>
        <span ng-show="myForm.name.$error.required == true">*</span>
        <input type='text' name="value" ng-model='vm.input.value' placeholder="a number greater than 0" required ng-pattern='/^([1-9][0-9]*(\.[0-9]+)?|0+\.[0-9]*[1-9][0-9]*)$/'>
        <span ng-show="myForm.value.$error.required == true">*</span>
        <button>submit</button>
      </form>
    </div>
</body>

The script:
var myApp = angular.module('validationExample', [])

myApp.controller('MyCtrl', [function () {
    var vm = this;
    vm.submitted = function(form, input) {
      if(form.$valid) {
        alert('submitted');
      }
    }
} ]);

The stylesheet:
.ng-submitted input.ng-invalid {
  border-color:red;
}

See the example in Plunker.

To read more about form validation, please see my previous post.

Thursday, 1 October 2015

Table with Dynamic Rows Manipulation Example in AngularJS

Below is a code example of building a table with the ability to add, edit and remove rows dynamically with AngularJS. It also makes the corresponding input in focus.

The view:
<html>
  <head>
    <script src="http://code.jquery.com/jquery-2.1.4.min.js"></script>
    <script src="https://code.angularjs.org/1.2.16/angular.js"></script>
    <script src="script.js"></script>
  </head>
  <body ng-app="myApp">
    <div ng-controller="MyCtrl as vm">
      <table>
        <thead>
          <tr>
            <th>Name</th>
            <th>Value</th>
          </tr>
        </thead>
        <tbody>
          <tr ng-repeat="row in vm.rows">
            <td>
              <input type="text" ng-model="row.name" ng-readonly="row.readonly" ng-disabled="row.readonly" on-focus="!row.readonly" />
            </td>
            <td>
              <input type="text" ng-model="row.value" ng-readonly="row.readonly" ng-disabled="row.readonly" />
            </td>
            <td>
              <button ng-click="vm.editRow($index)">{{row.readonly ? "Edit" : "Save" }}</button>
              <button ng-click="vm.removeRow($index)">Remove</button>
            </td>
          </tr>
        </tbody>
      </table>
      <br />
      <input type="button" value="Add New" ng-click="vm.addNewRow('','')" />
    </div>
  </body>
</html>

The script:
angular.module('myApp', [])
.controller('MyCtrl', function () {
    var vm = this;
    vm.rows = [{"name": "aaa", "value" : 50, "readonly": true}, {"name": "bbb", "value" : 70, "readonly": true}];
    
    vm.addNewRow = function(name, value) {
      vm.rows[vm.rows.length - 1].readonly= true;
      vm.rows.push({"name":"", "value":"", "readonly": false})
    }
    
    vm.removeRow = function(index) {
      vm.rows.splice(index, 1);
    }
    
    vm.editRow = function(index) {
      vm.rows[index].readonly = !vm.rows[index].readonly;
    }
})
.directive('onFocus', function($timeout) {
    return function(scope, element, attrs) {
        scope.$watch(attrs.onFocus, function (newValue) {
            if (newValue) {
                $timeout(function () {
                    element.focus();
                }, 0, false);
            }
        }); 
      };    
});

See the example in action on Plunker.

Wednesday, 30 September 2015

[INSTALL_PARSE_FAILED_MANIFEST_MALFORMED] Error

If you encounter an issue when trying to run a Cordova app in an Android emulator with the error messages similar like the following:
  Installing app on device...
C:\Users\Me\Documents\Visual Studio 2015\Projects\MyApp\MyApp\platforms\android\cordova\node_modules\q\q.js:126
throw e;
^
ERROR: Failed to launch application on device: ERROR: Failed to install apk to device:  pkg: /data/local/tmp/android-debug.apk
Failure [INSTALL_PARSE_FAILED_MANIFEST_MALFORMED]
  Command finished with error code 1: cmd /s /c ""C:\Users\Me\Documents\Visual Studio 2015\Projects\MyApp\MyApp\platforms\android\cordova\run.bat" --nobuild --target=169.254.56.136:5555 --debug "--buildConfig=C:\Users\Me\Documents\Visual Studio 2015\Projects\MyApp\MyApp\build.json""
  ERROR running one or more of the platforms: Error: cmd: Command failed with exit code 1
  You may not have the required environment or OS to run this project
try to make sure that Package Name in config.xml is in lower case then rebuild/rerun the app.

Friday, 21 August 2015

Simpler Framework with DbContext and DbSet

I am trying to design a base framework that utilises DbContext as a unit of work and its DbSet properties as repositories. There are some voices on the Internet suggesting this approach for simplicity, performance, faster development effort and being able to keep exposing Entity Framework goodness. I also try to use bounded context approach that is based on domain driven design.

I have a base context class that is derived from DbContext:
    public abstract class BaseContext : DbContext
    {
        static BaseContext()
        {
        }
        protected BaseContext()
            : base("name=FrameworkOneDatabase")
        { }               
    }
Then some bounded contexts. Below is one of them:
    public class ArticleBoundContext : BaseContext
    {
        public ArticleBoundContext()
        {            
        }

        public virtual DbSet<Article> Article { get; set; }
        public virtual DbSet<User> Submitter { get; set; }
    }
Also a basic service class to help me calling CRUD operations on any bounded context:
    public class CRUDService
    {
        private BaseContext _context;

        public CRUDService(BaseContext context)
        {
            this._context = context;
        }

        public void Insert(dynamic entityObject)
        {
            dynamic dbset = GetDbSetFromObject(entityObject);
            entityObject.ObjectState = ObjectState.Added;
            dbset.Add(entityObject);
            _context.ApplyStateChanges();
        }

        public void InsertOrUpdate(dynamic entityObject)
        {
            dynamic dbset = GetDbSetFromObject(entityObject);
            dbset.Attach(entityObject);  
            _context.ApplyStateChanges();
        }
        
        public void Delete(dynamic entityObject)
        {
            dynamic dbset = GetDbSetFromObject(entityObject);
            dbset.Remove(entityObject);
        }

        public async Task<int> Commit()
        {
            var result = await _context.SaveChangesAsync();
            return result;
        }

        public void Dispose()
        {
            _context.Dispose();
        }

        private dynamic GetDbSetFromObject(dynamic entityObject)
        {
            // if dynamicproxies wrapper is used then get the base object
            System.Type objectType = entityObject.GetType();
            if (objectType.Namespace == "System.Data.Entity.DynamicProxies")
            {
                objectType = objectType.BaseType;
            }

            var dbset = (from p in _context.GetType().GetProperties()
                    where p.PropertyType.IsGenericType
                    && p.PropertyType.GetGenericTypeDefinition() == typeof(DbSet<>)
                    let entityType = p.PropertyType.GetGenericArguments().First()
                    where objectType == entityType
                    select p.GetValue(_context)).FirstOrDefault();

            if (dbset == null)
            {
                throw new System.ArgumentException("object type does not exist in the context");
            }

            return dbset;
        }
    }
The class has methods accepting an object then will find its corresponding DbSet member of the context. The method then call one of the DbSet operations. The GetDbSetFromObject() method is the one that will do the finding.

Then I can use all of the classes and structure above to do something like in the tests below:
    [TestClass]
    public class CRUDServiceTest
    {
        private ArticleBoundContext _context;
        private CRUDService _service;

        public CRUDServiceTest()
        {
            _context = new ArticleBoundContext();
            _service = new CRUDService(_context);
        }
        
        [TestMethod]
        public async Task CanInsertArticle()
        {
            Article article = new Article { Title = "title test " + DateTime.Now.ToString("HH:mm:ss"), Description = "desc", Url = "test.com", ObjectState = ObjectState.Added };
            article.Submitter = new User { Firstname = "first " + DateTime.Now.ToString("HH:mm:ss"), Lastname = "last", ObjectState = ObjectState.Added };
            _service.Insert(article);
            var insert = await _service.Commit();
            Assert.IsTrue(insert > 0);
        }

        [TestMethod]
        public async Task CanUpdateArticle()
        {
            Article article = _context.Article.FirstOrDefault(); 
            article.Title = "UPDATED TITLE " + DateTime.Now.ToString("HH:mm:ss");
            article.Description = "UPDATED DESCRIPTION";
            article.ObjectState = ObjectState.Modified;
            _service.InsertOrUpdate(article);
            var update = await _service.Commit();
            Assert.IsTrue(update > 0);
        }

        [TestMethod]
        public async Task CanUpdateSubmitter()
        {
            var article = _context.Article.FirstOrDefault(); 
            article.Submitter.Firstname = "UPDATED FIRSTNAME " + DateTime.Now.ToString("HH:mm:ss");
            article.Submitter.Lastname = "UPDATED LASTNAME " + DateTime.Now.ToString("HH:mm:ss");
            article.Submitter.ObjectState = ObjectState.Modified;

            _service.InsertOrUpdate(article);
            var update = await _service.Commit();
            Assert.IsTrue(update > 0);
        }
        
        [TestMethod]
        public async Task CanUpdateSubmitter_2()
        {
            var submitter = _context.Submitter.FirstOrDefault();
            submitter.Firstname = "UPDATED FIRSTNAME " + DateTime.Now.ToString("HH:mm:ss");
            submitter.Lastname = "UPDATED LASTNAME " + DateTime.Now.ToString("HH:mm:ss");
            submitter.ObjectState = ObjectState.Modified;

            _service.InsertOrUpdate(submitter);
            var update = await _service.Commit();
            Assert.IsTrue(update > 0);
        }

        [TestMethod]
        public async Task CanDeleteArticle()
        {
            var article = _context.Article.FirstOrDefault();

            _service.Delete(article);
            var result = await _service.Commit();

            Assert.IsTrue(result > 0);
        }

        [TestMethod]
        public async Task CanInsertAndDeleteSubmitter()
        {
            var submitter = new User();
            submitter.Firstname = "firstname " +DateTime.Now.ToString("HH:mm:ss");
            submitter.Lastname = "lastname " + DateTime.Now.ToString("HH:mm:ss");

            _service.Insert(submitter);
            var result = await _service.Commit();

            Assert.IsTrue(result > 0);
            var insertedSubmitter = await _context.Submitter.FindAsync(submitter.Id);
            Assert.IsTrue(insertedSubmitter.Firstname == submitter.Firstname && insertedSubmitter.Lastname == submitter.Lastname);

            _service.Delete(submitter);
            result = await _service.Commit();

            Assert.IsTrue(result > 0);
        }

        [TestMethod]
        public async Task ThrowExceptionWhenInsertingWrongObject()
        {
            try
            {
                int test = 5;
                _service.Insert(test);
                var insert = await _service.Commit();
            }
            catch (Exception ex)
            {
                Assert.IsInstanceOfType(ex, typeof(System.ArgumentException));
            }
        }
    }

Monday, 3 August 2015

Memory Issue when Building Cordova Project in Visual Studio 2015

I have just upgraded my desktop to Windows 10 and installed Visual Studio 2015 Community Edition. When trying to build my first Apache Cordova project in VS2015, I got these errors:
Could not create the Java virtual machine
Error occurred during initialization of VM
Could not reserve enough space for object heap


After trying to google for the solution, I found one that is better than the others. It told me to add a new system variable _JAVA_OPTIONS with -Xmx512M as the value.

Below is the detail:
Go to Control Panel -> System -> Advanced, then click Environment Variables. Click New on the System variables section then put:
Variable name: _JAVA_OPTIONS
Variable value: -Xmx512M

Solved my issue right away.

Monday, 27 July 2015

Automatically Generate Resized Icons and Splash Screens with Ionic Framework

Rather than manually generating or cropping different size of images of icons and splash screens for different resolutions, orientation and platforms, we can use Ionic Framework to do this work for us. Ionic will use its resizing and cropping server to do this. We will need a recent version of Ionic CLI.

Below are the steps to do this:
1. Prepare the source icon or splash screen file
For icon file:
- the file is named with 'icon' and has either .png, .psd or .ai extension type (i.e. icon.png, icon.psd or icon.ai)
- image's minimum dimensions should be 192 x 192 px
- rounded corners will be applied for specific platforms (e.g. iOS)

For splash screen file:
- the file is named with 'splash' and has either .png, .psd or .ai extension type (i.e. splash.png, splash.psd or splash.ai)
- image's minimum dimensions should be 2208 x 2208 px
- the artwork should be centered within inner 1200 x 1200 px area

2. Use a new or existing Ionic project to do this job
To have the Ionic server doing the resizing and cropping, we will need to put the file inside an Ionic project.

3. Make sure we have the intended platform on the Ionic project.
To add a platform, run ionic platform add command in the root folder of the project, for example:
C:\MyLabs\IonicTemplate\SideMenu>ionic platform add android

4. Create 'resources' folder on the root of the project

5. Put the icon or splash screen file in the folder

6. Run ionic resources command at the project root
To generate icons, run ionic resources --icon command (with double dash characters), below is a screenshot:


To generate splash screens, run ionic resources --splash command (with double dash characters), below is a screenshot:


7. Get the icons from 'resources/PLATFORM_NAME/icon' folder or the splash screens from 'resources/PLATFORM_NAME/splash' folder